LLM 애플리케이션에서는 LLM API의 문제, 모델의 부적절한 출력, 다른 통합과 관련된 문제 등 다양한 실패 지점이 있을 수 있습니다. Fallbacks 방법은 이러한 문제를 우아하게 처리하고 격리하는 데 도움이 됩니다.

LangChain의 invoke 메소드를 사용할 때는 언어 모델과 외부 API를 다루는 복잡성으로 인해 다양한 오류가 발생할 수 있습니다. 일반적인 오류 유형은 다음과 같습니다. 

(1) 네트워크 오류 (Network Errors): 외부 언어 모델이나 API에 연결할 때 발생하는 타임아웃이나 연결 실패와 같은 네트워크 관련 문제입니다.

(2) API 오류 (API Errors): 언어 모델이나 다른 서비스의 API에서 반환되는 오류로, 속도 제한, 인증 문제 또는 예기치 않은 응답을 포함할 수 있습니다.

(3) 모델 오류 (Model Errors): 토큰 한도(Token Limits Per Minute, TPM)를 초과하는 응답을 생성하거나 지원되지 않는 입력 형식을 만나는 등, 언어 모델 자체와 관련된 문제입니다.

(4) 내부 LangChain 오류 (Internal LangChain Errors): LangChain 프레임워크 내의 오류로, 구성 문제, 프롬프트 구성 문제 또는 LangChain에서 정의된 작업 체인의 오류 등을 포함할 수 있습니다.

이러한 오류를 무난하게 처리하기 위해 코드에 오류 처리 메커니즘 또는 fallback 전략을 구현할 수 있습니다. 중요한 것은, Fallbacks 방법이 LLM 수준뿐만 아니라 전체 Runnable 수준에서도 적용될 수 있다는 것입니다. 


LangChain - Handling LLM API errors using Fallbacks


먼저 openai, langchain 가 설치되어 있지 않다면, 터미널에서  pip install 을 사용해서 설치합니다. 


! pip install -q openai langchain


아래 예제에서는 존재하지 않는 LLM 모델을 사용하여 에러가 발생한 상황에서, ChatGPT-3.5-Turbo, ChatGPT-4 모델을 대신 사용하도록 하는 Fallbacks을 설정하여 에러를 처리하여 보겠습니다. 


이때 다수의 LLM wrapper 들이 LLM API 에러를 감지하면 재시도(retry)를 하도록 디폴트 세팅이 되어있습니다. 그래서 max_retries=0 으로 설정을 해주어서 에러가 나면 바로 Fallbacks 로 넘어가도록 하였습니다. 


먼저, ChatOpenAI(model_name="gpt-fake") 라고 하는 존재하지 않는 모델을 사용해서 억지로 에러(NotFoundError)를 유발해보겠습니다. 


import os
from langchain.chat_models import ChatOpenAI
from langchain.prompts import ChatPromptTemplate
from langchain_core.output_parsers import StrOutputParser

os.environ["OPENAI_API_KEY"] = "sk-xxxxx..."

chat_prompt = ChatPromptTemplate.from_template("""Write a short joke about {topic}""")
bad_model = ChatOpenAI(model_name="gpt-fake", max_retries=0, openai_api_key=OPENAI_API_KEY)
bad_chain = chat_prompt | bad_model | StrOutputParser()

bad_chain.invoke({"topic": "birds"})

# NotFoundError                             Traceback (most recent call last)
# <ipython-input-15-7c48d4ea1ee5> in <cell line: 9>()
#       7 bad_chain = chat_prompt | bad_model | StrOutputParser()
#       8 
# ----> 9 bad_chain.invoke({"topic": "birds"})
# 
# NotFoundError: Error code: 404 - {'error': 
#     {'message': 'The model `gpt-fake` does not exist', 
#     'type': 'invalid_request_error', 
#     'param': None, 
#     'code': 'model_not_found'}
#     }


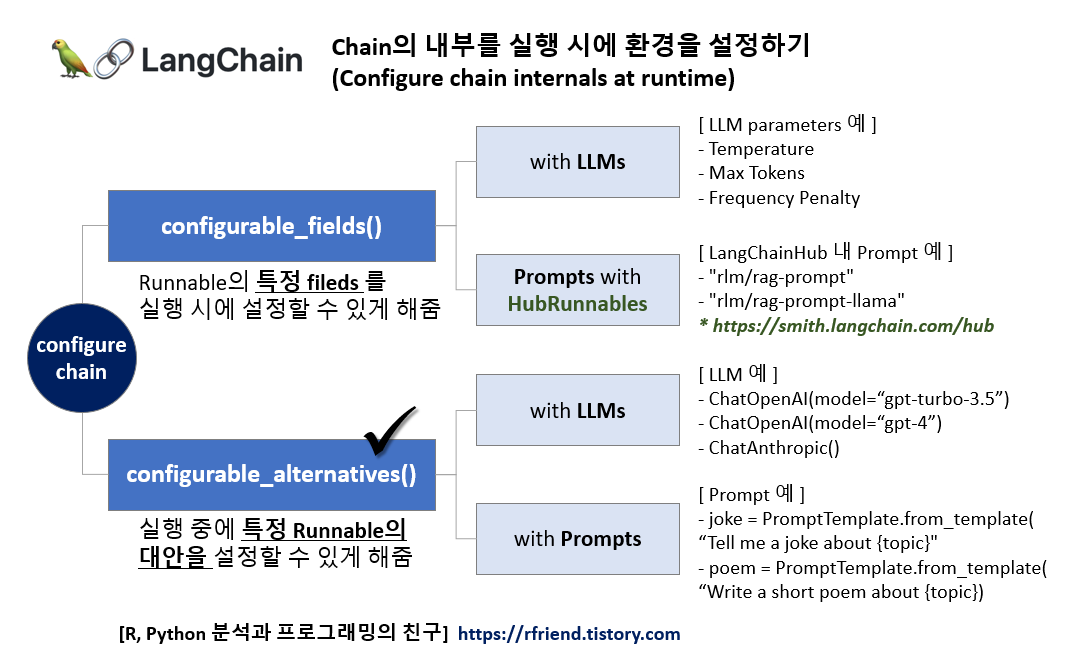
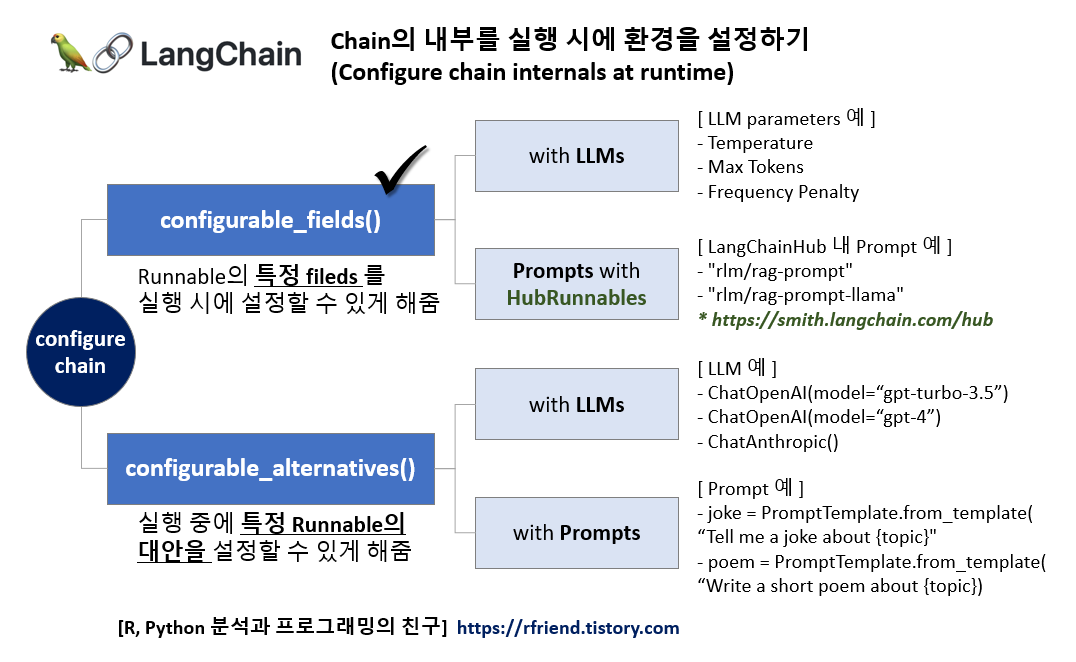
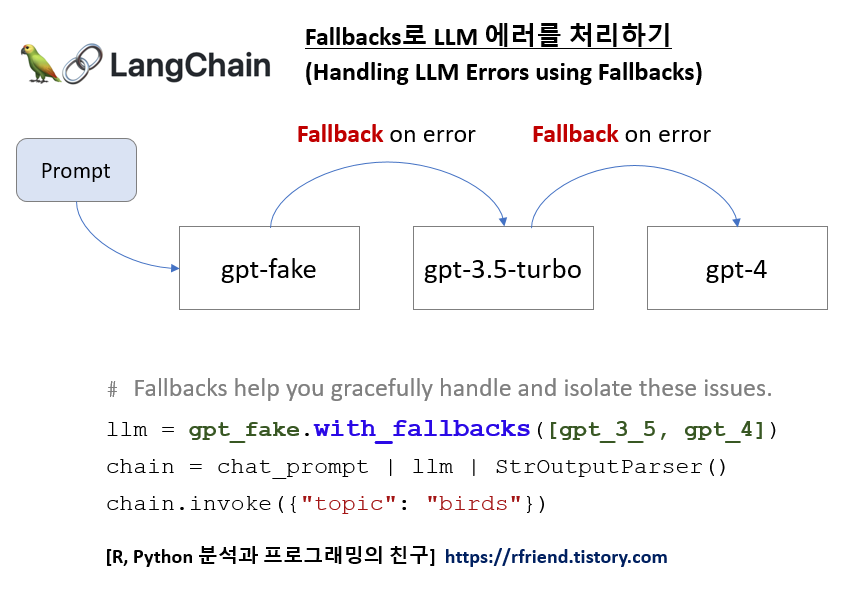
이제 Fallbacks 을 추가해서 "gpt-fake" LLM 모델에 에러가 발생 시 대체 방안인 "gpt-3.5-turbo" 모델을 사용하고, 이마저도 에러가 발생하면 "gpt-4" 모델로 넘어가서 응답을 생성하도록 해보겠습니다. 


llm = gpt_fake.with_fallbacks([gpt_3_5, gpt_4])


import os
from langchain.chat_models import ChatOpenAI
from langchain.prompts import ChatPromptTemplate
from langchain_core.output_parsers import StrOutputParser

os.environ["OPENAI_API_KEY"] = "sk-xxxx..."
template = """Write a short jork about {topic}"""
chat_prompt = ChatPromptTemplate.from_template(template)

gpt_fake = ChatOpenAI(
    model_name="gpt-fake",
    max_retries=0, # Note that we set max_retries = 0 to avoid retrying on RateLimits, etc
    )

gpt_3_5 = ChatOpenAI(model_name="gpt-3.5-turbo")

gpt_4 = ChatOpenAI(model_name="gpt-4")

# This is where the magic happens, using Fallbacks
llm = gpt_fake.with_fallbacks([gpt_3_5, gpt_4])

chain = chat_prompt | llm | StrOutputParser()

chain.invoke({"topic": "birds"})

# Why did the bird bring a ladder to the party?
# Because it heard the drinks were on the house!


이번에는 에러 없이 답변을 잘 하네요! ^^b


[ Reference ]

* LangChain Tutorial - Add Fallbacks: 

https://python.langchain.com/docs/expression_language/how_to/fallbacks


이번 포스팅이 많은 도움이 되었기를 바랍니다. 

행복한 데이터 과학자 되세요!  :-)


728x90
반응형
Posted by Rfriend
,

LLM 을 사용한 애플리케이션을 개발하다 보면 수정사항이 생길 수 있습니다. 이때 가능한 쉽고 빠르게 애플리케이션에 수정사항을 반영할 수 있도록 LangChain은


- configurable_fields() : Runnable의 특정 Fields(예: LLMs 내 parameters, HubRunnables 내 Prompts)를 실행 시에 설정할 수 있도록 해줌

- configurable_alternatives() : 실행 중에 특정 Runnable의 대안(예: LLMs, Prompts)을 설정할 수 있도록 해줌


의 2개 메소드를 제공합니다. 지난번 포스팅에서는 configurable_fileds() 에 대해서 소개했습니다. 


이번 포스팅에서는 이중에서도 configurable_alternatives() 을 사용해서 

   1. 실행 시 LLM 중 설정하기  

   2. 실행 시 Prompts 설정하기

에 대해서 소개하겠습니다. 


LangChain - configurable_alternatives() 특정 Runnable의 대안 설정하기


1. configurable_alternatives()를 사용해서 실행 시 LLM 중 설정하기


LangChain 의 Component 중에 LLM 모델과 ChatModel 이 있으며, 다른 구성요소와 통합이 되어있습니다.  LangChain은 Large Language Models (LLMs)와 ChatModels 사이에 구분을 두는데, 이 두 모델의 주요 차이점을 이해하는 것은 LangChain을 효과적으로 사용하는 데 중요합니다.


LangChain의 LLM과 ChatModel 모델의 주요 차이점은 다음과 같습니다. 

(1) 기능 및 목적 (Functionality and Purpose)

- LLMs (Large Language Models): GPT-3 또는 GPT-4와 같은 일반적인 목적의 언어 모델로, 주어진 프롬프트에 따라 텍스트를 생성할 수 있습니다. 다양한 주제와 형식에 걸쳐 인간과 유사한 텍스트를 이해하고 생성하도록 설계되었습니다. 

- ChatModels: LangChain 내에서 대화 맥락에 특화되어 설계된 전문화된 모델입니다. 이들은 여러 번의 교환을 통해 맥락을 유지하며 대화식 대화에 최적화되어 있으며, 대화식 상호 작용과 사용자 참여에 더 중점을 두고 있습니다. 


(2) 맥락 관리 (Context Management) 

- LLMs: 전통적인 LLM들은 일반적으로 단일 입력-출력 상호 작용(a single input-output interaction)을 처리합니다. 추가적인 맥락 관리 메커니즘 없이 여러 번의 교환에 걸쳐 대화 맥락을 유지하는 능력이 내재되어 있지 않습니다. 

- ChatModels: 이 모델들은 확장된 대화를 처리하도록 설계되어 대화 내역와 맥락(dialogue history and context)을 추적합니다. 대화의 연속성과 흐름(continuity and understanding of the conversation flow)을 이해하는 것이 중요한 챗봇과 같은 응용 프로그램에 적합합니다. 


(3) 훈련 및 튜닝 (Training and Tuning) 

- LLMs: 다양한 인터넷 텍스트를 기반으로 사전 훈련됩니다. 훈련은 대화에 특화된 것이 아니라 일관되고 문맥적으로 적절한 텍스트를 이해하고 생성하는 데 중점을 둡니다. 

- ChatModels: 대화 데이터에 미세 조정되거나 대화 처리에 본질적으로 더 나은 아키텍처를 가질 수 있어 대화식 시나리오에서 더 능숙합니다. 


(4) 사용 사례 (Use Cases) 

- LLMs: 콘텐츠 생성, 요약, 질문 답변 등 다양한 텍스트 생성 작업에 적합합니다. 

- ChatModels: 가상 보조원, 고객 서비스 챗봇 등 지속적인 대화가 핵심인 대화식 사용 사례에 특화되어 있습니다. 


(5) 응용 프로그램 통합 (Integration in Applications) 

- LLMs: 대화 기반 앱에서 맥락 관리를 위한 추가 계층이 필요한 다양한 AI 기반 텍스트 응용 프로그램의 백엔드 엔진으로 자주 사용됩니다. 

- ChatModels: 대화 상태를 유지하는 데 이미 최적화되어 있기 때문에 대화식 응용 프로그램에 플러그 앤 플레이(plug-and-play for conversational applications) 방식입니다. 

요약하자면, LangChain의 LLMs와 ChatModels는 모두 언어 생성 기술을 기반으로 하지만, ChatModels는 대화 맥락과 흐름(dialogue context and flow)을 유지하는 능력이 향상된 대화식 사용 사례에 특화된 반면, LLMs는 다양한 텍스트 생성 작업(a wide range of text generation tasks)에 적합한 더 일반적인 목적의 모델입니다. 


LangChain에서 통합하여 제공하는 LLMs, ChatModels 의 리스트는 아래 링크를 참조하세요. 


- LLMs : https://python.langchain.com/docs/integrations/llms/

- ChatModels: https://python.langchain.com/docs/integrations/chat/


아래 테이블은 LangChain의 ChatModels 에서 각 모델별로 invoke, async invoke, stream, async stream 별로 통합되어 있는 기능 현황을 정리한 것입니다. ('2023.12월 기준, 최신현황은 위 링크 참조하세요.) 


LangChain - ChatModels


LangChain - ChatModels Integration


먼저 openai, langchian 이 설치되어 있지 않다면 터미널에서 pip install 을 사용해서 설치해주기 바랍니다. 


! pip install -q openai langchain


이제 LangChain 의 configurable_alternatives() 메소드를 사용해서 ChatModels 중에서 ChatAnthropic, ChatOpenAI gpt-3.5-turbo, gpt-4 의 세 개 모델 중에서 실행 중에 설정해서 사용할 수 있도록 해보겠습니다. 


ConfigurableField 에서 id="llm" 으로 설정을 해서, 이후에 LLM 모델을 변경하고자 할 때 {"llm" : "Model_Name"} 처럼 사용하면 됩니다. 디폴트 LLM 모델은 defaulty_key="anthropic" 으로 설정했습니다. 


from langchain.chat_models import ChatAnthropic, ChatOpenAI
from langchain.prompts import PromptTemplate
from langchain_core.runnables import ConfigurableField


llm = ChatAnthropic(temperature=0).configurable_alternatives(
    # This gives this field an id
    # When configuring the end runnable, we can then use this id to configure this field
    ConfigurableField(id="llm"),
    # This sets a default_key.
    # If we specify this key, the default LLM (ChatAnthropic initialized above) will be used
    default_key="anthropic",
    # This adds a new option, with name `openai` that is equal to `ChatOpenAI()`
    openai=ChatOpenAI(),
    # This adds a new option, with name `gpt4` that is equal to `ChatOpenAI(model="gpt-4")`
    gpt4=ChatOpenAI(model="gpt-4"),
    # You can add more configuration options here
)

prompt = PromptTemplate.from_template("Tell me a joke about {topic}")
chain = prompt | llm

* 코드 예시는 LangChain Tutorial 의 코드를 그대로 소개합니다. 


위에서 정의한 chain 을 invoke 해서 실행하면 디폴트로 설정한 ChatAntoropic 모델을 사용해서 답변을 생성합니다. 


# By default it will call Anthropic
chain.invoke({"topic": "bears"})

# AIMessage(content=" Here's a silly joke about bears:
# \n\nWhat do you call a bear with no teeth?\nA gummy bear!")


LLM 모델을 ChatOpenAI 로 변경해서 설정하려고 하면 아래처럼 chain.with_config(configurable = {"llm": "openai"}) 처럼 해주면 됩니다. 


# We can use `.with_config(configurable={"llm": "openai"})` to specify an llm to use
chain.with_config(configurable={"llm": "openai"}).invoke({"topic": "bears"})

# AIMessage(content="Sure, here's a bear joke for you:\n\nWhy don't bears wear shoes?
# \n\nBecause they already have bear feet!")


2. configurable_alternatives()를 사용해서  실행 시 Prompts 설정하기


다음으로 configurable_alternatives() 를 사용해서 ConfigurableField()에 여러개의 Prompts 를 등록해놓고, chain을 실행할 때 여러개의 Prompts 대안 중에서 선택해서 설정하여 사용할 수 있도록 해보겠습니다. 


아래 예에서는 Prompts 에 "joke"와 "poem" 의 2개를 등록해놓고, "joke"를 디폴트 프롬프트로 설정해두었습니다. 


llm = ChatAnthropic(temperature=0)
prompt = PromptTemplate.from_template(
    "Tell me a joke about {topic}"
).configurable_alternatives(
    # This gives this field an id
    # When configuring the end runnable, we can then use this id to configure this field
    ConfigurableField(id="prompt"),
    # This sets a default_key.
    # If we specify this key, the default LLM (ChatAnthropic initialized above) will be used
    default_key="joke",
    # This adds a new option, with name `poem`
    poem=PromptTemplate.from_template("Write a short poem about {topic}"),
    # You can add more configuration options here
)

chain = prompt | llm


디폴트 설정으로 위에서 정의한 chain을 invoke 해서 실행하면 "joke" 프롬프트가 적용이 되어서 답변을 생성합니다. 


# By default it will write a joke
chain.invoke({"topic": "bears"})

# AIMessage(content=" Here's a silly joke about bears:
# \n\nWhat do you call a bear with no teeth?\nA gummy bear!")


만약 프롬프트를 기본 설정인 "joke" 대신에 "poem"으로 실행 시에 바꾸고자 한다면 아래처럼 chain.with_config(configurable={"prompt": "poem"}) 처럼 Prompt 대안을 바꿔주면 됩니다. 


# We can configure it write a poem
chain.with_config(configurable={"prompt": "poem"}).invoke({"topic": "bears"})

# AIMessage(content=' Here is a short poem about bears:
# \n\nThe bears awaken from their sleep
# \nAnd lumber out into the deep\nForests filled with trees so tall
# \nForaging for food before nightfall 
# \nTheir furry coats and claws so sharp
# \nSniffing for berries and fish to nab
# \nLumbering about without a care
# \nThe mighty grizzly and black bear
# \nProud creatures, wild and free
# \nRuling their domain majestically
# \nWandering the woods they call their own
# \nBefore returning to their dens alone')


[ Reference ]

* LangChain Turorial - "Configure chain internals at runtime":

https://python.langchain.com/docs/expression_language/how_to/configure


이번 포스팅이 많은 도움이 되었기를 바랍니다. 

행복한 데이터 과학자 되세요!  :-)


728x90
반응형
Posted by Rfriend
,

LLM 을 사용한 애플리케이션을 개발하다 보면 수정사항이 생길 수 있습니다. 이때 가능한 쉽고 빠르게 애플리케이션에 수정사항을 반영할 수 있도록 LangChain은


- configurable_fields() : Runnable의 특정 Fields(예: LLMs 내 parameters, HubRunnables 내 Prompts)를 실행 시에 설정할 수 있도록 해줌

- configurable_alternatives() : 실행 중에 특정 Runnable의 대안(예: LLMs, Prompts)을 설정할 수 있도록 해줌


의 2개 메소드를 제공합니다. 


이번 포스팅에서는 이중에서도 configurable_fields() 을 사용해서 

- (1) LLM 내 parameter 설정하기

- (2) HubRunnables 내 Prompts 설정하기

에 대해서 소개하겠습니다. 


LangChain - configurable_fields()


(1) configurable_fields() 를 사용해서 LLM 내 parameters 설정하기


먼저 openai 와 langchain 모듈이 설치되어있지 않다면 pip install 을 사용해서 설치하기 바랍니다. 


! pip install -q openai langchain


ChatGPT LLM 모델에서 설정 가능한 주요 파라미터로는 다음과 같은 것들이 있습니다. 


- (a) Max Tokens: 모델이 응답에서 생성해야 하는 최대 토큰(단어 또는 문자, 모델의 토큰화에 따라 다름) 수입니다. 이것은 콘텐츠의 길이를 조절하는 것입니다. 설정 방법에 따라 한 줄짜리 또는 전체 소설을 얻을 수 있습니다. 생성할 텍스트의 최대 길이를 전달합니다. 현재 최대 4,096개의 토큰까지의 숫자를 받아들입니다. 기본값은 2,048입니다. 

- (b) Temperature: 응답의 무작위성을 조절합니다. 높은 온도는 더 다양하고 예측하기 어려운 결과를 낳으며, 낮은 온도는 출력을 더 결정론적으로 만들어 가장 가능성 있는 응답에 가깝게 합니다. 기본값은 0.7이며, 0부터 1 사이의 값을 받아들입니다. 

- (c) Frequency Penalty: 모델이 같은 줄이나 구절을 반복할 확률을 감소시키는 데 사용됩니다. 빈도 벌칙 매개변수는 반복을 처벌하며, 높은 숫자는 출력을 다양하게 만들어 드물게 사용되는 단어를 촉진시키고, 음수 값은 더 일반적이고 때로는 반복적인 언어를 얻습니다. -2.0부터 2.0 사이에서 변동되며, 기본값은 0입니다. 


아래 예제에서는 LLM 의 Temperature 파라미터를 configurable_fileds() 메소드를 사용해서 실행 시에 설정 가능하도록 하였습니다. 디폴트는 temperature=0.0 으로 해서 결정론적이고 보수적으로 응답이 생성되도록 하였습니다. 


ConfigurableFiled() 에서 Configuration을 하려는 Field의 id, name, description 의 메타정보를 입력해줄 수 있으며, 나중에 실행 시 재설정할 때 Distionary에서 'id' 와 재설정값을 {key: value} pair로 재설정해주면 됩니다. 


## (1) Configuration Fields with LLMs

from langchain.chat_models import ChatOpenAI
from langchain.prompts import PromptTemplate
from langchain_core.runnables import ConfigurableField

OPENAI_API_KEY="sk-xxxx...."

model = ChatOpenAI(temperature=0, openai_api_key=OPENAI_API_KEY)\
.configurable_fields(
    temperature=ConfigurableField(
        id="llm_temperature",
        name="LLM Temperature",
        description="The temperature of the LLM",
    )
)

prompt = PromptTemplate.from_template("Write a joke about {topic}")
chain = prompt | model

chain.invoke({"topic": "dog"})
# AIMessage(content="Why don't dogs make good dancers?
#                    \n\nBecause they have two left paws!")
#                    \n\nBecause he heard the drinks were on the house!')


아래 예제 코드에서는 LLM 모델의 temperature=0.9 로 재설정하여 보다 창의적인 응답을 생성하도록 하였습니다. 


## Configuration of LLM's temperature
chain.with_config(configurable={"llm_temperature":0.9}).invoke({"topic": "dog"})

# AIMessage(content="Why couldn't the dog tell lies?
#                    \nBecause he always got caught up in his own ruff tales!")


(2) configurable_fields() 를 사용해서 HubRunnables 내 Prompts 설정하기


LangChain은 최근 프롬프트를 업로드, 탐색, 가져오기 및 관리하기 위한 장소로 LangChain Hub를 출시했습니다. LangChain Hub의 주요 목표는 개발자들이 새로운 사용 사례와 정교한 프롬프트를 발견할 수 있는 주요 장소가 되는 것입니다. LangChainHub는 자주 사용되는 프롬프트(Prompts), 체인(Chains), 에이전트(Agents) 등을 찾고 등록할 수 있는 곳입니다. (https://smith.langchain.com/hub)


LangChain Hub에서 Prompt를 다운로드 받아서 쉽게 코드를 확인하고, 또 수정도 할 수 있습니다. 


* LangChain Blog - LangChainHub post: https://blog.langchain.dev/langchainhub/


LangChain Hub :&nbsp;https://smith.langchain.com/hub


LangChain Hub를 사용하기 위해 먼저 langchainhub 모듈을 pip install을 사용해서 설치합니다. 


! pip install langchainhub


HubRunnable() 메소드와 configurable_fileds() 메소드를 사용해서 LangChain Hub 내에 있는 Prompts 를 chain 실행 시에 쉽게 바꿔치기 할 수 있습니다. 


아래 예에서는 기본 Prompt로 "rlm/rag-prompt" 를 사용하도록 설정을 해놓고, ConfigurableField() 에서 'id', 'name', 'description' 의 메타정보를 등록해주었습니다. 


from langchain.runnables.hub import HubRunnable

prompt = HubRunnable("rlm/rag-prompt").configurable_fields(
    owner_repo_commit=ConfigurableField(
        id="hub_commit",
        name="Hub Commit",
        description="The Hub commit to pull from",
    )
)


prompt.invoke({"question": "foo", "context": "bar"})

# ChatPromptValue(messages=[HumanMessage(
# content="You are an assistant for question-answering tasks.
#          Use the following pieces of retrieved context to answer the question. 
#          If you don't know the answer, just say that you don't know. 
#          Use three sentences maximum and keep the answer concise.
# \nQuestion: foo 
# \nContext: bar 
# \nAnswer:")])


참고로 LangChain Hub 내 'rlm/rag-prompt' 에서 "RAG prompt" 부분만 소개하면 아래와 같습니다. 


# RAG prompt
from langchain import hub
prompt = hub.pull("rlm/rag-prompt")


이번에는 LangChain Hub 내 "rlm/rag-prompt-llama" Prompt 로 재설정해보겠습니다. Llama LLM 모델의 Prompt 로 변경되었습니다. 


prompt.with_config(
    configurable={"hub_commit": "rlm/rag-prompt-llama"}).invoke(
        {"question": "foo", "context": "bar"}
)

# ChatPromptValue(messages=[HumanMessage(
# content="
#   [INST]
#       <<SYS>> 
#           You are an assistant for question-answering tasks. 
#           Use the following pieces of retrieved context to answer the question. 
#           If you don't know the answer, just say that you don't know. 
#           Use three sentences maximum and keep the answer concise.
#       <</SYS>> 
#   \nQuestion: foo 
#   \nContext: bar 
#   \nAnswer: 
# [/INST]")])


참고로 LangChain Hub 에서 'rlm/rag-prompt-llama' 에서 "RAG prompt" 부분만 소개하면 아래와 같습니다. 


# RAG prompt
from langchain import hub
prompt = hub.pull("rlm/rag-prompt-llama")


[ Reference ]

- LangChain Tutorial - Configuration Fields: https://python.langchain.com/docs/expression_language/how_to/configure


이번 포스팅이 많은 도움이 되었기를 바랍니다. 

행복한 데이터 과학자 되세요!  :-)


728x90
반응형
Posted by Rfriend
,

애플리케이션을 개발하다보면 인풋의 조건, 또는 이전 단계의 결과에 따라 이후 단계에 LLM 모델이 실행해야 하는 과업(즉, 프롬프트)이 동적으로 달라져야 하는 경우가 있습니다. LangChain의 RunnableBranch 를 사용하면 로직에 따라서 인풋의 조건을 평가해서 이후 수행할 runnable을 동적으로 Routing 할 수 있습니다. 


아래에는 간단한 예를 들어서 RunnableBranch를 사용해서 Routing 하는 방법을 소개하겠습니다. 


(1) 인풋으로 받은 질문의 주제(Topic)를 "LangChain", "Anthropic", "Other" 의 3개 범주로 분류하기

(2) 각 Topic별로 프롬프트를 달리해서 'langchain_chain', 'anthropic_chain', 'general_chain' 만들기

(3) RunnableBranch() 를 사용해서 Topic 분류 결과에 따라 runnable Routing 하기

      - 만약 질문의 Topic이 "LangChain"이면 --> 'langchain_chain' 실행

      - 만약 질문의 Topic이 "Anthropic"이면   --> 'anthropic_chain' 실행

      - 만약 질문의 Topic이 "Other"이면         --> 'general_chain'실행


LangChain - RunnableBranch()로 동적으로 Routing 하기


먼저, 실습 환경에 openai, langchain 모듈이 설치가 안되어 있다면, 터미널에서 pip install 을 사용해서 설치를 하기 바랍니다. ('!'는 Jupyter Notebook에서 실행 시 추가)


! pip install -q openai langchain


(1) 인풋으로 받은 질문의 주제(Topic)를 "LangChain", "Anthropic", "Other" 의 3개 범주로 분류하기


1단계로서, 아래의 예처럼 template 에 인풋으로 받은 질문을 "LangChain", "Anthropic", "Other"의 3개 범주로 분류하고 단답형으로만 답하라고 지시를 했습니다.(classifier 모델이 따로 필요없다는게 놀랍습니다!) 그리고 '|' 를 사용해서 topic_chain = Prompt | Model | OutputParser를 chaining 하였습니다. 


from langchain.chat_models import ChatOpenAI
from langchain.prompts import PromptTemplate
from langchain_core.output_parsers import StrOutputParser

OPENAI_API_KEY = "sk-xxxxx...." # set with yours

## Create a chain that will identify incoming questions as being about 'LangChain', 'Anthropic', 'Other'.
template = """Given the user question below, classify it \
as either being about 'LangChain', 'Anthropic', or 'Other'.

Do not respond with more than one word.

<question>
{question}
</question>

Classification:"""

prompt = PromptTemplate.from_template(template)
model = ChatOpenAI(temperature=0.0, model="gpt-3.5-turbo", openai_api_key=OPENAI_API_KEY)
parser = StrOutputParser()

topic_chain =  prompt | model | parser


invoke() 를 사용해서 topic_chain을 실행시켜보니 "LangChain", "Anthropic", "Other"의 3개 범주로 Topic을 제대로 분류하고 있네요. 


## Run the chains

topic_chain.invoke({"question": "How do I call LangChain?"})
# LangChain

topic_chain.invoke({"question": "How do I call Anthropic?"})
# Anthropic

topic_chain.invoke({"question": "What is 2 + 5?"})
# Other


(2) 각 Topic별로 프롬프트를 달리해서 'langchain_chain', 'anthropic_chain', 'general_chain' 만들기


이제 질문을 받았을 때 각 Topic 별로 프롬프트에 지시문을 다르게 해서 만들고, '|'로 서로 다른 Prompt + Model + OutputParser 를 chaining 해서 3개의 sub chains runnable을 만들었습니다. 


## Create three sub chains.
## (1) Topic: LangChain
langchain_chain = (
    PromptTemplate.from_template(
        """You are an expert in langchain.\
        Always answer questions starting with "Sure. I'm an expert in LangChain". \
        Respond to the following question:

        Question: {question}
        Answer:"""
    )
    | ChatOpenAI(openai_api_key=OPENAI_API_KEY)
    | StrOutputParser()
)

# (2) Topic: Anthropic
anthropic_chain = (
    PromptTemplate.from_template(
        """You are an expert in Anthropic. \
        Always answer questions staring with "Sure. I'm an expert in Anthropic". \
        Respond to the following question:

        Question: {question}
        Answer:"""
    )
    | ChatOpenAI(openai_api_key=OPENAI_API_KEY)
    | StrOutputParser()
)

# (3) Topic: Other
general_chain = (
    PromptTemplate.from_template(
        """Respond to the following question:

        Qeustion: {question}
        Answer:"""
    )
    | ChatOpenAI(openai_api_key=OPENAI_API_KEY)
    | StrOutputParser()
)


(3) RunnableBranch() 를 사용해서 Topic 분류 결과에 따라 runnable Routing 하기


마지막 단계로서, 앞의 단계에서 만든 구슬을 꿰어서 목걸이를 만들어보겠습니다. 

RunnableBranch(condition, runnable) 의 쌍으로 로직을 구성하고 Routing을 합니다. 


                      조건 (condition)                    Routing     실행 (runnable)

      - 만약 질문의 Topic이 "LangChain"이면 ----------> 'langchain_chain' 실행

      - 만약 질문의 Topic이 "Anthropic"이면   ----------> 'anthropic_chain' 실행

      - 만약 질문의 Topic이 "Other"이면         ----------> 'general_chain'실행


## Dynamically route logic based on input using RunnableBranch()
from langchain_core.runnables import RunnableBranch

branch = RunnableBranch(
    (lambda x: "langchain" in x["topic"].lower(), langchain_chain), # a list of (condition, runnable) pair
    (lambda x: "anthropic" in x["topic"].lower(), anthropic_chain), 
    general_chain
)

# Full Chain: topic_chain + branch
full_chain = {"topic": topic_chain, "question": lambda x: x["question"]} | branch


위에서 RunnableBranch를 사용해서 정의한 full_chain 을 invoke() 를 사용해서 실행시켜 보았습니다. 3개 Topic 별로 질문을 던져보니 잘 작동함을 확인할 수 있습니다. 


## Run full_chain runnable

## (1) Topic: 'LangChain' --> route to 'langchain_chain'
full_chain.invoke({"question": "How do I call LangChain?"})

# Sure. I'm an expert in LangChain. To call LangChain, you can use the LangChain API 
# or SDK provided by its developers. These tools allow you to interact with LangChain's 
# language processing capabilities programmatically. You would need to integrate the API 
# or SDK into your application or codebase and make the necessary API calls or 
# function calls to utilize LangChain's features.


## (2) Topic: 'Anthropic' --> route to 'anthropic_chain' 
full_chain.invoke({"question": "How do I call Anthropic?" })

# Sure. I'm an expert in Anthropic. Anthropic refers to the study of the relationship 
# between humans and their environment. It can also refer to the idea that the universe 
# is fine-tuned for the existence of human life. Therefore, you can call Anthropic 
# as the scientific study of human-environment interaction or the philosophical concept 
# of the fine-tuning of the universe.


## (3) Topic: 'Other' --> route to 'general_chain'
full_chain.invoke({"question": "What is 2 + 5?"})

# The sum of 2 and 5 is 7.


[ Reference ]

* LangChain Tutorial - RunnableBranch()

: https://python.langchain.com/docs/expression_language/how_to/routing#using-a-runnablebranch


이번 포스팅이 많은 도움이 되었기를 바랍니다.

행복한 데이터 과학자 되세요!  :-)


728x90
반응형
Posted by Rfriend
,

지난번 포스팅에서 RAG (Retrieval-Augmented Generation) 이란 무엇이고, LangChain으로 어떻게 구현하는지에 대해서 소개하였습니다. 


이번 포스팅에서는 


1 FAISS (Facebook AI Similarity Search) 는 무엇인가?
2. FAISS 알고리즘의 주요 단계와 구성 요소는 무엇인가?
3. LangChain의 FAISS VectorStore를 사용해서 RAG (Retrieval-Augmented Generation) 구현

하는 방법에 대해서 소개하겠습니다. 


1. FAISS (Facebook AI Similarity Search) 는 무엇인가?


FAISS (Facebook AI Similarity Search)는 효율적인 알고리즘 및 밀집 벡터의 유사성 검색 및 클러스터링을 위한 라이브러리입니다. 페이스북 AI 연구팀(Facebook AI Research Tema)에 의해 개발된 FAISS는 대규모 벡터 검색 작업에 특히 유용하며, 이미지 검색, 추천 시스템, 자연어 처리와 같은 분야에 응용됩니다. 

FAISS가 중요한 이유는 대규모, 고차원 데이터셋을 효율적으로 처리할 수 있는 능력(ability to efficiently handle large-scale, high-imensional datasets, ensuring speed and resource optimization) 때문입니다. 이는 빅데이터와 AI 시대에 필수적인 속도 및 자원 최적화를 보장합니다. 그 사용은 현대 데이터 기반 애플리케이션 및 연구의 필요성에 깊이 뿌리를 두고 있으며, 상업적 및 학술적 영역에서 중요한 도구가 되었습니다. 


FAISS 알고리즘의 주요 특징은 다음과 같습니다. 

(1) 벡터 검색 (Vector Search): FAISS는 대규모 데이터베이스에서 벡터를 효율적으로 검색하는 것을 목표로 합니다. 특히 딥러닝 모델에서 나오는 임베딩과 같은 고차원 데이터를 다룰 때 효과적입니다.

(2) 인덱싱 (Indexing): FAISS의 핵심 기능 중 하나는 벡터에 대한 다양한 유형의 인덱스를 생성하는 것입니다. 이러한 인덱스는 속도, 정확도, 메모리 사용 사이의 다른 균형점에 최적화되어 있습니다. FAISS에서 흔히 사용되는 인덱스 유형에는 Flat (Brute Force), Inverted File (IVF), 제품 양자화(Product Quantization) 인덱스 등이 있습니다.

(3) 대규모 효율성 (Efficiency at Scale): FAISS는 수백만에서 수십억에 이르는 벡터 데이터베이스를 효율적으로 처리하도록 최적화되어 있습니다. 그 효율성은 알고리즘 혁신(eg. 양자화)과 실제 최적화(eg. GPU의 효율적 사용)에서 비롯됩니다.

(4) 양자화 (Quantization): FAISS는 메모리 사용을 줄이고 검색 속도를 향상시키기 위해 벡터를 압축(compressing vectors)하는 양자화를 사용합니다. 제품 양자화는 인기 있는 기술 중 하나로, 여기서 고차원 벡터들이 더 작은 하위 벡터로 나뉘고 각 하위 벡터가 독립적으로 양자화됩니다. 

(5) 검색 방법 (Search Methods): FAISS는 정확한 검색 (Exact Search)과 근사 검색 (Approximate Search) 방법을 모두 지원합니다. 정확한 검색은 가장 가까운 이웃을 찾는 것을 보장하지만 계산적으로 비쌀 수 있습니다. 근사 검색은 속도와 정확도 사이의 타협을 제공하며, 실제 응용 프로그램에서는 종종 사용됩니다. 

(6) 배치 및 실시간 검색 (Batch and Real-time Searching): FAISS는 배치 및 실시간 쿼리 모두를 처리할 수 있어 다양한 용도에 적합합니다. 

(7) 클러스터링 (Clustering): 유사성 검색 외에도 FAISS는 k-평균(k-Means)과 같은 알고리즘을 사용하여 대규모 벡터 세트를 클러스터링하는 데에도 사용할 수 있습니다. 

(8) 언어 및 통합 (Language and Integration): FAISS는 효율성을 위해 C++로 구현되었지만 사용 편의성을 위해 파이썬 바인딩을 제공합니다. 인기 있는 딥러닝 프레임워크와 쉽게 통합할 수 있습니다. 

FAISS는 매우 큰 데이터셋과 고차원 벡터를 효과적으로 처리할 수 있는 능력으로 인해, 빠르고 확장 가능한 유사성 검색이 필요한 작업에 AI 커뮤니티에서 인기 있는 선택입니다. 


2. FAISS 알고리즘의 주요 단계와 구성 요소는 무엇인가?


(1) 벡터 표현 (Vector Representation) 
(2) 클러스터링 (Clustering) 
(3) 인덱스 구축 (Index Construction) 
(4) 검색 (Searching) 
(5) 후처리 (Post-Processing) 

FAISS (Facebook AI Similarity Search) 알고리즘은 특히 대규모 데이터베이스에서 밀집 벡터의 효율적인 유사성 검색 및 클러스터링을 위해 설계되었습니다. FAISS의 과정과 방법은 여러 주요 단계와 구성 요소로 나눌 수 있습니다:

(1) 벡터 표현 (Vector Representation)

- 입력 (Input): FAISS는 이미지, 텍스트 또는 딥러닝과 같은 기술을 사용하여 생성된 고차원 데이터와 같은 데이터에서 생성된 밀집 벡터(dense vectors)로 작동합니다. 

- 전처리 (Preprocessing): 특정 응용 프로그램에 필요한 경우 벡터는 정규화(normalization)되거나 전처리될 수 있습니다. 


(2) 클러스터링 (Clustering)

- k-평균 클러스터링 (k-Means clustering): FAISS는 유사한 벡터를 그룹화하기 위해 k-평균과 같은 클러스터링 알고리즘을 지원합니다.

- 인덱싱에서의 사용: 클러스터링은 인덱싱 과정의 효율성을 향상시키는 데 사용될 수 있습니다. 


(3) 인덱스 구축 (Index Construction)

- 인덱스 선택: 데이터셋의 크기와 속도, 정확도, 메모리 사용 사이의 원하는 균형에 따라 적절한 인덱스 유형이 선택됩니다. FAISS는 여러 인덱스 유형을 제공합니다

 - (a) Flat Index: 완전 탐색 (Brute-force search), 가장 높은 정확도를 제공하지만 계산이 많이 필요합니다. 

 - (b) IVF (Inverted File Index): 속도와 정확도 사이의 균형을 맞추며, 중간에서 큰 데이터셋에 적합합니다. 역 파일 인덱스(IVF)는 문서 검색 시스템에서 단어나 용어가 어느 문서에 나타나는지를 빠르게 찾기 위한 데이터 구조입니다. 역 파일 인덱스(IVF)는 각 단어나 용어를 문서 ID와 연결하여 어떤 문서에서 해당 단어가 나타나는지를 기록합니다. 이를 통해 검색 시스템은 사용자 질의에 일치하는 문서를 신속하게 식별할 수 있습니다. 

 - (c) 제품 양자화 (Product Quantization): 메모리 사용을 줄이기 위해 벡터를 압축하며 매우 큰 데이터셋에 좋습니다. 

 - (d) HNSW (Hierarchical Navigable Small World): 그래프 기반 인덱스 (Graph-based index), 고차원 데이터에 효율적입니다. 

- 인덱스 훈련: 양자화(Product Quantization)와 같은 일부 인덱스는 데이터의 분포를 학습하는 훈련 단계가 필요합니다. (float 의 min, max 값 등)

- 벡터 추가: 데이터셋 벡터가 인덱스에 추가됩니다. 


(4) 검색 (Searching)

- 쿼리 벡터(Query Vectors): 데이터셋 벡터와 마찬가지로 쿼리 벡터는 사용자의 쿼리 데이터에서 생성됩니다. 

- 인덱스 검색: 인덱스는 쿼리 벡터의 가장 가까운 이웃을 빠르게 검색하는 데 사용됩니다. 검색은 다음과 같을 수 있습니다. 


 - (a) 정확한 검색 (Exact Search): Brute-force (Exhaustive) Search 를 사용하여 정확한 가장 가까운 이웃을 찾지만, 검색해야 할 Passage가 많아질 수록 이에 비례해서 시간이 오래 걸립니다. 


 - (b) 근사 검색 (Approximate Search): 더 빠르지만 결과는 근사치입니다. 
Inverted File (IVF)은 Pruning 을 하여 search space를 줄여서 search 속도를 증가시킵니다. 전체 vector store를 k-means Clustering을 통해 k 개의 Cluster로 군집화하고, Vector Index를 저장하고 있는 Inverted File (IVF)에는 각 Cluster의 중심 ID(Centroid ID)와 해당 Cluster 내의 Vector 들이 연결되어 있는 Inverted List Structure 형태로 저장되어 있습니다. 사용자의 쿼리가 들어오면 이를 임베딩을 변환하고, 먼저 k 개의 Cluster 의 centroids 와 유사도를 계산해서 가장 유사한 (즉, 거리가 가장 짧은) Cluster를 찾습니다. 그리고 그 해당 Cluster 내 passage 들의 임베딩에 대해서만 유저 쿼리 임베딩과 유사도 검색을 함으로써 serch space를 pruning하고 search 속도를 증가시키는 효과를 볼 수 있습니다. 

- 매개변수: 이웃의 수(number of neighbors)나 검색 반경(search radus)과 같은 검색 매개변수를 조정할 수 있습니다. 


[ IVF (Inverted File) 알고리즘으로 사용자 쿼리와 가장 가까운 Cluster 내 k 개의 유사한 Passage 찾기 ]


* 이미지 출처: https://towardsdatascience.com/similarity-search-knn-inverted-file-index-7cab80cc0e79


(5) 후처리 (Post-Processing)

- 랭킹 (Ranking): 결과는 쿼리 벡터와의 거리 또는 유사성에 따라 순위가 매겨질 수 있습니다. 

- 필터링 (Filtering): 응용 프로그램별 기준에 따라 추가 필터링이 적용될 수 있습니다. 


6. 추가 고려 사항

- GPU 가속: FAISS는 GPU를 활용하여 검색 과정을 가속화할 수 있어 큰 데이터셋에 대한 성능을 크게 향상시킵니다. 
 
- 확장성: FAISS는 데이터셋 크기와 함께 확장되도록 설계되어 매우 큰 데이터셋에서도 효율성을 유지합니다. 

- 통합: FAISS는 다른 도구 및 프레임워크와의 통합을 쉽게 하기 위해 파이썬 바인딩을 제공합니다. 


요약하면, FAISS는 정확성, 속도, 메모리 사용 사이의 균형을 맞출 수 있는 다양한 옵션을 제공하는 대규모 유사성 검색 및 클러스터링 작업을 위한 포괄적인 도구 및 방법을 제공하며, 다양한 응용 프로그램에 적응할 수 있습니다.


3. LangChain의 FAISS VectorStore를 사용해서 RAG (Retrieval-Augmented Generation) 구현


터미널에서 먼저 pip install 로 openai, langchian, tiktoken, faiss-cup 모듈을 설치해줍니다. 


! pip install -q openai langchain tiktoken faiss-cpu


(1) Text Embedding 변환과 FAISS VectorStore 저장


- embedding=OpenAIEmbeddings() 으로 passage 를 텍스트 임베딩(text embedding) 으로 변환합니다. 디폴트 모델은 deployment= "text-embedding-ada-002" 입니다.

- FAISS.from_texts() 로 dense vector 텍스트 임베딩을 FAISS VectorStore에 저장합니다. 

  : IVF(Inverted File) 형태로 Indexing 되어 저장되어, 사용자 쿼리와 유사한 문서를 찾을 때 빠르게 검색이 됩니다. 


(2) Retriever, Prompt, Chat Model, Output Parser 정의하기


- Retriever 정의: vectorstore.as_retriever()

- Prompt 정의: ChatPromptTemplate.from_template(template) 

- Model 정의: ChatOpenAI(). 디폴트는 model_name='gpt-3.5-turbo' 입니다.  

- Output Parser 정의: StrOurputParser()


(3) 앞에서 정의한 파이프라인을 Chaining 연결하고, 실행하기


- Chaining: '|'

retrieval_chain = (
    {"context": retriever, "question": RunnablePassthrough()}
    | prompt
    | model
    | StrOutputParser()
)


- Chain 실행: retrieval_chain.invoke("where did harrison work?")


from langchain.chat_models import ChatOpenAI
from langchain.embeddings import OpenAIEmbeddings
from langchain.prompts import ChatPromptTemplate
from langchain.vectorstores import FAISS
from langchain_core.output_parsers import StrOutputParser
from langchain_core.runnables import RunnablePassthrough

# Create a FAISS VectorStore
vectorstore = FAISS.from_texts(
    ["harrison worked at kensho"], embedding=OpenAIEmbeddings() # deployment="text-embedding-ada-002"
)

# Create a Retriever
retriever = vectorstore.as_retriever()

# Create a prompt, model
template = """Answer the question based only on the following context:
{context}

Question: {question}
"""
prompt = ChatPromptTemplate.from_template(template)
model = ChatOpenAI() # model_name='gpt-3.5-turbo'

# Chaining a pipeline
retrieval_chain = (
    {"context": retriever, "question": RunnablePassthrough()}
    | prompt
    | model
    | StrOutputParser()
)

# Run retrieva_chain
retrieval_chain.invoke("where did harrison work?")
# 'Harrison worked at Kensho.'


* LangChain tutorial: https://python.langchain.com/docs/expression_language/how_to/map


[Reference]


1. FAISS document: https://faiss.ai/index.html

2. LangChain FAISS VectorStore: https://js.langchain.com/docs/integrations/vectorstores/faiss


이번 포스팅이 많은 도움이 되었기를 바랍니다. 

행복한 데이터 과학자 되세요!  :-)


728x90
반응형
Posted by Rfriend
,

지난번 포스팅에서는 LangChain을 사용해서 RAG (Retrieval-Agumented Generation) 을 구현해보았습니다. 

그때 RunnableParallel() 메소드를 사용해서 사용자 질문을 RunnablePassThrough()와 Retriever 에 동시에 병렬로 처리하는 방법을 한번 소개한 적이 있습니다. 


이번 포스팅에서는 LangChain의 RunnableParallel() 을 사용해서 독립적인 다수의 Chain들을 병렬로 처리하는 방법을 소개하겠습니다. 


LangChain RunnableParallel() 로 Chain 병렬처리하기 (run multiple processes in parallel using RunnableParallel)


먼저, langchain, openai 모듈이 설치되어 있지 않다면 터미널에서 pip install 을 사용해서 먼저 설치하시기 바랍니다. (만약 Jupyter Notebook을 사용중이라면, 셀의 제일 앞부분에 '!' 를 추가해주세요)


! pip install langchain openai


예시에서 진행한 과업은

 - 사용자로 부터 topic 을 인풋으로 받아서

 - ChatOpenAI 모델을 사용해서 (1) Joke, (2) Poem, (3) Question 을 생성

하기 입니다. 


이들 3개의 각 과업에 '|' 을 사용해서 PomtptTemplate + ChatModel + OutputParser 를 chaining 했습니다. 이들 3개 과업의 chain 들은 동일한 topic을 인풋으로 받아서 서로 독립적으로 처리가 가능합니다. 


이처럼 독립적으로 수행 가능한 3개의 chain을 'RunnableParallel()' 을 사용해서 병렬로 처리합니다. 그리고 아웃풋은 Dictionary 형태로 chian 의 이름과 매핑이 되어서 생성한 답변을 반환합니다. (아래 제일 마지막 줄의 {'joke': xxx, 'poem': xxx, 'question': xxxx} 결과 참조)


from langchain.chat_models import ChatOpenAI
from langchain.prompts import ChatPromptTemplate
from langchain_core.output_parsers import StrOutputParser
from langchain_core.runnables import RunnableParallel

## define PromptTemplates
joke_template = ChatPromptTemplate.from_template("tell me a joke about {topic}")
poem_template = ChatPromptTemplate.from_template("write a 2-line poem about {topic}")
question_template = ChatPromptTemplate.from_template("make a question about {topic}")


## define a ChatModel
#openai_api_key = "sk-xxxxxx..." # set with your API key
model = ChatOpenAI(openai_api_key=OPENAI_API_KEY) 


## define a OutputParser
parser = StrOutputParser()


## Chaining Prompt + ChatModel + OutputParser
joke_chain = joke_template | model | parser
poem_chain = poem_template | model | parser
question_chain = question_template | model | parser

## execute multiple runnables in parallel using RunnableParallel()
map_chain = RunnableParallel(
   joke=joke_chain, 
   poem=poem_chain, 
   qeustion=question_chain
)


# Run all chains
map_chain.invoke({"topic": "snowman"})


# {'joke': 'Why did the snowman go to the spa?\n\nBecause he wanted to chill out and relax!',
#  'poem': "Snowman's frozen smile,\nMelts away in winter's warmth.",
#  'qeustion': 'What are some creative ways to decorate a snowman?'}


RunnableParallel()을 사용하기 전에 각 과업의 chain을 개별적으로 수행했을 때의 소요 시간과, RunnableParallel()을 사용해서 3개의 chain을 동시에 병렬로 처리했을 때의 소요 시간을 측정해서 비교해보았습니다. 그랬더니, RunnableParallel()로 병렬처리했을 때의 시간과 개별로 처리했을 때의 시간이 별 차이가 없음을 알 수 있습니다! 


[ 'joke' chain 단독 수행 소요 시간: 11s +- 112ms ]


%%timeit
joke_chain.invoke({"topic":"snowman"})

# 11 s ± 112 ms per loop (mean ± std. dev. of 7 runs, 1 loop each)


[ 'poem' chain 단독 수행 소요 시간: 891 ms +- 197ms ]


%%timeit
poem_chain.invoke({"topic": "snowman"})

# 891 ms ± 197 ms per loop (mean ± std. dev. of 7 runs, 1 loop each)


[ 'question' chain 단독 수행 소요 시간: 751ms +- 128ms ]


%%timeit
question_chain.invoke({"topic": "snowman"})

# 751 ms ± 128 ms per loop (mean ± std. dev. of 7 runs, 1 loop each)


[ 'map' chain 으로 3개의 모든 chain 병렬 처리 소요 시간: 922ms +- 101ms]


%%timeit
map_chain.invoke({"topic": "snowman"})

# 922 ms ± 101 ms per loop (mean ± std. dev. of 7 runs, 1 loop each)


이번 포스팅이 많은 도움이 되었기를 바랍니다. 

행복한 데이터 과학자 되세요!  :-)


728x90
반응형
Posted by Rfriend
,

LLM (Large Language Model) 을 사용하는데 있어 

 - Knowledge Cutoff: 모델 학습 이후에 생성된 데이터에 대해서는 학습이 안되어 답변을 못함

 - No access to private data: 회사 내부 기밀정보, 신상정보, 비공개 정보에 대해서는 접근 불가

 - Hallucinations: 사실에 입각하지 않은 답변을 그럴싸하고 자연스럽게 하는 환각 증상

 - General Purpose: 다방면에 일정 수준 이상의 답변을 할 수 있지만, 특정 영역의 전문성이 떨어짐

등의 한계가 있을 수 있습니다. 


이를 해결하는 방법으로 Fine-tuning 방법과 함께 RAG (Retrieval-Augmented Generation) 방법이 많이 사용됩니다. 


이번 포스팅에서는 


1. RAG (Retrieval-Augmented Generation) 이란 무엇인가? 

2. RAG (Retrieval-Augmented Generation) 방법의 절차는 어떻게 되나? 

3. LangChain 으로 RAG 구현해보기


에 대해서 소개하겠습니다. 


1. RAG (Retrieval-Augmented Generation) 이란 무엇인가? 


RAG (Retrieval-Augmented Generation)은 자연 언어 처리 분야에서 언어 모델의 기능을 향상시키기 위해 검색 시스템과 결합하는 방법입니다. 이 접근법은 광범위한 외부 정보 소스에 의해 정보를 제공받아 응답이나 콘텐츠를 생성하는 데 특히 유용합니다. 

RAG(Retrieval-Augmented Generation)에 대한 개요는 다음과 같습니다. 

1. 검색 및 생성 결합 (Combining Retrieval and Generation): RAG 모델은 문서 검색 시스템과 seq2seq 언어 모델을 통합합니다. 검색 시스템은 입력 쿼리에 기반하여 대규모 코퍼스(위키피디아나 사용자 정의 데이터베이스와 같은)에서 관련 문서나 정보를 먼저 가져옵니다. 

2. 정보 증강 (Information Augmentation): 검색된 문서는 언어 모델의 입력을 증강하는 데 사용되며, 이는 모델이 초기 훈련 중에 '학습'하지 못한 추가적인 맥락과 정보(additional context and information)를 제공합니다. 이를 통해 모델은 더 정확하고 맥락에 적합한 응답을 생성할 수 있게 됩니다. 

3. 응용 분야 (Applications): RAG는 모델이 훈련 데이터에 포함되지 않은 구체적이고 사실적인 답변을 제공해야 하는(model needs to provide specific, factual answers) 질문 응답 시스템에서 특히 유용합니다. 또한, 정확도를 위해 외부 데이터 소스가 필요한 상세하거나 기술적인 응답이 필요한 애플리케이션에서도 사용됩니다. 

4. 사용 예시: RAG의 일반적인 응용은 복잡한 질문에 대해 독립적인 언어 모델보다 정확하게 답변할 수 있는 관련 정보를 수집하는 AI 챗봇과 가상 비서입니다. 

5. RAG 방법의 장점 (Advantages of RAG)

- 더 풍부한 응답 (Richer Responses): 광범위한 정보에 접근함으로써 RAG는 더 상세하고 정확한 응답을 제공할 수 있습니다.
- 동적 지식 (Dynamic Knowledge): 모델이 최신 정보에 접근할 수 있게 해주며, 특히 최근 이벤트나 특정 데이터에 관한 질문에 유용합니다. 

6. 기술 구현 (Technical Implementation): RAG 시스템을 구현하는 것은 일반적으로 Elasticsearch나 밀집 벡터 검색 시스템(Dense Vector Search System)과 같은 검색 모델과 GPT나 BART와 같은 seq2seq 언어 모델을 결합하는 것을 포함합니다. 


RAG는 AI와 NLP 분야에서 중요한 발전을 나타내며, 광범위한 외부 정보에 기반한 보다 동적이고 최신의 내부 정보에 입각한 정확한 언어 생성을 가능하게 합니다.  


2. RAG (Retrieval-Augmented Generation) 방법의 절차는 어떻게 되나? 


검색-증강 생성(Retrieval-Augmented Generation, RAG) 방법은 정보 검색과 언어 생성의 힘을 결합한 자연 언어 처리에서의 정교한 접근법입니다. RAG 작동 방식을 단계별로 설명하면 다음과 같습니다:


RAG(Retrieval-Augmented Generation): Load - Split - Embed - Store
RAG(Retrieval-Augmented Generation): Question - Retrieve - Prompt - LLM - Answer

* 출처: https://python.langchain.com/docs/use_cases/question_answering/


1. 문서를 텍스트 임베딩으로 변환하여 Vector DB에 저장하기 

- 문서를 읽어와서(Load) 분할(Split)하고 파싱(Parsing)하기
- Dense Vector 형태의 Sentence Embedding 변환하기
- 나중에 Retrieval 단계에서 빠르게 검색해서 사용할 수 있도록 Indexing하여 Vector DB에 저장(Store)하기 


2. 입력 수신 (Input Reception)

프로세스는 입력 쿼리 또는 프롬프트를 받는 것으로 시작됩니다. 이 쿼리가 RAG 프로세스를 활성화합니다.


3. 문서 검색 (Document Retrieval)

- 검색 시스템 활성화 (Retrieval System Activation): 첫 번째 주요 단계는 검색 시스템을 활성화하는 것입니다. 이 시스템은 대규모 문서 코퍼스나 데이터베이스(위키피디아나 전문화된 데이터셋과 같은)를 검색하도록 설계되었습니다. 
- 쿼리 처리 (Retrieval System Activation): 입력 쿼리는 검색 시스템이 이해할 수 있는 검색 쿼리를 형성하기 위해 처리됩니다. 
문서 가져오기 (Document Fetching): 검색 시스템은 처리된 쿼리를 기반으로 코퍼스를 검색하고 관련 문서나 정보 스니펫을 검색합니다. 


4. 정보 증강 (Information Augmentation)

맥락 통합 (Context Integration): 검색된 문서는 입력 쿼리를 증강하는 데 사용됩니다. 이 단계는 원래 입력과 문서에서 추출된 관련 정보를 결합하는 것을 포함합니다.
증강된 입력 형성 (Context Integration): 증강된 입력이 형성되며, 이제 원래 쿼리와 검색된 문서의 추가 맥락을 모두 포함하게 됩니다.


5. 언어 모델이 답변 생성 (Language Model Generation)

증강된 입력 공급 (Feeding Augmented Input): 이 증강된 입력은 일반적으로 GPT나 BART와 같은 시퀀스-투-시퀀스 모델인 언어 모델에 공급됩니다.
응답 생성 (Response Generation): 언어 모델은 증강된 입력을 처리하고 응답을 생성합니다. 이 응답은 모델의 사전 훈련된 지식뿐만 아니라 검색 단계에서 가져온 외부 정보에 의해 정보를 제공받습니다.


6. 출력 생성 (Output Production)

정제 및 형식화 (Refinement and Formatting): 생성된 응답은 필요에 따라 애플리케이션의 요구 사항에 맞게 정제되거나 형식화될 수 있습니다.
아웃풋 전달 (Output Delivery): 최종 응답은 RAG 프로세스의 출력으로 전달됩니다. 이 출력은 일반적으로 독립적인 언어 모델에 의해 생성된 응답보다 더 정보에 근거하고 정확하며 맥락적으로 관련성이 높습니다.


7. 피드백 루프 (선택적)

일부 구현에서는 검색된 문서의 효과성과 최종 출력의 품질을 평가하는 피드백 메커니즘이 있을 수 있습니다. 이 피드백은 프로세스의 미래 반복을 개선하는 데 사용될 수 있습니다.


RAG 방법은 광범위한 정적 지식베이스와 현대 언어 모델의 동적 생성 능력 사이의 격차를 효과적으로 연결하여 맥락적으로 풍부하고 매우 관련성이 높은 답변을 생성합니다. 


3. LangChain 으로 RAG 구현해보기


흐름은 다음과 같습니다. 

RAG Pipeline

* 출처: https://python.langchain.com/docs/expression_language/get_started#basic-example-prompt-model-output-parser


1. 첫 번째 단계에서는 두 개의 항목이 있는 RunnableParallel 객체를 생성합니다. 첫 번째 항목인 context는 검색기에 의해 가져온 문서 결과를 포함할 것입니다. 두 번째 항목인 question은 사용자의 원래 질문을 담을 것입니다. 질문을 전달하기 위해 RunnablePassthrough를 사용하여 이 항목을 복사합니다. 

2. 위 단계에서의 Dictionary를 프롬프트 구성요소에 공급합니다. 그런 다음 사용자 입력인 question과 검색된 문서인 context를 사용하여 프롬프트를 구성하고 PromptValue를 출력합니다. 

3. 모델 구성요소는 생성된 프롬프트를 가져와 OpenAI LLM 모델(ChatModel)에 평가를 위해 전달합니다. 모델에서 생성된 출력은 ChatMessage 객체입니다. 

4. 마지막으로, output_parser 구성요소는 ChatMessage를 가져와 이를 Python 문자열로 변환(StrOutputParser)하며, 이는 chain.invoke() 메소드에서 반환됩니다. 


LangChain 코드를 하나씩 살펴보겠습니다. 

먼저, 필요한 모듈로서 langchain, openai, docarray, tiktoken 이 미리 설치가 안되었다면, 먼저 터미널에서 pip install 을 사용해서 모듈을 설치해야 합니다. (Jupyter Notebook에서 사용 중이라면 셀 안에서 '!' 를 앞에 붙임)


-- Prerequisite: install modules of langchain, openai, docarray, tiktoken
! pip install -q langchain openai docarray tiktoken


DocArrayInMomorySerch 클래스를 사용해서 In-memory Vector DB에 OpenAI의 Embeddings model을 사용해서 임베딩 변환한 문장들을 저장합니다. 


그리고 retriever 를 설정 (retriever = vectorstore.as_retriever()) 합니다. 

retriever 는 나중에 chaining 해서 쓸 수도 있고, 아니면 retriever.invoke() 해서 바로 검색(Retrieval)하는데 사용할 수도 있습니다. 검색을 할 때는 Vector DB에 저장된 임베딩과 User query로 들어온 문서의 임베딩 간에 코사인 유사도 (cosine similarity)를 계산해서 유사도 내림차순 기준으로 검색 결과를 반환합니다. 


## import modules required
from langchain.chat_models import ChatOpenAI
from langchain.embeddings import OpenAIEmbeddings
from langchain.prompts import ChatPromptTemplate
from langchain.vectorstores import DocArrayInMemorySearch
from langchain_core.output_parsers import StrOutputParser
from langchain_core.runnables import RunnableParallel, RunnablePassthrough


## Sentence Embedding, Vector Store
vectorstore = DocArrayInMemorySearch.from_texts(
    ["There are 4 seasons in Korea", 
     "Harry Potter is an outstanding wizard",
     "The dog likes to walk"], 
    embedding=OpenAIEmbeddings(openai_api_key=OPENAI_API_KEY), # set with yours
)


## Setup the Retriever using an In-memory store
## , which can retrieve documents based on a query
retriever = vectorstore.as_retriever()

## This is a runnable component that can be chained together with other component as below, 
## , but you can also try to run it separately.
retriever.invoke("Who is Harry Potter?")
# [Document(page_content='Harry Potter is an outstanding wizard'),
#  Document(page_content='The dog likes to walk'),
#  Document(page_content='There are 4 seasons in Korea')]


ChatPromptTemplate.from_template() 를 사용해서 Prompt Template 를 생성해줍니다. 아래의 template 를 보면 알 수 있는 것처럼 LLM 모델에게 "오직 주어진 context 에 기반해서 질문에 답변을 해라" 라고 지시를 합니다. 


template = """Answer the question based only on the following context: {context}  Question: {question}""" 


그리고 {context} 에는 문서 검색(Retrieval)의 결과를 넣어주고, {question}에는 사용자 질문을 넣어줍니다. 그러면 위에서 정의한 retriever 가 문서의 임베딩된 문장들과 사용자 질문 임베딩 간의 코사인 유사도를 계산해서 가장 유사한 k 개의 문장을 {context}로 넣어주게 됩니다. 


## Chat Prompt Template
# : the prompt template below takes in context and question as values 
# : to be substituted in the prompt.
template = """Answer the question based only on the following context:
{context}

Question: {question}
"""

prompt = ChatPromptTemplate.from_template(template)

## ChatModel
model = ChatOpenAI(openai_api_key=OPENAI_API_KEY) # set with yours

## Output Parser
output_parser = StrOutputParser()


RunnableParallel 메소드는 (a) "context"로서 retriever와 (b) "question"으로서 RunnablePassthrough() 를 병렬로 처리할 수 있게 해줍니다. (위의 RAG pipeline 그림 참조하세요. 두 갈래로 나뉘어서 동시 처리됩니다.)


'|' 를 사용해서 setpu_and_retrieval (사용자 질문을 받아서 저장된 문서 중에서 가장 관련있는 텍스트를 검색해오기) + Prompt (오직 {context}를 참조해서만 {question}에 답변하라는 지시) + model (OpenAI의 ChatModel LLM을 사용해서 답변) + output_parser (ChatModel이 생성한 ChatMessage를 string으로 파싱) 연결(chaining) 합니다. 


chain.invoke() 로 위에서 생성한 chian을 실행해줍니다. 


## Before building the prompt template, 
## we want to retrieve relevant documents to the search and include them as part of the context.
setup_and_retrieval = RunnableParallel(
    {"context": retriever, # the retriever for document search
     "question": RunnablePassthrough() # to pass the user's question
     }
)

## Chaining setup_and_retrieval + Prompt + ChatModel + OutputParser
chain = setup_and_retrieval | prompt | model | output_parser

## Run a chain pipeline
chain.invoke("Who is Harry Potter?")
# Harry Potter is an outstanding wizard.


[ Reference ]
1. RangChain Tutorial - RAG Search Example
https://python.langchain.com/docs/expression_language/get_started#basic-example-prompt-model-output-parser

2. LangChain Tutorial - Retrieval-Augmented Generation (RAG)
https://python.langchain.com/docs/use_cases/question_answering/


3. transformer를 이용한 토큰화(Tokenization), 단어 임베딩(Word Embedding), 텍스트 임베딩 (Text Embedding)
: https://rfriend.tistory.com/m/807


이번 포스팅이 많은 도움이 되었기를 바랍니다. 

행복한 데이터 과학자 되세요!


728x90
반응형
Posted by Rfriend
,

지난번 포스팅에서 LangChain 은 대규모 언어 모델을 사용해서 애플리케이션을 개발, 프로덕트화, 배포하는 것을 도와주는 프레임워크라고 소개했습니다. 그리고 LangChain Expression Language (LCEL) 는 LangChain의 기본적인 컴포넌트들을 chaining 기법을 써서 다단계 작업들의 연결 체인을 만들어 복잡한 기능을 구현할 수 있도록 해준다고 했습니다. 


이번 포스팅에서는 LangChain Expression Language (LCEL) 의 가장 간단한 형태의 chaining 예시를 들어보겠습니다. 


LCEL Chaining 기본 형태: Prompt + Model + Output Parser


이때 Model 로서 ChatModel과 LLM 모델을 사용할 때 input 과 output 이 조금 다르기 때문에, Model에 따라서 나누어서 소개하겠습니다. 


(1) ChatModel 사용 시 Pipeline: Input --> {Dict} --> PromptTemplate --> PromptValue --> ChatModel --> ChatMessage --> StrOutputParser --> String --> Result


(2) LLM 사용 시 Pipeline: Input String --> LLM --> Output String


LangChain: chaining a prompt, a model, and output parser


(1) ChatModel 을 사용한 Chaining 예: Prompt + ChatModel + Output Parser

: Input --> {Dict} --> PromptTemplate --> PromptValue --> ChatModel --> ChatMessage --> StrOutputParser --> String --> Result


만약 실습 환경에 langchain, openai 모듈이 설치가 안되어 있다면 termianl 이나 Jupyter Notebook (pip install 앞에 '!' 를 붙여서 사용) 에서 langchain, openai 모듈을 먼저 설치하기 바랍니다. 


! pip install -q langchain
! pip install openai


(1) 필요한 modules 을 불러옵니다. 

(2) OpenAI 의 API Key 를 설정해줍니다. 

(3) Prompt Template, Chat Model, Output Parser 의 인스턴스를 생성합니다. 

(4) '|' 를 사용해서 chain = promt | model | output_parser 를 연결(Chaining)해줍니다 

(5) chain.invoke() 를 사용해서 chain pipeline 을 실행시켜줍니다. 이때 invoke({"topic": "bird"}) 처럼 Dictionary 형태로 PromptTemplate 에 들어갈 Input을 넣어주면 됩니다. 


## (1) Importe modules
from langchain.prompts import ChatPromptTemplate
from langchain.chat_models import ChatOpenAI
from langchain_core.output_parsers import StrOutputParser

## (2) set with your openai api key
openai_api_key="sk-xxxxxx..."

## (3) Create instances of prompt, ChatModel, adn output parser
prompt = ChatPromptTemplate.from_template("tell me a short joke about {topic}")
model = ChatOpenAI(openai_api_key=openai_api_key)
output_parser = StrOutputParser()

## (4) Chaining a PromptTemplate + ChatModel + Output Parser using '|'
chain = prompt | model | output_parser

## (5) Run the whole pipeline of chain
chain.invoke({"topic": "bird"})

# \n\nWhy was the bird kicked out of the comedy club? Because it kept telling fowl jokes!


위에서 생성한 ChatPromptTemplate 의 인풋, 아웃풋을 단계별로 하나씩 살펴보겠습니다. 


    - ChatPromptValue: prompt.invoke()

    - Messages: prompt_value.to_messages()

    - HumanMessage: prompt_value.to_string()


ChatModel 은 인풋으로 PromptValue 를 받는 반면에, LLM 은 a string을 인풋으로 받는 차이점이 있습니다. (LLM도 PromptValue를 인풋으로 넣어줘도 작동합니다)


## ChatPromptValue
prompt_value = prompt.invoke({"topic": "bird"})

prompt_value
# ChatPromptValue(messages=[HumanMessage(content='tell me a short joke about bird')])

prompt_value.to_messages()
# Human: tell me a short joke about bird

prompt_value.to_string()
# Human: tell me a short joke about bird


다음으로, ChatModel의 아웃풋인 AIMessage 를 살펴보겠습니다. 


## ChatModel AIMessage
message = model.invoke(prompt_value)

message
# AIMessage(content="Why don't birds wear shoes? \n\nBecause they have talon-t!")


(2) LLM Model 을 사용 예

: Input String --> LLM --> Output String


LLM 모델로는 OpenAI의 OpenAI(model="gpt-3.5-turbo-instruct") 모델을 사용해서 예를 들어보겠습니다. LLM 모델의 인풋으로 string 을 받고, 아웃풋으로는 생성된 string 을 반환합니다. (위의 ChatModel 대비 인풋과 아웃풋이 모두 string 으로 상대적으로 간단합니다.)


# prompt + llm model + output parser
from langchain.llms import OpenAI

# Set your OpenAI API Key
openai_api_key="sk-xxxxx..."

# Create an instance of LLM model
llm = OpenAI(model="gpt-3.5-turbo-instruct", openai_api_key=openai_api_key)

# Run LLM model, put a string as an input, and outputs a string
llm.invoke("tell me a short joke about bird")
# \n\nWhy did the chicken go to the seance? To get in touch with its inner chick!


[Reference]

* LangChain Expression Language
https://python.langchain.com/docs/expression_language/get_started#basic-example-prompt-model-output-parser


이번 포스팅이 많은 도움이 되었기를 바랍니다. 

행복한 데이터 과학자 되세요!  :-)


728x90
반응형
Posted by Rfriend
,

LLM (Large Language Model) 을 활용한 애플리케이션 개발에 많이 활용되는 프레임워크로 LangChain과 Semantic Kernel 이 있습니다. 


이번 포스팅에서는 


1. LangChain의 주요 컴포넌트 및 특징

2. Semantic Kernel의 주요 컴포넌트 및 특징

3. LangChain과 Semantic Kernel 의 관계


에 대해서 소개하겠습니다. 


1. LangChain의 주요 컴포넌트 및 특징


LangChain은 언어 모델을 기반으로 한 애플리케이션을 개발하기 위한 프레임워크입니다. 특히 복잡한 추론, 다단계 작업 처리, 그리고 외부 데이터 소스와의 통합에 중점을 둡니다. 이 프레임워크를 통해 다음과 같은 애플리케이션을 구현할 수 있습니다.  

문맥 인식 (Are context-aware): 언어 모델을 문맥의 출처(프롬프트 지시사항, 소수 샷 예시, 반응을 근거로 하는 내용 등)에 연결합니다. 


추론 (Reason): 언어 모델이 제공된 문맥을 바탕으로 어떻게 답변할지, 어떤 행동을 취할지 등에 대해 추론하도록 합니다. 


이 프레임워크는 여러 부분으로 구성되어 있습니다. 


(1) LangChain 라이브러리 (LangChain Libraries): Python과 JavaScript 라이브러리입니다. 다양한 컴포넌트의 인터페이스와 통합, 이러한 컴포넌트를 체인과 에이전트로 결합하는 기본 런타임, 그리고 체인과 에이전트의 즉각적인 구현을 포함합니다.  


LangChain은 다음 모듈에 대한 표준적이고 확장 가능한 인터페이스 및 통합을 제공합니다.  

 
  - 모델 I/O (Models I/O): 언어 모델과의 인터페이스

  - 검색 (Retrieval): 애플리케이션별 데이터와의 인터페이스

  - 에이전트 (Agents): 고수준 지시에 따라 모델이 사용할 도구를 선택하도록 함


(2) LangChain 템플릿 (LangChain Templates): 다양한 작업에 쉽게 배포할 수 있는 참조 아키텍처 모음입니다.  


(3) LangServe: LangChain 체인을 REST API로 배포하기 위한 라이브러리입니다.  


(4) LangSmith: 어떤 LLM 프레임워크에서 구축된 체인을 디버깅, 테스트, 평가 및 모니터링할 수 있게 해주는 개발자 플랫폼으로, LangChain과 원활하게 통합됩니다.  


[ LangChain Stack ]

LangChain Stack


* 출처: https://python.langchain.com/docs/get_started/introduction


이러한 제품들은 애플리케이션 수명 주기 전체를 간소화합니다. 


개발 (Develop): LangChain/LangChain.js에서 애플리케이션을 작성할 수 있습니다. 템플릿(Templates)을 참조하여 신속하게 시작할 수 있습니다.  


제품화 (Productionize): LangSmith를 사용하여 체인을 검사, 테스트 및 모니터링하면 지속적으로 개선하고 자신있게 배포할 수 있습니다.  


배포 (Deploy): LangServe를 사용하여 어떤 체인도 API로 전환합니다.  


LangChain을 활용한 애플리케이션 수명주기 간소화


LangChain의 주요 구성요소는 다음과 같습니다.  


(1) 언어 모델 (Language Models): LangChain의 핵심으로, 텍스트 생성에 필요한 기능을 제공합니다. GPT-3와 같은 다양한 언어 모델과 호환됩니다. 모델 I/O 모듈은 LLM과의 상호 작용을 다룹니다.  


(2) 체이닝 (Chaining): 여러 언어 모델 출력을 연결하여 일관되고 확장된 응답이나 해결책을 형성하는 과정입니다. 이를 통해 모델은 단일 단계에서 할 수 있는 것보다 더 복잡한 작업을 수행할 수 있습니다. 


(3) 도구 (Tools): LangChain은 웹 브라우저, 데이터베이스, 기타 API와 같은 다양한 도구를 통합하여 언어 모델이 정보를 수집하거나 작업을 수행할 수 있게 합니다. 


(4) 메모리 (Memory): 대화나 작업의 이전 부분에서 얻은 정보를 기억할 수 있는 메모리 시스템을 포함합니다. 이 메모리는 단기(단일 대화 동안) 또는 장기(대화 간 지속)로 사용될 수 있습니다. 


(5) 제어 시스템 (Control Systems): 모델이 다양한 컴포넌트를 어떻게 사용할지 결정하는 방식을 관리합니다. 예를 들어, 제어 시스템은 정보를 찾기 위해 언제 브라우저 도구를 사용할지 또는 모델의 내부 지식에 의존할지 결정할 수 있습니다. 


(6) 사용자 인터페이스 (User Interfaces): LangChain은 다양한 사용자 인터페이스와 통합될 수 있어, 챗봇, 가상 보조원 또는 더 전문화된 도구와 같은 다양한 애플리케이션에서 사용될 수 있습니다. 


(7) 애플리케이션 로직 (Application Logic): LangChain 모델이 특정 애플리케이션에서 어떻게 동작할지 정의하는 특정 로직과 규칙을 포함합니다. 이것이 LangChain을 다양한 사용 사례에 맞게 사용자 정의하는 부분입니다. 


(8) 콜백 (Callback): LangChain은 개발자에게 LLM 애플리케이션의 다양한 단계에 연결할 수 있는 콜백 시스템을 제공합니다. 이는 로깅, 모니터링, 스트리밍 및 기타 작업에 유용합니다. 파이프라인 내에서 특정 상황이 발생할 때 호출되는 사용자 지정 콜백 핸들러를 작성할 수 있게 해줍니다.  


LangChain의 모듈식 아키텍처는 개발자들이 언어 모델을 혁신적인 방식으로 활용하는 다양한 애플리케이션을 구축할 수 있는 유연성과 맞춤 설정 기능을 제공합니다. 


2. Semantic Kernel의 주요 컴포넌트 및 특징


Semantic Kernel은 언어 모델의 의미론적 이해와 텍스트 처리 기능을 향상시키기 위해 설계된 프레임워크입니다. 이는 언어 모델이 보다 정교하고 깊이 있는 의미론적 분석을 수행할 수 있도록 하는 데 중점을 두고 있습니다.  


Semantic Kernel 의 플러그인(Plugins)과 커넥터(connectors) 를 활용하면 AI 개발을 확장할 수 있습니다.  

Semantic Kernel은 플러그인(Plugins)을 통해 기존 코드를 AI 에이전트에 쉽게 추가할 수 있도록 설계되었습니다. 플러그인을 사용하면, 기존 앱과 서비스를 호출하여 에이전트가 실제 세계와 상호작용할 수 있는 능력을 부여할 수 있습니다. 이런 방식으로, 플러그인은 AI 앱의 "팔과 손"과 같습니다. 

또한, Semantic Kernel의 인터페이스는 어떤 AI 서비스와도 유연하게 통합할 수 있게 해줍니다. 이는 기억과 AI 모델을 쉽게 추가할 수 있는 일련의 커넥터(Connectors)들을 통해 이루어집니다. 이런 방식으로 Semantic Kernel은 앱에 시뮬레이션된 "뇌"를 추가할 수 있으며, 새롭고 더 나은 AI 모델이 나올 때마다 쉽게 교체할 수 있습니다. 

Semantic Kernel이 커넥터와 플러그인으로 제공하는 확장성 덕분에, 특정 AI 모델 제공업체에 구속되지 않고 거의 모든 기존 코드를 조율할 수 있습니다. 예를 들어, OpenAI의 ChatGPT용으로 다수의 플러그인을 구축했다면, Semantic Kernel을 사용하여 Azure나 Hugging Face와 같은 다른 제공업체의 모델과 함께 조율할 수 있습니다. 

Semantic Kernel은 어떤 제공업체의 AI 플러그인도 조율할 수 있습니다. 

개발자로서, Semantic Kernel의 다양한 구성요소를 별도로 사용할 수 있습니다. 예를 들어, OpenAI와 Azure OpenAI 서비스에 대한 추상화만 필요한 경우, 수제 프롬프트를 실행하기 위해 SDK만 사용할 수 있지만, Semantic Kernel의 진정한 힘은 이러한 구성요소를 함께 결합할 때 나타납니다. 


Semantic Kernel makes AI development extensible: Connectors, Plugins


Semantic Kernel의 주요 컴포넌트 및 특징은 다음과 같습니다. 

(1) 의미론적 분석 (Semantic Analysis): 이 컴포넌트는 텍스트의 의미를 보다 정확하게 파악하고 분석하는 데 도움을 줍니다. 이는 언어 모델이 텍스트의 뉘앙스와 복잡한 의미 구조를 더 잘 이해하고 반영할 수 있도록 합니다. 

(2) 문맥 관리 (Context Management): SemanticKernel은 긴 대화나 문서에서 문맥을 더 효과적으로 관리하는 기능을 제공합니다. 이를 통해 모델은 대화의 전체 흐름을 더 잘 이해하고, 이전에 나온 정보를 적절히 활용할 수 있습니다. 

(3) 향상된 언어 생성 (Enhanced Language Generation): 의미론적 분석을 통해 얻은 통찰력을 바탕으로, SemanticKernel은 언어 모델이 보다 정교하고 자연스러운 텍스트를 생성할 수 있도록 지원합니다. 이는 모델이 더 복잡하고 세부적인 표현을 생성하는 데 유용합니다. 

(4) 긴 문서 처리 (Long Document Handling): 긴 텍스트나 문서를 처리할 때, SemanticKernel은 중요한 정보를 추출하고 의미론적으로 관련된 내용을 더 잘 연결하는 데 도움을 줍니다. 

SemanticKernel의 핵심 목표는 언어 모델의 기본적인 언어 이해 능력을 향상시켜, 더 깊이 있는 의미론적 이해와 정교한 언어 생성을 가능하게 하는 것입니다. 이 프레임워크는 특히 의미론적으로 복잡한 작업, 긴 문서 분석, 또는 자연스러운 언어 생성이 필요한 응용 프로그램에서 유용하게 사용될 수 있습니다. 


3. LangChain과 Semantic Kernel 의 목적, 구성요소 및 관계


LangChain과 Semantic Kernel은 언어 모델의 기능을 향상시키기 위해 설계된 프레임워크지만, 각각 다른 목적을 가지고 있으며 다른 방식으로 작동합니다.


(1) LangChain


목적: LangChain은 언어 모델 응용 프로그램을 구축하기 위한 프레임워크로, 특히 멀티스텝 추론과 외부 도구와의 통합에 중점을 둡니다. 이는 언어 모델이 다양한 데이터 소스, 도구와 상호작용하거나 확장된 추론 작업을 수행하는 복잡한 응용 프로그램을 만드는 데 사용됩니다.


구성요소: 이 프레임워크는 언어 모델 출력의 연결, 브라우저나 데이터베이스와 같은 도구와의 통합, 메모리 처리 및 특정 응용 프로그램 로직을 포함합니다.


초점: LangChain의 주요 초점은 언어 모델이 복잡한 멀티스텝 작업을 수행하고 외부 데이터 소스와 상호작용할 수 있도록 함으로써 응용 프로그램 구축 프로세스를 향상시키는 데 있습니다.


(2) Semantic Kernel


목적: SemanticKernel은 언어 모델이 텍스트를 이해하고 생성하는 능력을 향상시키기 위해 설계된 프레임워크입니다. 이는 언어 모델의 의미론적 이해와 추론 능력을 향상시키는 데 중점을 둡니다.


구성요소: SemanticKernel은 더 나은 문맥 관리, 의미론적 이해 및 긴 대화나 문서 처리에 대한 효과적인 관리와 같은 기술 및 도구를 포함합니다.


초점: SemanticKernel의 주요 목표는 모델이 깊은 의미론적 이해와 뉘앙스 있는 언어 생성을 요구하는 작업에서 더 효과적이도록 언어 모델의 기본 언어 이해 및 처리 능력을 향상시키는 것입니다.


(3) LongChain과 Semantic Kernel의 보완적 관계


보완적 성격: LangChain과 Semantic Kernel은 서로 보완적입니다. LangChain은 외부 도구와 멀티스텝 추론을 활용하여 복잡한 작업을 수행할 수 있는 응용 프로그램을 구축하는 데 관한 것이며, 반면 Semantic Kernel은 언어 모델의 의미론적 처리 능력을 향상시키는 데 중점을 둡니다.


통합 가능성: 실제 응용 프로그램에서 Semantic Kernel을 사용하여 LangChain 프레임워크 내의 모델의 언어 이해 및 생성 능력을 향상시킬 수 있습니다. 이 통합은 LangChain의 고급 응용 프로그램 구축 기능과 Semantic Kernel의 향상된 의미론적 처리 능력을 결합합니다.


이 두 프레임워크는 언어 모델 기능을 향상시키는 다른 레이어를 나타냅니다. LangChain은 응용 프로그램 및 워크플로우 영역에서, Semantic Kernel은 핵심 언어 처리 및 이해 영역에서 작동합니다. 


이번 포스팅이 많은 도움이 되었기를 바랍니다. 

행복한 데이터 과학자 되세요! 


728x90
반응형
Posted by Rfriend
,

이번 포스팅에서는 PyTorch에서 모델을 저장하고 다시 로딩하는 3가지 방법을 소개하겠습니다. 


(1) 모델 가중치(model weights) 만 저장하고, 다시 로딩하기

(2) 모델 전체 (model structure & weights) 를 저장하고, 다시 로딩하기

(3) General Checkpoint 를 저장하고, 다시 로딩하기


위 3가지 방법 중에서 하고자 하는 과업의 상황에 맞게 선택해서 사용하면 되겠습니다. 


PyTorch : Saving and Loading the model


(1) 모델 가중치(model weights) 만 저장하고, 다시 로딩하기


PyTorch 의 internal state dictionary (state_dict)에 있는 학습된 파라미터의 가중치(weights)를 torch.save(model.state_dict(), 'model_weights.pth') 메소드를 사용해서 저장할 수 있습니다. 


import torch
import torchvision.models as models


## Saving and Loading model weights
# : PyTorch models store the learned parameters in an internal state dictionary
# : called 'state_dict'
# : These can be persisted via the 'torch.save' method.

model = models.vgg16(weights='IMAGENET1K_V1')
torch.save(model.state_dict(), 'model_weights.pth')


저장된 파라미터별 가중치를 다시 로딩하서 사용하기 위해서는

먼저, 가중치를 저장했을 때와 동일한 모델의 인스턴스를 생성해 놓고,

==> 그 다음에 load_state_dict() 메소드를 사용해서 가중치를 로딩합니다. 

(비유하자면, 철근으로 집의 골격을 먼저 세워 놓고, ==> 그 다음에 시멘트를 붇기)


# to load model weights, we need to create an instance of the same model first
# and then load the parameters using 'load_state_dict()' method.

model = models.vgg16() # create untrained model
model.load_state_dict(torch.load('model_weights.pth'))
model.eval() # to set the dropout and batch normalization layers to evaluation mode


(2) 모델 전체 (model structure & weights) 를 저장하고, 다시 로딩하기


다음 방법으로는 모델의 구조(model structure, shape)과 데이터로 부터 학습된 파라미터별 가중치(model weights)를 model.save() 메소드를 사용해서 한꺼번에 저장하는 방법입니다. 


## Saving the model with shape and weights
torch.save(model, 'model.pth')


모델의 구조와 가중치가 한꺼번에 저장이 되었기 때문에, 로딩할 때도 torch.load() 메소드로 한꺼번에 모델 구조와 가중치를 가져와서 사용하면 됩니다.

(* (1)번과는 달리, 모델의 구조에 해당하는 인스턴스 생성 절차 없음)


# loading the model with shape and weights
model = torch.load('model.pth')


(3) General Checkpoint 를 저장하고, 다시 로딩하기


여러번의 Epoch를 반복하면서 모델을 훈련하다가, 중간에 그때까지 학습된 모델과 기타 모델 학습 관련된 정보를 직렬화된 딕셔너리(serialized dictionary)로 저장하고, 다시 불러와서 사용할 수도 있습니다. 


예를 들어보자면, 먼저 아래처럼 먼저 신경망 클래스를 정의하고 초기화해서 인스턴스를 생성하겠습니다. 


import torch
import torch.nn as nn
import torch.optim as optim
import torch.nn.functional as F


# Define and initialize the neural network
class Net(nn.Module):
    def __init__(self):
        super(Net, self).__init__()
        self.conv1 = nn.Conv2d(3, 6, 5)
        self.pool = nn.MaxPool2d(kernel_size=2, stride=2)
        self.conv2 = nn.Conv2d(6, 16, 5)
        self.fc1 = nn.Linear(16*5*5, 120)
        self.fc2 = nn.Linear(120, 84)
        self.fc3 = nn.Linear(84, 10)

    def forward(self, x):
        x = self.pool(F.relu(self.conv1(x)))
        x = self.pool(F.relu(self.conv2(x)))
        x = x.view(-1, 16*5*5)
        x = F.relu(self.fc1(x))
        x = F.relu(self.fc2(x))
        x = self.fc3(x)

        return x

net = Net()
print(net)
# Net(
#   (conv1): Conv2d(3, 6, kernel_size=(5, 5), stride=(1, 1))
#   (pool): MaxPool2d(kernel_size=2, stride=2, padding=0, dilation=1, ceil_mode=False)
#   (conv2): Conv2d(6, 16, kernel_size=(5, 5), stride=(1, 1))
#   (fc1): Linear(in_features=400, out_features=120, bias=True)
#   (fc2): Linear(in_features=120, out_features=84, bias=True)
#   (fc3): Linear(in_features=84, out_features=10, bias=True)
# )


Optimizer 를 초기화하고, 모델 학습과 관련된 추가 정보로 EPOCH, PATH, LOSS 등도 정의를 해준 후에 torch.save() 메소드에 Dictionary 형태로 저장하고자 하는 항목들을 key: value 에 맞춰서 하나씩 정의해주어서 저장을 합니다. 


# initialize the optimizer
optimizer = optim.SGD(net.parameters(), lr=0.001, momentum=0.9)

# save the general checkpoint
# : collect all relevant information and build your dictionary.
# additional information
EPOCH = 5
PATH = "model.pt"
LOSS = 0.4

torch.save({
    'epoch': EPOCH,
    'model_state_dict': net.state_dict(),
    'optimizer_state_dict': optimizer.state_dict(),
    'loss': LOSS,
}, PATH)


위에서 처럼 serialized dictionary 형태로 저장된 General Checkpoint 를 다시 로딩해서 사용할 때는, 

먼저 저장했을 때와 동일한 model, optimizer 의 인스턴스를 초기화해서 생성해 놓고, 

--> torch.load(PATH) 메소드를 사용해서 checkpoint 를 로딩하고 

--> load_state_dict() 메소드를 사용해서 로딩한 checkpoint 로부터 저장되어있던 model과 optimizer를 가져와서 사용합니다. 


모델 평가나 예측(inference) 용도로 사용할 때는 반드시 model.eval() 를 사용해서 'evaluation model'로 설정해주어야 합니다. 그렇지 않으면 예측을 할 때마다 dropout 과 batch normalization이 바뀌어서 예측값이 바뀌게 됩니다. 


만약 모델 훈련을 계속 이어서 하고자 한다면, model.train() 을 사용해서 'training model'로 설정해서 데이터로 부터 계속 Epoch을 반복하면서 학습을 통해 파라미터의 가중치를 업데이트 해주면 됩니다. 


## Load the general checkpoint
# : first initialize the model and optimier, then load the dictionary locally.
model = Net()
optimizer =  optim.SGD(model.parameters(), lr=0.001, momentum=0.9) # initialization first

checkpoint = torch.load(PATH)
model.load_state_dict(checkpoint['model_state_dict'])
optimizer.load_state_dict(checkpoint['optimizer_state_dict'])
epoch = checkpoint['epoch']
loss = checkpoint['loss']

model.eval() #  to set dropout and batch normalization layers to evaluation mode before running inference.


[Reference]

(1) PyTorch tutorial - Save and Load the Model

: https://pytorch.org/tutorials/beginner/basics/saveloadrun_tutorial.html

(2) PyTorch tutorial - Saving and Loading a General Checkpoint in PyTorch

: https://pytorch.org/tutorials/beginner/basics/saveloadrun_tutorial.html


이번 포스팅이 많은 도움이 되었기를 바랍니다. 

행복한 데이터 과학자 되세요!  :-)


728x90
반응형
Posted by Rfriend
,