프롬프트 템플릿을 '부분적(Partial prompt templates)'으로 사용하는 것이 의미 있을 수 있습니다. 예를 들어, 필요한 값들의 부분 집합을 전달하여, 나머지 값들만을 기대하는 새로운 프롬프트 템플릿을 만듭니다.
LangChain은 이를 두 가지 방법으로 지원합니다.
1. 문자열 값을 가진 부분적 프롬프트 템플릿 (Partial prompt templates with Strings) 2. 문자열 값을 반환하는 함수를 사용한 부분적 프롬프트 템플릿 (Partial prompt templates with Functions)
이 두 가지 다른 방법은 다른 사용 사례들을 지원합니다.
아래 예제에서 문자열 값을 반환하는 함수를 사용한 부분적 프롬프트 템플릿 (Partial with Functions) 을 만들고, LangChain에서 이를 수행하는 방법에 대해 소개하겠습니다.
LangChain - Partial Prompt Templates
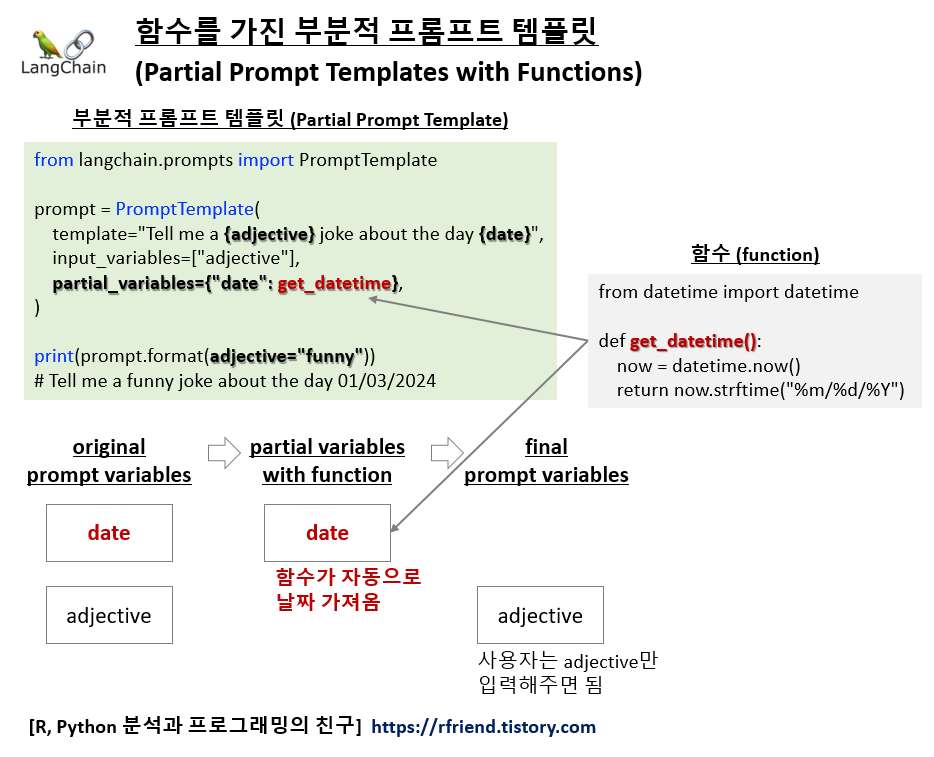
함수를 이용한 부분적 프롬프트 템플릿 사용 사례는 언제나 일반적인 방법으로 가져오고 싶은 변수가 있을 때 적용됩니다.
이의 대표적인 예는 날짜나 시간과 관련된 경우입니다. 항상 현재 날짜를 포함하고 싶은 프롬프트가 있다고 가정해보겠습니다. 프롬프트에 그것을 하드코딩 하여 다른 입력 변수들과 함께 전달하는 것은 매우 불편하며 또 휴면에러를 유발할 수도 있습니다. 이 경우, 항상 현재 날짜를 반환하는 함수(Function)로 프롬프트를 부분적(Partial prompt template)으로 사용하면 매우 편리합니다.
먼저 터미널에서 pip install 로 langchain, openai 모듈을 설치합니다.
! pip install langchain openai
다음으로, 필요한 모듈을 importing 합니다. 그리고 LLM 모델로는 OpenAI 의 LLM을 쓸 것이므로 OpenAI API Key를 환경변수에 등록해줍니다.
import os

from langchain.llms import OpenAI
from langchain.prompts import PromptTemplate
from langchain_core.output_parsers import StrOutputParser

os.environ["OPENAI_API_KEY"]="sk-xxxx..." # set with yours
이번 예제에서는 현재 날짜와 시간을 가져오는 사용자 정의 함수(User Defined Function)를 정의해서 사용하겠습니다.
# Define a funtion that returns the current date
from datetime import datetime

def get_datetime():
    now = datetime.now()
    return now.strftime("%m/%d/%Y, %H:%M:%S")
부분적 프롬프트 템플릿(Partial prompt templates)을 만드는 방법에는 2가지가 있습니다.
- 방법 1: PromptTemplate()로 prompt를 먼저 만들고, prompt.partial() 로 부분 프롬프트 생성
- 방법 2: PromptTemplate() 의 partial_varialbes 로 부분 변수 초기화하여 부분 프롬프트 생성
[방법 1] PromptTemplate()로 prompt를 먼저 만들고, prompt.partial() 로 부분 프롬프트 생성
# [option 1] Partial prompt template with a function
prompt = PromptTemplate(
    template="Tell me a {adjective} joke about the day {date}",
    input_variables=["adjective", "date"]
)

# -- Partil prompt here --
partial_prompt = prompt.partial(date=get_datetime)

print(partial_prompt.format(adjective="funny"))
# Tell me a funny joke about the day 01/03/2024, 23:39:21
[방법 2] PromptTemplate() 의 partial_varialbes 로 부분 변수 초기화하여 부분 프롬프트 생성
# [option 2] You can initialize the prompt with the partialed variables
prompt = PromptTemplate(
    template="Tell me a {adjective} joke about the day {date}",
    input_variables=["adjective"],
    partial_variables={"date": get_datetime}, # -- partial prompt initialization here --
)

print(prompt.format(adjective="funny"))
# Tell me a funny joke about the day 01/03/2024, 23:41:26
이제, 위에서 만든 부분적 프롬프트 템플릿을 LLM Model, Output Parser와 '|'로 Chaining 해보겠습니다.
프롬프트 내 "date" 는 위에서 Partial Variable 로 해서 get_date() 함수로 현재의 날짜와 시간을 가져와서 부분적으로 입력을 해주었으며, chain.invoke({"adjective": "funny"}) 를 사용해서 "adjective" 변수에 대해서만 사용자가 하드코딩으로 "funny"를 입력해주면 프롬프트 전체를 완성해서 LLM 모델에 전달하여 LLM 모델이 답변을 생성하도록 실행해보겠습니다.
print(prompt.format(adjective="funny"))
# Tell me a funny joke about the day 01/03/2024, 23:41:26


response = chain.invoke({"adjective": "funny"})
print(response)

# Q: What did the calendar say when it saw the date and time?
# A: "Wow, I'm so far ahead of myself!"
아래에는 chain.invoke({"adjective": "sarcastic"}) 으로 바꾸어서 실행을 해보았습니다.
promt.format(adjective="sarcastic") 으로 프롬프트를 확인해보면 {date} 부분에 get_date() 함수로 가져온 현지 날짜와 시간이 바뀌어 있음을 알 수 있습니다. 그리고 LLM 모델의 답변도 "adjective"와 "date"가 바뀌었기 때문에 위와는 다르게 바뀌었네요.
print(prompt.format(adjective="sarcastic"))
# Tell me a sarcastic joke about the day 01/04/2024, 00:02:09


response = chain.invoke({"adjective": "sarcastic"})
print(response)

# Q: What did the clock say to the person at 00:01:20 on 1/4/2024?
# A: "Happy Birthday, a day late!"
Zero-shot, One-shot, Few-shot prompting은 특히 자연어 처리나 이미지 생성과 관련된 머신러닝 모델에서, 모델이 데이터를 어떻게 훈련하거나 사용하는지에 대해 설명할 때 사용됩니다. 이 용어들은 훈련 또는 추론 중에 모델에 제공되는 예제의 수와 관련이 있습니다.
1. Zero-Shot Prompting
- 이는 모델이 수행해야 할 작업에 대한 예제가 전혀 제공되지 않는 시나리오를 의미합니다. 모델은 오로지 사전 훈련과 프롬프트의 지시에만 의존합니다.
- 예시: 언어 모델에게 영어에서 프랑스어로 문장을 번역하라고 요청하는 것이며, 이때 이전의 번역 예제는 제공되지 않습니다.
2. One-Shot Prompting
- 이 경우 모델은 수행해야 할 작업의 한 가지 예제(a single example)를 제공받습니다. 이는 모델이 기대하는 형식이나 응답 유형을 이해하는 데 도움이 됩니다.
- 예시: 언어 모델에게 새로운 농담을 만들기 전에 한 가지 농담 예제를 보여주는 것입니다. 이 예제는 템플릿이나 가이드 역할을 합니다.
3. Few-Shot Prompting
- 여기서는 모델에게 작업을 더 잘 이해할 수 있도록 소수의 예제(하나 이상이지만 일반적으로 많지 않음)가 제공됩니다.
- 예시: 언어 모델에게 긴 텍스트를 한 단락으로 요약하는 세 가지 다른 예제를 제공한 후 새로운 텍스트를 요약하도록 요청하는 것입니다.
각 경우에서 모델은 제공된 프롬프트의 정보를 사용하여 요청된 작업을 더 잘 이해하고 완수합니다. Zero-shot, One-shot, Few-shot prompting의 효과는 작업의 복잡성과 모델의 능력에 따라 다를 수 있습니다.
이번 포스팅에서는 LLM Models 대신에 Chat Models 과 LangChain을 사용하여 Few-shot Prompting 하는 방법을 소개하겠습니다.
(1) Chat Model 에 고정된 개수의 몇 개의 예시를 주는 Few-shot Prompting
(2) Chat Model 에 사용자 인풋과 유사한 top k 개의 예시를 선별해서 주는 Dynamic Few-shot Prompting
LangChain - Few-shot Prompting for Chat Models
(1) Chat Model 에 고정된 개수의 몇 개의 예시를 주는 Few-shot Prompting
먼저 터미널에서 pip install 로 langchain, openai, faiss-cup 모듈을 설치합니다.
! pip install -q langchain openai faiss-cpu
그리고, 실습에 필요한 모듈을 importing 하고, Chat Model로 ChatGPT-4를 사용할 것이므로 OnenAI API Key를 등록해줍니다.
from langchain.embeddings import OpenAIEmbeddings
from langchain.prompts import FewShotPromptTemplate, PromptTemplate
from langchain.prompts.example_selector import SemanticSimilarityExampleSelector
from langchain.vectorstores import FAISS
#from langchain.llms import OpenAI
from langchain.chat_models import ChatOpenAI
from langchain_core.output_parsers import StrOutputParser

# set environment: OpenAI API Key
import os
os.environ["OPENAI_API_KEY"]="sk-xxxx..." # set with yours
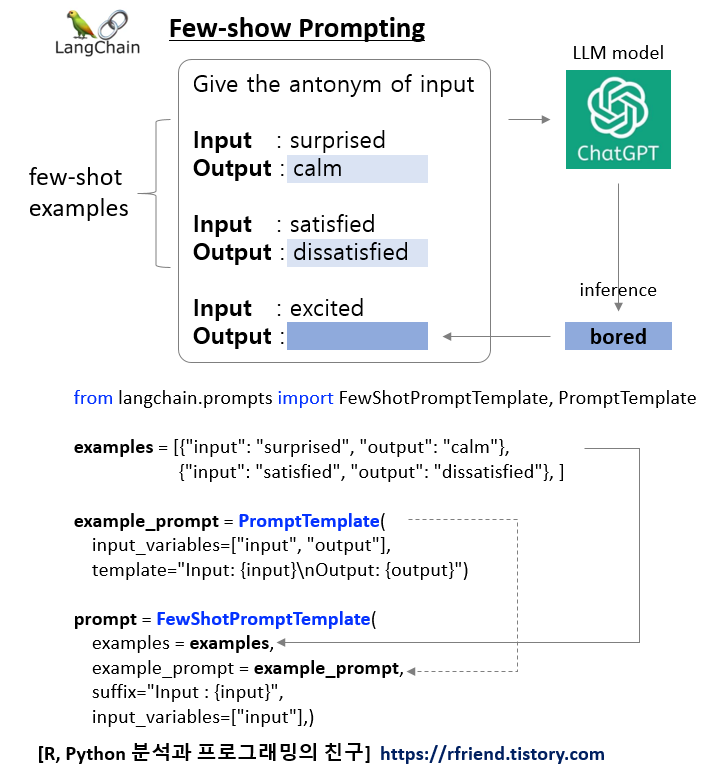
(a) Few-shot Prompting에 사용할 몇 개의 예시를 작성합니다.
(b) 그리고 ChatPromptTemplate() 를 사용해서 ("human": "{input}"), ("ai", "{output}") 처럼 Human과 AI의 역할에 인풋과 아웃풋을 매핑해줍니다 (이 부분이 LLM Model과 Chat Model이 다른 부분임).
(c) 그 다음에 FewShotChatMessagePromptTemplate()에 앞서 정의해준 examples, example_prompt를 각 각 설정해줍니다.
(d) 마지막으로 ChatPromptTemplate.from_messages() 으로 앞에서 정의해준 예시와 Prompt 포맷을 다 조합해서 최종 Few-shot Prompt 를 작성해줍니다. 이때 "system"에게 페르소나를 지정해주는 것과 마지막에 "human"의 "input"이 추가되었습니다.
# (a) Fixed Examples
# Define examples of creating antonyms
examples = [
    {"input": "happy", "output": "sad"},
    {"input": "tall", "output": "short"},
    {"input": "sunny", "output": "rainy"},
    {"input": "surprised", "output": "calm"},
    {"input": "dry", "output": "humid"},
    {"input": "hot", "output": "cold"},
    {"input": "satisfied", "output": "dissatisfied"},
]


# (b) A prompt template used to format each individual example.
example_prompt = ChatPromptTemplate.from_messages(
    [
        ("human", "{input}"),
        ("ai", "{output}")
    ]
)

# (c) Assemble them into the few-shot prompt template
few_shot_prompt = FewShotChatMessagePromptTemplate(
    example_prompt = example_prompt,
    examples = examples,
)

print(few_shot_prompt.format())
# Human: happy
# AI: sad
# Human: tall
# AI: short
# Human: sunny
# AI: rainy
# Human: surprised
# AI: calm
# Human: dry
# AI: humid
# Human: hot
# AI: cold
# Human: satisfied
# AI: dissatisfied


# (d) Finally, assemble the final prompt and use it with a model
final_prompt = ChatPromptTemplate.from_messages(
    [
        ("system", "You are a trustwordy AI assistant."),
        few_shot_prompt,
        ("human", "{input}")
    ]
)
앞에서 정의한 Few-shot Prompt와 Chat Model, 그리고 Output Parser를 '|'를 사용해서 Chaining 해줍니다.
# Chat Model
model = ChatOpenAI(model="gpt-4")

# Output Parser
parser = StrOutputParser()

# Chaining
chain = final_prompt | model | parser
앞에서 정의한 chain을 invoke()를 사용해서 실행시켜줍니다.
chain.invoke({"input": "excited"}) ==> 'bored'
chain.invoke({"input": "snowy"}) ==> 'sunny'
라고 답변하는걸 보니 Few-shot Prompting이 잘 작동하네요.
## Run the chain

chain.invoke({"input": "excited"})
# 'bored'

chain.invoke({"input": "snowy"})
# 'sunny'
(2) Chat Model 에 사용자 인풋과 유사한 top k 개의 예시를 선별해서 주는 Dynamic Few-shot Prompting
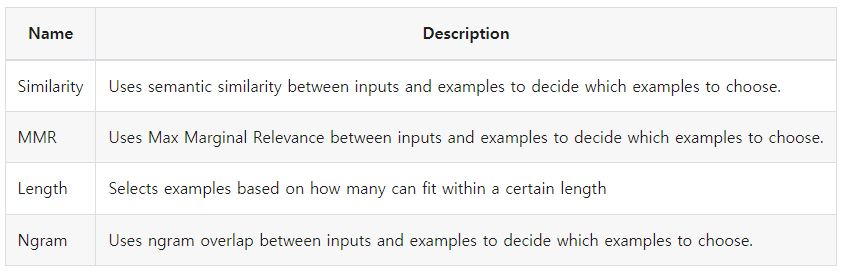
LangChain은 여러개의 예시 중에서 몇 개의 예시만을 선별해서 Few-shot Prompting을 할 수 있도록 4가지 종류의 Example Selector를 제공합니다.
[ LangChain: Example Selector Types ]
LangChain Example Selector Types
이중에서 인풋과 예시를 임베딩으로 변환한 후에, 각 임베딩 벡터간 코사인 유사도를 계산해서, 사용자의 인풋과 가장 유사한 k개의 예시를 선택해주는 Semantic Similarity Example Selector를 사용해보겠습니다. 임베팅 변환은 OpenAI의 OpenAIEmbeddings() 를 사용하였으며, 임베딩 벡터를 저장하고 유사도 검색을 하는 Vector DB는 FAISS를 사용하였습니다.
FewShotChatMessagePromptTemplate() 에 (예제 대신에) Example Selector를 설정해주고, ChatPromptTemplate.from_messages()에 "human"과 "ai"의 메시지 포맷을 설정해줍니다. 그리고 인풋으로 받는 변수 input_variables=["input"] 을 설정해주면 됩니다.
# Select examples based on similarity to the inputs
# by finding the examples with the embeddings that have the greatest cosine similarity with the inputs.
example_selector = SemanticSimilarityExampleSelector.from_examples(
    # the list of examples available to select from.
    examples,
    # The embedding class used to produce embeddings which are used to measure semantic similarity.
    OpenAIEmbeddings(),
    # The VectorStore class used to store the embeddings and do a similarity search over.
    FAISS,
    # the number of examples to produce.
    k=2,
)


similar_prompt = FewShotChatMessagePromptTemplate(
    # we provide an ExampleSelector instead of examples.
    example_selector=example_selector,
    # Define how each example will be formatted.
    example_prompt=ChatPromptTemplate.from_messages(
        [("human", "{input}"), ("ai", "{output}")]
    ),
    input_variables=["input"]
)
k=2 로서 사용자 인풋과 가장 유사한(즉, 인풋과 예제 임베딩 간 코사인 유사도가 가장 큰) 2개의 예제를 Example Selector를 사용해 선별해보겠습니다.
"excited"를 인풋으로 넣었더니 감정에 해당하는 예제 2개를 잘 선택했습니다.
"snowy"를 인풋으로 넣엏더니 날씨에 해당하는 예제 2개를 잘 선택했습니다. ^^b
# "excited" is a Feeling, k=2
example_selector.select_examples({"input": "excited"})
# [{'input': 'surprised', 'output': 'calm'}, {'input': 'happy', 'output': 'sad'}]


# "snowy" is a Weather, k=2
example_selector.select_examples({"input": "snowy"})
# [{'input': 'sunny', 'output': 'rainy'}, {'input': 'hot', 'output': 'cold'}]
ChatPromptTemplate.from_messages() 로 "system"의 페르소나를 지정해주고, 앞에서 Example Selector를 사용한 Few-shot Prompt 와 "human"의 "input" 까지 조합해주면 최종 프롬프트가 완성됩니다.
# Assemble the final prompt template
final_prompt = ChatPromptTemplate.from_messages(
    [
        ("system", "You are a trustwordy AI assistant."),
        similar_prompt,
        ("human", "{input}"),
    ]
)


print(final_prompt.format(input="excited"))
# System: You are a trustwordy AI assistant.
# Human: surprised
# AI: calm
# Human: happy
# AI: sad
# Human: excited
final_prompt, Chat Model, 그리고 Output Parser를 '|'를 사용해서 Chaining 해줍니다.
LLM(Large Language Model, 대규모 언어 모델)에서의 Few-shot prompting는 GPT-3나 GPT-4 같은 모델에 소수의 예시(보통 하나에서 다섯 사이)를 제공하여 그 반응을 안내하거나 특정 작업을 가르치는 기술을 말합니다. 이는 '프롬프트 엔지니어링 (Prompt Engineering)'이라고 하는 더 넓은 범위의 기술 중 하나로, 이는 이러한 AI 모델과 효과적으로 소통하기 위해 입력(프롬프트)을 설계하는 예술입니다.
Few-shot prompting에서는 모델에게 주어진 예시들이 패턴을 보여주거나 특정한 반응 방식을 가르치기 위해 신중하게 선택됩니다. 그런 다음 모델은 이 예시들을 참조로 사용하여 자신의 반응에서 기대되는 것을 이해합니다. 이는 단순한 지시만으로는 모델이 의도된 작업을 충분히 이해하기 어려운 복잡하거나 미묘한 작업에 특히 유용합니다.
Few-shot prompting에 대한 주요 포인트는 다음과 같습니다.
- 예시를 통한 시연 (Demonstration through Examples): 특정 예시를 제공함으로써 모델에게 어떤 종류의 출력이 기대되는지를 보여줍니다. 이는 분류, 번역 또는 심지어 창의적 글쓰기와 같은 작업에 특히 도움이 될 수 있습니다.
- 모호성 감소 (Reduction in Ambiguity): Few-shot prompting는 작업 지시에서 모호성을 줄여 모델에게 무엇을 해야 하는지 더 명확하게 합니다.
- 유연성과 적응성 (Flexibility and Adaptability): 이 방법은 모델이 재교육이나 핵심 알고리즘에 대한 업데이트 없이도 새로운 작업에 적응할 수 있게 해줍니다.
- 효율성 (Efficiency): 퓨샷 학습은 새로운 작업에 모델을 적응시키기 위해 대량의 데이터나 광범위한 파인튜닝이 필요하지 않다는 점에서 효율적입니다.
- 예시 품질에 대한 의존성 (Dependency on Example Quality): Few-shot prompting의 효과는 제공된 예시의 품질과 관련성에 크게 의존합니다. 잘못 선택된 예시는 모델로 하여금 부적절하거나 잘못된 반응을 할 수 있게 만듭니다.
전반적으로, Few-shot prompting은 특히 모델 Finetuning 이나 대규모 데이터셋이 실행 가능하지 않은 상황에서 LLM의 능력을 유연하고 효율적으로 활용하기 위한 강력한 도구입니다.
이번 포스팅에서는 LangChain과 ChatGPT LLM 모델을 사용하여 Few-shot Prompting 하는 방법을 소개하겠습니다.
1. 몇 개의 예시를 제공하여 LLM 모델에게 특정 출력을 지시하는 Few-shot Prompting
2. 사용자 인풋과의 유사도에 따라 예시를 선택해서 LLM 모델에 Few-show Prompting 하기
1. 몇 개의 예시를 제공하여 LLM 모델에게 특정 출력을 지시하는 Few-shot Prompting
먼저 터미널에서 pip install 을 이용하여 langchain, openai, faiss-cpu 모듈을 설치합니다.
! pip install -q langchain openai faiss-cpu
필요한 모듈을 importing 합니다.
from langchain.embeddings import OpenAIEmbeddings
from langchain.prompts import FewShotPromptTemplate, PromptTemplate
from langchain.prompts.example_selector import SemanticSimilarityExampleSelector
from langchain.vectorstores import FAISS
from langchain.llms import OpenAI
from langchain_core.output_parsers import StrOutputParser
OpenAI의 LLM 모델을 사용할것이므로 OpenAI API Key를 등록합니다.
import os

os.environ["OPENAI_API_KEY"]="sk-xxxx..." # set with yours
Few-shot Prompting을 하기 위해 다음의 순서대로 Prompt 를 작성합니다.
(1) 몇 개의 예시를 작성 (아래 예에서는 Input 의 반대말을 Output으로 출력하는 7개 예시)
(2) PromptTemplate()로 예시의 인풋 변수와 예시 템플릿 포맷을 생성
(3) FewShotPromptTemplate()에 (1) 예시, (2) 예시 PromptTemplate을 입력하여 Prompt 생성
2. 사용자 인풋과의 유사도에 따라 예제를 선택해서 LLM모델에 Few-show Prompting 하기
여러개의 예시 중에서 사용자 인풋과 유사하고 관련성이 높은 예시를 선별해 Prompt를 만들어서 LLM 모델에 전달하면 Token의 개수가 줄어들어서 비용이 줄어들고 Latency가 향상되는 효과, 그리고 LLM 모델이 좀더 향상된 답변을 제시할 수 있는 효과가 있습니다.
이번 포스팅에서는 예시와 사용자 인풋을 Text Embeddings 변환하여, Cosine Similarity가 가장 높은 k개의 예시를 선별해서 Few-shot Prompt에 넣어서 LLM 모델에 전달하는 방법을 소개하겠습니다.
예시와 사용자 인풋을 Text Embeddings 변환하는 것은 OpenAIEmbeddigns() 를 사용하였으며, 임베딩 변환된 벡터를 저장하고 코사인 유사도 계산을 하는 것은 FAISS 벡터 DB를 사용하였습니다.
# Select examples based on similarity to the inputs
# by finding the examples with the embeddings that have the greatest cosine similarity with the inputs.
example_selector = SemanticSimilarityExampleSelector.from_examples(
    # the list of examples available to select from.
    examples,
    # The embedding class used to produce embeddings which are used to measure semantic similarity.
    OpenAIEmbeddings(),
    # The VectorStore class used to store the embeddings and do a similarity search over.
    FAISS,
    # the number of examples to produce.
    k=2,
)


similar_prompt = FewShotPromptTemplate(
    # we provide an ExampleSelector instead of examples.
    example_selector=example_selector,
    example_prompt=example_prompt,
    prefix="Give the antonym of every input",
    suffix="Input: {input}\nOutput:",
    input_variables=["input"]
)
k=2 로 설정하여 사용자 인풋과 Semantic Similarity 가 가장 높은 2개의 예시를 선택하도록 하였습니다.
아래의 예를 보면, 먼저 "excited"의 경우 감정에 해당하므로 "surprised", "satisfied" 의 두 개 예시가 선택되었습니다.
# Input is a feeling
print(similar_prompt.format(input="excited"))

# Give the antonym of every input

# Input: surprised
# Output: calm

# Input: satisfied
# Output: disappointed

# Input: excited
# Output:
위에서 Semantic Similarity 기준의 Example Selector 로 정의한 similar_prompt 를 LLM 모델과 Output Parser 와 함께 '|'로 chaining 하였습니다. fewshot_similar_chain.invoke() 로 실행을 해보겠습니다.
감정에 해당하는 "excited"를 사용자 인풋으로 넣어주면 "surprised", "satisfied"에 대한 예시를 Prompt에 함께 넣어서 ChatGPT LLM 모델에 보내게 되고, ChatGPT LLM 모델은 "excited"에 대한 반대말로 "bored"를 Output으로 반환하였습니다.
날씨에 해당하는 "snowy"를 사용자 인풋으로 넣었더니 k=2 개의 Semantic Similarity가 높은 예시로 "sunny", "hot"의 2개 예시가 적절하게 잘 선택되었습니다.
# Input is a weather
print(similar_prompt.format(input="snowy"))

# Give the antonym of every input

# Input: sunny
# Output: rainy

# Input: hot
# Output: cold

# Input: snowy
# Output:
fewshot_similar_chain.invoke({"input": "snowy"}) 로 Few-shot Prompting ("sunny", "hot"의 2개 예시)하여 ChatGPT LLM 모델을 실행시켰더니 "dry"라는 Output을 생성하였습니다.
ChatGPT와 같은 LLM 모델을 이용한 질의응답 시에 제약조건으로 지식단절(Knowledge Cutoff)이 있습니다.
지식단절 (Knowledge Cutoff)이란 LLM 모델이 학습에 사용한 데이터가 생성된 시점 이후의 새로운 사건, 정보에 대해서는 학습이 안되어서 답변 생성이 불가능한 것을 말합니다.
지식단절의 한계를 극복하는 방법으로 최신의 데이터를 계속 수집해서 자주 LLM 모델을 Fine-tuning 해주는 방법이 있습니다. 하지만 이는 비용과 시간이 많이 듭니다.
지식단절의 한계를 극복하는 또 다른 방법으로는 웹 검색 툴을 추가하여, 사용자의 질문에 해당하는 최신의 공개된 정보를 웹 검색을 통해 가져와서, 이 최신 공개 정보를 컨텍스트 정보로 하여 LLM 모델이 답변을 생성하도록 할 수 있습니다. 이는 앞서 말한 Fine-tuning 기법 대비 상대적으로 비용과 시간이 적게 들고 바로 적용해볼 수 있는 장점이 있습니다.
이번 포스팅에서는 LangChain 을 이용하여 DuckDuckGo Web Search Tool을 추가해 사용자 질의에 해당하는 최신 정보를 검색하고, ChatGPT LLM 모델이 이를 컨텍스트 정보로 삼아 답변을 생성하는 방법을 소개하겠습니다.
from langchain.chat_models import ChatOpenAI
from langchain.prompts import ChatPromptTemplate
from langchain_core.output_parsers import StrOutputParser
from langchain_core.runnables import RunnablePassthrough
OpenAI API Key를 환경변수로 등록해줍니다.
import os

os.environ["OPENAI_API_KEY"] = "sk-xxxx..." # set with yours
(1) Web Search Tool을 사용하지 않았을 때의 지식 단절 (Knowledge Cutoff)
먼저, Web Search Tool을 사용하지 않고 ChatGPT LLM 모델만을 가지고 최신 정보가 필요한 질문을 했을 때 지식 단절로 인해 적절한 답변을 못하는 현상을 살펴보겠습니다.
template = """You are an AI assistant. Answer the question.
If you don't know the answer, just say you don't know.

Question: {question}
Answer:"""

prompt = ChatPromptTemplate.from_template(template)
model = ChatOpenAI(model="gpt-4")
parser = StrOutputParser()

chain = prompt | model | parser
아래처럼 "누가 BTS 멤버 중에 가장 늦게 군대에 갔나요?" 라고 질문을 했을 때 ChatGPT-4 모델이 최신의 실시간 데이터를 제공할 수 없다고 답변합니다. (가상의 그럴싸한 거짓말을 하는 환각(Hallucinations) 현상을 일으키지 않아서 그나마 다행이예요.)
## -- 지식 단절 (Knowledge Cutoff)
chain.invoke({"question": "Which BTS member was the last to go to the military?"})

# "As an AI developed up to October 2021, I can't provide real-time data.
# As of my last update, none of the BTS members have begun their military service yet.
# In South Korea, all able-bodied men are required to serve in the military
# for approximately two years. Please check the most recent sources for this information."
(2) Web Search Tool을 사용하여 최신 정보를 검색해 지식 단절 (Knowledge Cutoff) 극복하기
이번에는 DuckDuckGo Search Tool을 추가해서 최신 정보를 웹에서 검색해 가지고 와서, 이를 컨텍스트 정보로 하여 답변을 생성해보도록 하겠습니다.
## Adding Web Search Tools
from langchain.tools import DuckDuckGoSearchRun

search = DuckDuckGoSearchRun()

## Provide "the latest context information" from web search
template = """Answer the question based on context.

Question: {question}
Context: {context}
Answer:"""

prompt = ChatPromptTemplate.from_template(template)
model = ChatOpenAI(model="gpt-4")
parser = StrOutputParser()

chain = (
    {"question": RunnablePassthrough(), "context": RunnablePassthrough()}
    | prompt
    | model
    | parser
)
먼저, DuckDuckGo Search tool 이 잘 작동하나 살펴보겠습니다.
search_result = search.run("Which BTS member was the last to go to the military?")

print(search_result)

# The last two members, Jimin and Jungkook, began their 18-month military duty
# in South Korea on Tuesday. Some fans say they should have been exempt. 24 BTS in 2019.
# Any potential reunion... South Korea Final Members of K-Pop Band BTS Begin Mandatory
# South Korean Military Service This video cannot be played because of a technical error.
# (Error Code: 102006) By Kim Tong-hyung / AP... Updated Dec 15, 2023, 11:01 AM
# SGT SEOUL - South Korean singers Jimin and Jungkook of K-pop boy band BTS
# began their mandatory military service on Dec 12. They are the last of the...
# Last October, BTS's agency BigHit Music owned by HYBE, confirmed that all seven members
# of the band would fulfil their country's military obligation, starting with the eldest,
# Jin, who... BTS formed in 2013 with seven members: RM, Jin, V, J-Hope, Suga,
# Jimin and Jungkook. The band went on to achieve global fame,
# with number one singles in more than 100 countries around the...
다음으로, DuckDuckGo 웹 검색 결과를 컨텍스트로 하여 답변을 생성해보겠습니다.
2024년 1월을 기준으로 했을 때, BTS 멤버 중에 가장 늦게 군대에 간 멤버가 "지민과 정국 (Jimin and Jungkook)" 이라고 이번에는 정확하게 답변을 해주네요!
question = "Which BTS member was the last to go to the military?"

chain.invoke({"question": question, "context": search.run(question)})
# 'Jimin and Jungkook'
LangChain과 LLM 모델을 사용하여 애플리케이션을 만들 때 필요에 따라서 여러개의 템플릿(templates)을 미리 작성해 놓고, 사용자의 질문과 가장 유사한 (most similar, most relavant) 템플릿을 선택해서 LLM 모델로 질문과 템플릿을 인풋으로 보낼 수 있다면 보다 맞춤형의 답변을 생성할 수 있을 것입니다.
LangChain - Routing templates dynamically by semantic search
시맨틱 검색은 임베딩과 코사인 유사도를 사용하는 것은 자연어 처리 및 정보 검색에서 검색 결과의 관련성과 정확성을 향상시키기 위해 쿼리의 의미에 기반하여 사용되는 방법입니다.
1. 시맨틱 검색 (Semantic Search): 전통적인 검색 엔진은 종종 정확한 키워드 일치에 의존합니다. 반면에 시맨틱 검색은 검색 쿼리의 의도와 맥락적 의미를 이해하려고 합니다. 동의어, 관련 용어 및 전체 맥락과 같은 언어의 뉘앙스를 해석하여 더욱 관련성 높은 결과를 제공하려고 합니다.
2. 임베딩 (Embeddings): 시맨틱 이해를 달성하기 위해 시스템은 임베딩을 사용합니다. 임베딩은 단어, 구, 문장 또는 전체 문서를 고차원 공간에서 수치적으로 표현한 것입니다. 이러한 표현은 대규모 데이터셋에서 학습되며 단어 간의 의미 관계를 포착합니다. 예를 들어, 잘 훈련된 임베딩 공간에서는 유사한 의미를 가진 단어들이 서로 가까이 위치합니다.
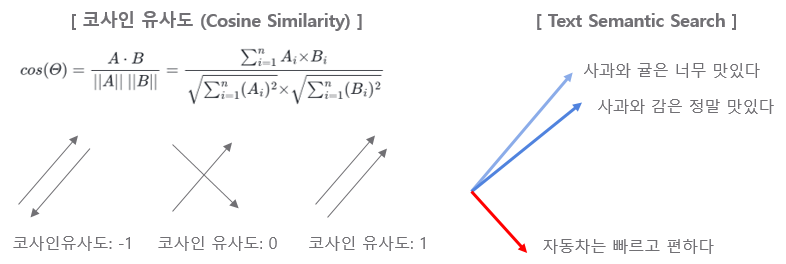
3. 코사인 유사도 (Cosine Similarity): 텍스트(검색 쿼리와 검색 가능한 문서 모두)를 임베딩으로 변환한 후, 시스템은 얼마나 유사한지 측정할 방법이 필요합니다. 이를 위해 흔히 사용되는 척도는 코사인 유사도입니다. 코사인 유사도는 두 벡터(이 경우, 쿼리와 문서의 임베딩) 사이의 각도의 코사인을 측정합니다. 코사인 유사도가 1에 가까우면 매우 작은 각도를 나타내고, 따라서 높은 유사도를 의미합니다. 반대로, 코사인 유사도가 0에 가까우면 큰 각도와 낮은 유사도를 나타냅니다.
4. 검색에서의 적용 (Application in Search): 사용자가 쿼리를 제출하면, 시스템은 이를 임베딩으로 변환한 다음 이 임베딩과 데이터베이스의 다양한 문서들의 임베딩 간의 코사인 유사도를 계산합니다. 코사인 유사도 점수가 더 높은 문서는 쿼리와 더 관련이 있다고 간주되어 검색 결과에서 더 높은 순위를 차지합니다.
이러한 접근 방식은 시스템이 사용자 쿼리의 의미적 내용을 더 잘 포착하고 응답할 수 있게 하여, 단순히 특정 단어를 일치시키는 것보다 더 미묘하고 효과적인 검색 경험을 가능하게 합니다.
[ 코사인 유사도와 시맨틱 검색 ]
Cosine Similarity and Text Semantic Search
LangChain과 ChatGPT LLM 모델을 사용해서 여러개의 템플릿을 미리 만들어놓고 질문에 가장 유사한 템플릿을 선택해서 대답을 생성하는 간단한 챗봇을 만들어보겠습니다.
먼저, 터미널에서 langchain, openai, tiktoken 모듈을 pip install을 사용해서 설치합니다.
! pip install -q langchain openai tiktoken
OpenAI의 ChatGPT를 LLM 모델로 사용할 것이므로 OpenAI API Key를 등록해줍니다.
import os

os.environ["OPENAI_API_KEY"] = "sk-xxxx..."
필요한 모듈을 import 하고, Database PostgreSQL 과 관련된 template 1, 그리고 Cloud Kubernetes Docker 관련된 template 2 를 각각 정의해 줍니다.
from langchain.chat_models import ChatOpenAI
from langchain.embeddings import OpenAIEmbeddings
from langchain.prompts import PromptTemplate
from langchain.utils.math import cosine_similarity
from langchain_core.output_parsers import StrOutputParser
from langchain_core.runnables import RunnableLambda, RunnablePassthrough

# Template 1: Database PostgreSQL
database_template = """You are an expert on database, especially open source PostgreSQL.
You are good at answering questions about database in a concise manner.

Here is a question:
{query}"""


# Template 2: Colud, Kubernetes, Docker
cloud_template = """You are an expert on cloud platform.
You are good at answering questions especially on kubernetes and docker.
The user is from Korean. Answer the question in Korean.

Here is a question:
{query}
"""
Text Embedding 모델로는 OpenAI의 1,536 차원을 가진 "text-embedding-ada-002" 를 사용하겠습니다.
임베딩과 시맨틱 검색 (semantic search) 이 잘 작동하는지를 확인하기 위해 아래에 PostgreSQL Database, K8s and Docker 관련된 질문을 각각 해봤습니다. 코사인(Cosine Similarity)는 -1~1 사이의 값을 가지면 1에 가까울 수록 서로 유사하다고 판단할 수 있는데요, 첫번째 PostgreSQL 관련 질문에는 database_template 이 유사하다고 나왔고, 두번째 K8s and Docker 관련 짊누에서는 cloud_template 이 더 유사한 것으로 나왔으니 의도한 대로 잘 작동하네요.
chain.invoke("What is PostgreSQL database?")

# Using Database
# 'PostgreSQL is an open-source relational database management system (RDBMS)
# that offers advanced features and strong data integrity. It is widely known
# for its robustness, scalability, and SQL compliance.
# PostgreSQL supports various data types, including structured, semi-structured,
# and unstructured data, making it suitable for a wide range of applications.
# It offers features like ACID compliance, MVCC, JSON support, full-text search,
# and extensive extensibility through procedural languages and extensions.
# PostgreSQL is highly customizable and can be used for small to large-scale applications,
# making it a popular choice among developers and enterprises.'
의도한 대로, 그리고 템플릿에 지시문을 작성한 대로 잘 작동하네요.
(cloud_template 에는 사용자가 한국인이므로 한글로 답변을 생성하라고 지시문을 추가했었습니다.)
chain.invoke("What is Kubernetes and Docker?")

# Using Cloud
# 'Kubernetes와 Docker는 모두 컨테이너화된 애플리케이션을 관리하기 위한 클라우드 플랫폼 도구입니다.
# Docker는 컨테이너 기반 가상화 기술을 제공하는 플랫폼입니다.
# 컨테이너는 애플리케이션을 격리된 환경에서 실행하고, 이식성과 확장성을 높여줍니다.
# Docker는 애플리케이션의 종속성을 패키징하고 배포할 수 있도록 도와주며,
# 애플리케이션을 컨테이너 이미지로 만들어 관리합니다.
# Kubernetes는 컨테이너 오케스트레이션 플랫폼으로, 도커 컨테이너의 배포, 확장, 관리를
# 자동화합니다. Kubernetes는 여러 호스트에 걸쳐 컨테이너를 스케줄링하고, 서비스 디스커버리,
# 로드 밸런싱, 자가 치유 등의 기능을 제공하여 애플리케이션 운영을 단순화합니다.
# 또한 Kubernetes는 컨테이너의 상태를 모니터링하고 필요한 조치를 취할 수 있어
# 안정적인 운영을 지원합니다.\n\n요약하자면, Docker는 컨테이너 기반 가상화 기술을 제공하고,
# Kubernetes는 컨테이너 오케스트레이션 플랫폼으로
# 컨테이너화된 애플리케이션의 배포와 관리를 용이하게 해주는 도구입니다.'
Python REPL(Read-Eval-Print Loop)은 Python 프로그래밍 언어의 대화형 인터프리터 환경을 나타냅니다. 이것은 사용자가 Python 코드를 입력하고 실행하며 결과를 즉시 확인할 수 있는 인터페이스를 제공합니다.
- Read 단계에서 사용자의 입력을 받습니다. - Evaluation 단계에서 입력을 처리하고 Python 표현식으로 평가합니다. - Print 단계에서 평가 결과를 사용자에게 출력합니다. - Loop 단계에서 이 과정을 반복하며 다음 사용자 입력을 기다립니다.
Python - REPL (Read-Eval-Print Loop)
(ChatGPT 에게 Python REPL 컨셉을 그림으로 그려달라고 했더니 위처럼 그렸네요. 나름 잘 그리네요. ㅋㅋ)
다음은 Python REPL이 어떻게 사용되는지에 대한 예시입니다.
>>> 2 + 2
4
>>> print("Hello, World!")
Hello, World!
>>> x = 10
>>> x * 5
50
REPL은 Python 프로그래머들에게 코드 작성, 디버깅, 실험 등을 위한 강력한 도구로 자주 사용됩니다. 사용자가 코드를 입력하면 Python 인터프리터가 해당 코드를 실행하고 결과를 반환하며, 이러한 과정을 반복할 수 있습니다. REPL을 사용하면 빠르게 코드를 테스트하고 작업할 수 있어 개발 과정을 효율적으로 만들어 줍니다.
이번 포스팅에서는 LangChain Expression Language (LCEL)와 ChatGPT를 사용해서 자연어를 인풋으로 입력하면 Python으로 코드를 짜고, Python REPL (Read-Eval-Print Loop) 방식으로 Python 코드를 실행해서 결과를 얻는 방법을 소개하겠습니다.
먼저, langchin과 openai 모듈을 터미널에서 pip install 로 설치합니다.
! pip install -q -U langchain openai
다음으로, OpenAI API Key를 설정해줍니다.
import os

os.environ["OPENAI_API_KEY"] = "sk-xxxx..." # set with yours
Prompt에는 "사용자의 질문을 풀기 위한 Python 코드를 짜라. 사용자가 결과를 확인할 수 있도록 끝에 print(result) 코드를 포함해라. 단지 Python 코드만 반환하고 나머지는 반환하지 마라"는 지시문을 넣어주었습니다.
LLM Model은 ChatGPT-4를 사용하였으며, temperature=0 으로 설정해서 사실에 기반한 일관성있고 보수적인 답변만 생성하도록 하였습니다.
StrOutputParser() 로 LLM 모델이 생성한 답변(즉, Python codes)을 string 포맷으로 파싱합니다.
마지막으로 PythonREPL() 메소드를 사용해서 ChatGPT가 생성한 Python codes 를 Python REPL 모드로 실행합니다.
이러한 모든 절차를 '\'를 사용해서 chaining 해주었습니다.
참고로, 여러개의 chain을 다시 chaining 할 수 있으며, PythonCode_chain 에다가 PythonREPL().run 을 chaing 하여 PythonCodeRun_chain 을 만들었습니다.
# 파이썬 코드 생성 chain (Python codes generation) PythonCode_chain = prompt | model | StrOutputParser()
# 파이썬 코드를 실행해서 결과를 보여주는 chain (Python REPL (Read-Eval-Print Loop)) PythonCodeRun_chain = PythonCode_chain | PythonREPL().run
from langchain.chat_models import ChatOpenAI
from langchain.prompts import ChatPromptTemplate
from langchain_core.output_parsers import StrOutputParser
from langchain_experimental.utilities import PythonREPL

template = """
Write some python  code to solve the user's problem.
Include print(result) at the end for user to check the result.
Return only python code and nothing else."""

prompt = ChatPromptTemplate.from_messages(
    [("system", template), ("human", "{question}")]
)

model = ChatOpenAI(temperature=0, model_name="gpt-4")

#  Python codes generation
PythonCode_chain = prompt | model | StrOutputParser()

# Python REPL (Read-Eval-Print Loop)
PythonCodeRun_chain = PythonCode_chain | PythonREPL().run
자연어로 3가지 질문을 던져보았는데요, ChatGPT-4가 모두 정확하게 Python 코드도 생성하고 잘 풀어주네요.
Q: y = 5 + 3 * x. If x is 10, then what is y?
A: y = 5 + 3 * 10 = 35
## ----------------------------------------
## Q: y= 5 + 3 * x. If x is 10, what is y?
## ----------------------------------------

## (a) Python codes generation
PythonCode_chain.invoke({"question": "y= 5 + 3 * x. If x is 10, what is y?"})
# 'x = 10\ny = 5 + 3 * x\nprint(y)'

## (b) Run Python codes
PythonCodeRun_chain.invoke({"question": "y= 5 + 3 * x. If x is 10, what is y?"})
# '35\n'
Q: What is 2 multiplied by 10?
A: 2 * 10 = 20
## ---------------------------
## Q: What is 2 multiplied by 10?
## ---------------------------

## (a) Python codes generation
PythonCode_chain.invoke({"question": "What is 2 multiplied by 10?"})
# 'result = 2 * 10\nprint(result)'

## (b) Run Python codes
PythonCodeRun_chain.invoke({"question": "What is 2 multiplied by 10?"})
# '20\n'
Q: How much is 5 factorial?
A: 5! = 5 * 4* 3* 2* 1 = 120
## ---------------------------
## Q: How much is 5 factorial?
## ---------------------------

## (a) Python codes generation
PythonCode_chain.invoke({"question": "How much is 5 factorial?"})
# 'import math\n\nresult = math.factorial(5)\nprint(result)'

## (b) Run Python codes
PythonCodeRun_chain.invoke({"question": "How much is 5 factorial?"})
# '120\n'
위에 간단한 자연어 질의에는 모두 정확하게 답변을 했는데요, 그래도 반드시 Python codes 를 확인하는 절차를 밟는게 필요해보입니다.
대규모 언어 모델 (Large Language Model, LLM) 이 사실에 입각하지 않고 그럴싸한 답변을 생성하는 것을 환각 (Hallucinations) 이라고 합니다. LLM의 환각을 방지하는 방법 중의 하나로 RAG (Retrieval-Agumented Generation) 이 많이 사용되고 있는데요, 이전에 소개했던 RAG 는 비정형 데이터인 텍스트를 임베딩하여 Semactic Search를 하여 Context로 사용할 문서를 LLM에 인풋으로 넣어주는 방법이었습니다.
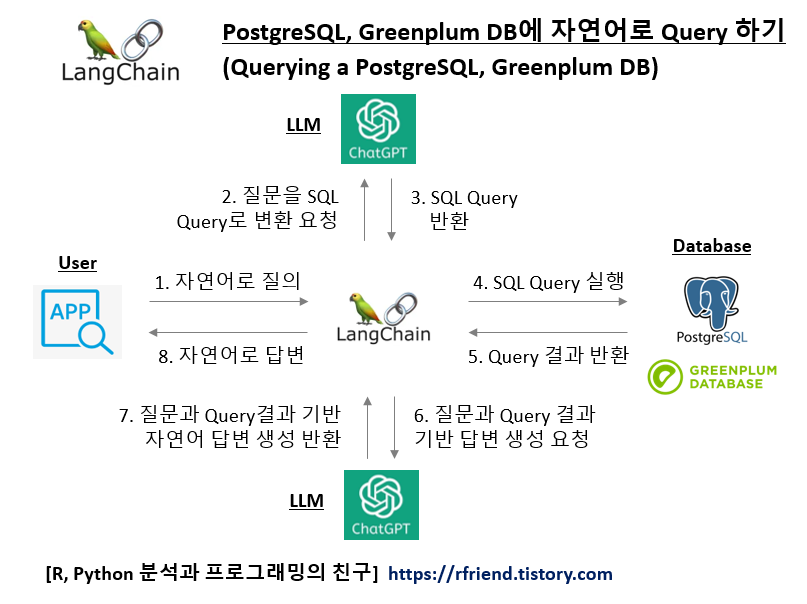
이번 포스팅에서는 LangChain과 ChatGTP를 이용해서 PostgreSQL, Greenplum Database의 테이블에 행, 열의 테이블에 저장되어 있는 정형 데이터 (Structured Data)에 대해서 SQL Query를 사용해서 질의를 해서 사실 (Fact) 데이터를 Query 해와서, 이를 기반으로 LLM 모델이 답변을 생성하는 방법을 소개하겠습니다. 자연어로 질문하고 자연어로 답변을 받게 되면 DB나 SQL Query를 모르는 일반 사용자도 DB에 저장되어 있는 사실에 기반한 최신의 내부 데이터까지도 활용해서 정확한 답변을 받을 수 있게 됩니다.
먼저, PostgreSQL, Greenplum 데이터베이스에 대해서 간략히 소개하겠습니다.
1. PostgreSQL 데이터베이스란?
PostgreSQL, 종종 Postgres로 불리는 이 데이터베이스는 강력한 오픈 소스 객체-관계형 데이터베이스 시스템입니다. 이는 신뢰성, 기능의 견고함, 그리고 성능 면에서 좋은 평판을 가지고 있습니다.
PostgreSQL은 객체-관계형 데이터베이스로서, 전통적인 관계형 데이터베이스 기능인 테이블 기반 데이터 저장 및 SQL(Structured Query Language) 쿼리와 더불어 객체 지향 데이터베이스 기능인 객체와 클래스에 데이터를 저장하는 것을 지원합니다.
이는 무료로 자유롭게 사용할 수 있는 오픈 소스 소프트웨어입니다. 그 소스 코드는 누구나 열람하거나 개선하길 원하는 사람에게 공개되어 있습니다.
PostgreSQL의 핵심 강점 중 하나는 확장성입니다. 사용자는 자신만의 데이터 타입, 인덱스 타입, 함수 언어 등을 정의할 수 있습니다.
2. Greenplum 데이터베이스란?
Greenplum 데이터베이스는 고급 기능을 갖춘 오픈 소스 데이터 웨어하우스입니다. 이는 페타바이트 규모의 빅데이터에 대해 강력하고 빠른 분석을 제공합니다. 원래 PostgreSQL에서 파생되었지만, Greenplum 데이터베이스는 그 능력과 성능을 크게 확장해 발전시켰습니다.
Greenplum은 Shared-Nothing, 대규모 병렬 처리 아키텍처(Massively Parallel Processing Architecture, MPP)를 사용합니다. 이는 데이터가 여러 세그먼트로 나뉘고 각 세그먼트가 병렬로 처리되어 고성능 및 대규모 데이터 분석을 가능하게 한다는 의미입니다.
확장성(Scalability)을 위해 설계된 Greenplum은 큰 데이터 볼륨을 처리할 수 있습니다. 이는 많은 서버에 걸쳐 확장되어 큰 데이터 볼륨과 복잡한 쿼리를 관리할 수 있습니다.
Greenplum은 고급 분석 기능을 지원합니다. 이는 Python, R 및 기타 통계 및 머신 러닝 라이브러리와 통합되어 데이터베이스 내에서 고급 데이터 분석을 직접 수행할 수 있게 합니다.
(1) 사용자가 애플리케이션에서 자연어로 질의 (2) LangChain이 LLM 모델에 사용자 질문을 SQL Query로 변환 요청 (3) LLM 모델이 DB Schema 정보에 기반해 사용자 질문에 대한 SQL Query를 생성해서 반환 (4) LangChain이 PostgreSQL, Greenplum DB에 SQL Query 실행 요청 (5) PostgreSQL, Greenplum DB에서 SQL Query 실행하여 결과 반환 (6) LangChain이 사용자 질문과 SQL Query, Query 결과를 기반으로 LLM 모델에 답변 생성 요청 (7) LLM 모델이 사용자 질문과 Query 결과를 기반으로 생성한 자연어 답변 반환 (8) LangChain이 애플리케이션의 사용자 UI에 LLM 모델이 생성한 자연어 답변 반환
(0) 준비사항: PostgreSQL에 예제 테이블 생성하고 데이터 집어넣기
먼저, 예제로 사용할 PostgreSQL DB에 iris 라는 테이블을 만들어보겠습니다. 그리고, 나중에 자연어로 질의할 내용을 미리 SQL Query로 결과를 조회해보았습니다.
DROP TABLE IF EXISTS iris;
CREATE TABLE iris (id INT, sepal_length FLOAT, sepal_width FLOAT,
                    petal_length FLOAT, petal_width FLOAT,
                   class_name text);

INSERT INTO iris VALUES
(1,5.1,3.5,1.4,0.2,'Iris-setosa'),
(2,4.9,3.0,1.4,0.2,'Iris-setosa'),
(3,4.7,3.2,1.3,0.2,'Iris-setosa'),
(4,4.6,3.1,1.5,0.2,'Iris-setosa'),
(5,5.0,3.6,1.4,0.2,'Iris-setosa'),
(6,5.4,3.9,1.7,0.4,'Iris-setosa'),
(7,4.6,3.4,1.4,0.3,'Iris-setosa'),
(8,5.0,3.4,1.5,0.2,'Iris-setosa'),
(9,4.4,2.9,1.4,0.2,'Iris-setosa'),
(10,4.9,3.1,1.5,0.1,'Iris-setosa'),
(11,7.0,3.2,4.7,1.4,'Iris-versicolor'),
(12,6.4,3.2,4.5,1.5,'Iris-versicolor'),
(13,6.9,3.1,4.9,1.5,'Iris-versicolor'),
(14,5.5,2.3,4.0,1.3,'Iris-versicolor'),
(15,6.5,2.8,4.6,1.5,'Iris-versicolor'),
(16,5.7,2.8,4.5,1.3,'Iris-versicolor'),
(17,6.3,3.3,4.7,1.6,'Iris-versicolor'),
(18,4.9,2.4,3.3,1.0,'Iris-versicolor'),
(19,6.6,2.9,4.6,1.3,'Iris-versicolor'),
(20,5.2,2.7,3.9,1.4,'Iris-versicolor'),
(21,6.3,3.3,6.0,2.5,'Iris-virginica'),
(22,5.8,2.7,5.1,1.9,'Iris-virginica'),
(23,7.1,3.0,5.9,2.1,'Iris-virginica'),
(24,6.3,2.9,5.6,1.8,'Iris-virginica'),
(25,6.5,3.0,5.8,2.2,'Iris-virginica'),
(26,7.6,3.0,6.6,2.1,'Iris-virginica'),
(27,4.9,2.5,4.5,1.7,'Iris-virginica'),
(28,7.3,2.9,6.3,1.8,'Iris-virginica'),
(29,6.7,2.5,5.8,1.8,'Iris-virginica'),
(30,7.2,3.6,6.1,2.5,'Iris-virginica');

SELECT * FROM iris ORDER BY id LIMIT 5;
-- 5.1	3.5	1.4	0.2	"Iris-setosa"
-- 4.9	3	1.4	0.2	"Iris-setosa"
-- 4.7	3.2	1.3	0.2	"Iris-setosa"
-- 4.6	3.1	1.5	0.2	"Iris-setosa"
-- 5	3.6	1.4	0.2	"Iris-setosa"

SELECT
    AVG(sepal_length)
FROM iris
WHERE class_name = 'Iris-setosa';
-- 4.859999999999999

SELECT
	class_name,
	AVG(sepal_length)
FROM iris
GROUP BY class_name
ORDER BY class_name;

-- class_name         avg
-- "Iris-setosa"	  4.85
-- "Iris-versicolor"  6.10
-- "Iris-virginica"   6.57


SELECT
	class_name
	, MAX(sepal_width)
FROM iris
GROUP BY class_name
ORDER BY class_name;

-- class_name          max
-- "Iris-setosa"	   3.9
-- "Iris-versicolor"   3.3
-- "Iris-virginica"    3.6
(0) 준비사항: Python 모듈 설치
LLM 모델을 통한 답변 생성에 필요한 openai, langchain, 그리고 PostgreSQL, Greenplum DB access를 위해 필요한 psycopg2 모듈을 pip install을 사용해서 설치합니다.
! pip install -q openai langchain psycopg2
(0) 준비사항: OpenAI API Key 설정
OpenAI의 ChatGPT를 사용하기 위해 필요한 OpenAI API Key를 등록합니다.
import os

# setup OpenAI API Key with yours
os.environ["OPENAI_API_KEY"]="sk-xxxx..." # set with yours
(0) 준비사항: PostgreSQL DB 연결
이제 LangChain의 SQLDatabase() 클래스를 사용해서 PostgreSQL DB에 연결하겠습니다.
(DB credientials 는 사용 중인 걸로 바꿔주세요)
# Connect to the PostgreSQL DB
from langchain.utilities import SQLDatabase

# set with yours
username='postgres'
password='changeme'
host='localhost'
port='5432'
database='postgres'

pg_uri = f"postgresql+psycopg2://{username}:{password}@{host}:{port}/{database}"

db = SQLDatabase.from_uri(pg_uri)
(0) 준비사항: Query를 위한 Helper Function 정의
DB의 Table 정보 (테이블 이름, 칼럼 정보) 를 가져오고, SQL Query를 실행할 수 있는 Helper 함수를 정의합니다. 이제 준비가 다 되었네요.
사용자가 자연어로 질의한 질문과 DB테이블 정보를 인풋으로 받아서, "DB 테이블 정보 ("scheam")와 사용자 질문 ("question")이 주어졌을 때 PostgreSQL Query를 생성하라"고 프롬프트에 지시문을 생성하였습니다.
# Prompt for generating a SQL query
from langchain.prompts import ChatPromptTemplate

template_query = """
Based on the table schema below, \
Write a PostgreSQL query that answer the user's question:
{schema}

Question: {question}
SQL Query:"""

prompt = ChatPromptTemplate.from_template(template_query)
(2) LangChain이 LLM 모델에 사용자 질문을 SQL Query로 변환 요청
LLM에는 ChatGPT-4 모델을 사용하고, temperature=0 으로 해서 사실에 기반해서 일관성 있고 보수적인 답변을 생성하도록 설정했습니다.
# Chaining prompt, LLM model, and Output Parser
from langchain.chat_models import ChatOpenAI
from langchain_core.output_parsers import StrOutputParser
from langchain_core.runnables import RunnablePassthrough

model = ChatOpenAI(temperature=0, model_name='gpt-4')

sql_response = (
    RunnablePassthrough.assign(schema=get_schema)
    | prompt
    | model.bind(stop=["\nSQLResult:"])
    | StrOutputParser()
)
(3) LLM 모델이 DB Schema 정보에 기반해 사용자 질문에 대한 SQL Query를 생성해서 반환
sql_response.invoke({"question": "What is the average of sepal length for Iris-setosa?"})
# "SELECT AVG(sepal_length) \nFROM iris \nWHERE class_name = 'Iris-setosa';"
(4) LangChain이 PostgreSQL, Greenplum DB에 SQL Query 실행 요청
아래와 같이 "DB 테이블 정보 ("schema"), 사용자 질문 ("question"), SQL Query ("query"), SQL Query 결과 ("response") 가 주어졌을 때 자연어(natural language)로 답변을 생성하라"고 프롬프트 지시문을 만들었습니다.
# Prompt for generating the final answer by running a SQL query on DB
template_response = """
Based on the table schema below, question, sql query, and sql response, \
write a natural language response:
{schema}

Question: {question}
SQL Query: {query}
SQL Response: {response}"""

prompt_response = ChatPromptTemplate.from_template(template_response)
(5) PostgreSQL, Greenplum DB에서 SQL Query 실행하여 결과 반환
'|' 를 사용해서 앞에서 정의한 SQL Query 생성하는 chain과 Query를 실행한 결과를 받아서 자연어로 답변을 생성하는 chain을 모두 엮어서 Chaining 하였습니다.
(6) LangChain이 사용자 질문과 SQL Query, Query 결과를 기반으로 LLM 모델에 답변 생성 요청
(7) LLM 모델이 사용자 질문과 Query 결과를 기반으로 생성한 자연어 답변 반환
자연어로 3개의 질문을 해보았는데요, 기대했던 SQL Query 문이 생성되고 Query 질의 결과를 기반으로 답변이 모두 정확하게 생성되었습니다.
Q1: What is the average of sepal length for Iris-setosa?
## Q: What is the average of sepal length for Iris-setosa?

sql_response.invoke({"question": "What is the average of sepal length for Iris-setosa?"})
# "SELECT AVG(sepal_length) \nFROM iris \nWHERE class_name = 'Iris-setosa';"

full_chain.invoke({"question": "What is the average of sepal length for Iris-setosa?"})
# 'The average sepal length for Iris-setosa is approximately 4.86.'
Q2: What is the average of sepal length by class name?
## Q: What is the average of sepal length by class name?

sql_response.invoke({"question": "What is the average of sepal length by class name?"})
# 'SELECT class_name, AVG(sepal_length) \nFROM iris \nGROUP BY class_name;'


full_chain.invoke({"question": "What is the average of sepal length by class name?"})
#'The average sepal length for the Iris-versicolor class is 6.1,
#for the Iris-setosa class is approximately 4.86,
#and for the Iris-virginica class is 6.57.'
Q3: What is the maximum value of sepal width by class name?
## Q: What is the maximum value of sepal width by class name?

sql_response.invoke({"question": "What is the maximum value of sepal width by class name?"})
# 'SELECT class_name, MAX(sepal_width) \nFROM iris \nGROUP BY class_name;'


full_chain.invoke({"question": "What is the maximum value of sepal width by class name?"})
# "The maximum sepal width for the class 'Iris-versicolor' is 3.3,
# for 'Iris-setosa' is 3.9,
# and for 'Iris-virginica' is 3.6."
위의 예는 매우 간단한 질문이어서 하나의 테이블 내에서 Join 없이도 모두 정확하게 Querying 이 되었는데요, 그래도 mission critical한 업무에서는 사용에 유의할 필요가 있습니다. 왜냐하면 실무에서 사용하는 SQL Query 문의 경우 여러개의 테이블을 Join 해야 될 수도 있고, Where 조건절에 Business Logic이 복잡하게 반영되어야 할 경우도 있고, 테이블 이름/설명이나 변수명/설명이 LLM 모델이 사용자의 질의와 매핑해서 사용하기에 부적절한 경우도 있을 수 있어서 SQL Query가 부정확할 수 있기 때문입니다.
따라서 반드시 사용자 질의에 대한 SQL Query 문을 같이 확인해보는 절차가 필요합니다.
그리고 SQL Query Generator 를 잘하는 LLM 모델, 자사 회사 내 SQL Query 문으로 Fine-tuning한 LLM 모델에 대한 시도도 의미있어 보입니다.
LangChain 을 사용하면 편리한 점 중의 하나가 Runnables 을 '|' 을 사용해서 Chaining 할 수 있다는 점입니다. 이번 포스팅에서는 한발 더 나가서, LangChain 에서 여러 개의 체인을 나누고 합치기를 소개하겠습니다.
(Branching and Merging of Multiple Chains)
LangChain - 여러 개의 체인을 나누고 합치기 (Branching and Merging of Multiple Chains)
먼저 openai, langchian 모듈이 설치되어 있지 않다면 터미널에서 pip install 로 이들 모듈을 설치해주세요.
! pip install -q openai langchain
다음으로 os.environment["OPENAI_API_KEY"] 에 API Key를 등록해 보겠습니다.
import os
from operator import itemgetter

os.environ["OPENAI_API_KEY"]="sk-xxxxx..." # set with yours
예제로 사용할 Multiple Chains의 내용은 다음과 같습니다.
- (1) planner: {topic}을 인풋으로 받으면 논쟁거리를 생성합니다.
- (2) arguments_for: planner가 생성한 {topic}의 논쟁거리에 대한 찬성 입장을 생성합니다.
- (3) agruments_against: planner가 생성한 {topic}의 논쟁거리에 대한 반대 입장을 생성합니다.
- (4) final_responder: (1) 최초 논쟁거리, (2) 찬성 입장, (3) 반대 입장을 모두 고려해서 최종 입장을 생성합니다. 이때 ChatPromptTemplate.from_messages() 이고, 프롬프트가 "ai", "human", "system"으로 나누어서 작성한 점 확인해주세요.
RunnableParallel() 을 사용하면 다수의 Chains을 병렬처리 할 수 있습니다. (순차처리 대비 병렬처리 시 수행시간이 단축됩니다. %timeit 로 확인해보세요.)
- (5) chain: (1) planner 를 먼저 실행하고, (2) arguments_for, arguments_against, itemgetter("base_response")가 RunnableParallel() 로 해서 Branching 되어서 병렬로 처리됩니다.
그리고 이 결과를 모두 Merging 해서, 앞서의 결과를 모두 고려하여 final_responder 에서 최종 답변이 생성됩니다.
from langchain.chat_models import ChatOpenAI
from langchain.prompts import ChatPromptTemplate
from langchain.schema import StrOutputParser
from langchain_core.runnables import RunnablePassthrough
from langchain_core.runnables import RunnableParallel

planner = (
    ChatPromptTemplate.from_template("Generate an argument about: {topic}")
    | ChatOpenAI()
    | StrOutputParser()
    | {"base_response": RunnablePassthrough()}
)

arguments_for = (
    ChatPromptTemplate.from_template(
        "List the pros or positive aspects of {base_response}"
    )
    | ChatOpenAI()
    | StrOutputParser()
)

arguments_against = (
    ChatPromptTemplate.from_template(
        "List the cons or negative aspects of {base_response}"
    )
    | ChatOpenAI()
    | StrOutputParser()
)

final_responder = (
    ChatPromptTemplate.from_messages(
        [
            ("ai", "{original_response}"),
            ("human", "Pros:\n{results_1}\n\nCons:\n{results_2}"),
            ("system", "Generate a final response given the critique"),
        ]
        )
        | ChatOpenAI()
        | StrOutputParser()
)

chain = (
    planner
    | {
        "results_1": arguments_for,
        "results_2": arguments_against,
        "original_response": itemgetter("base_response"),
    }
    | final_responder
)

## Equivantly using RunnableParallel()
# chain = (
#     planner
#     | RunnableParallel(
#         results_1 = arguments_for,
#         results_2 = arguments_against,
#         original_response = itemgetter("base_response"),
#     )
#     | final_responder
# )
chain.invoke({"topic": "AI"}) 로 실행시켜 보겠습니다. 여러 개의 chain을 연결하다보니 약 43초 걸리네요.
chain.invoke({"topic": "AI"})

# While there are legitimate concerns and potential drawbacks associated with Artificial Intelligence (AI), it is crucial to address these challenges and work towards responsible and ethical development and deployment of AI technologies. Here are some possible solutions and considerations:
# 1. Job displacement: Governments, businesses, and educational institutions should invest in retraining programs and initiatives to help workers transition into new roles and industries. This can involve reskilling programs, job placement assistance, and support for entrepreneurship and innovation.
# 2. Bias and discrimination: Efforts should be made to ensure that AI systems are trained on diverse and representative datasets, and that biases are identified and eliminated. Ongoing monitoring and auditing of AI systems can help identify and address any biases that may arise.
# 3. Transparency and accountability: Developers and organizations should strive for transparency in AI systems, providing explanations for decisions and ensuring that AI algorithms are auditable. Regulatory frameworks can be put in place to ensure accountability and transparency in AI systems.
# 4. Human skills and creativity: Emphasis should be placed on developing and nurturing human skills that complement AI technologies, such as critical thinking, creativity, and emotional intelligence. Education systems can adapt to focus on these skills and encourage lifelong learning.
# 5. Security and privacy: Strong cybersecurity measures and data protection protocols should be implemented to safeguard personal and sensitive information. Privacy regulations can provide guidelines for the responsible handling of data in AI systems.
# 6. Ethical considerations: A robust ethical framework should be developed to guide the development and deployment of AI technologies. Organizations and developers should adhere to ethical guidelines and principles, ensuring that AI is used for the benefit of humanity and respects individual rights and dignity.
# 7. Economic equality: Efforts should be made to ensure that the benefits of AI adoption are distributed equitably. This can involve policies that promote access to AI technologies, support for inclusive innovation, and measures to address economic disparities.
# 8. Unemployment and retraining: Governments, businesses, and educational institutions should collaborate to provide support and resources for retraining workers and facilitating job transitions. This can include financial assistance, vocational training programs, and job placement services.
# 9. Human touch and empathy: AI technologies should be designed to complement human capabilities rather than replace them entirely. In domains such as healthcare and customer service, a balance should be struck between AI automation and maintaining human connection and personalized care.
# 10. Dependence and vulnerability: Efforts should be made to diversify technological solutions and avoid over-reliance on AI systems. Continual monitoring, testing, and contingency planning can help mitigate the risks associated with dependence on AI technologies.
# By addressing these concerns and challenges, we can ensure that AI technologies are developed and deployed in a responsible and ethical manner, maximizing their benefits while minimizing their potential drawbacks. Collaboration between stakeholders, including governments, organizations, researchers, and the public, is key to achieving this goal.
이번 포스팅에서는 LangChain으로 RAG (Retrieval-Augmented Generation)을 구현할 때
- Web 에서 문서를 가져와서 분할하고
- OpenAI의 Text Embedding 모델을 사용해서 Embeddings 으로 변환을 하고
- Chroma Vector DB 에 저장, 검색하여
- ChatGPT 모델로 질문에 답변을 생성
하는 방법을 소개하겠습니다.
1. 시장 내 Vector DB 의 구분
먼저, 텍스트를 벡터 임베딩으로 변환하여 저장하고 의미론적 검색을 할 때 사용하는 Vector DB에 대해서 잠깐 살펴보겠습니다.
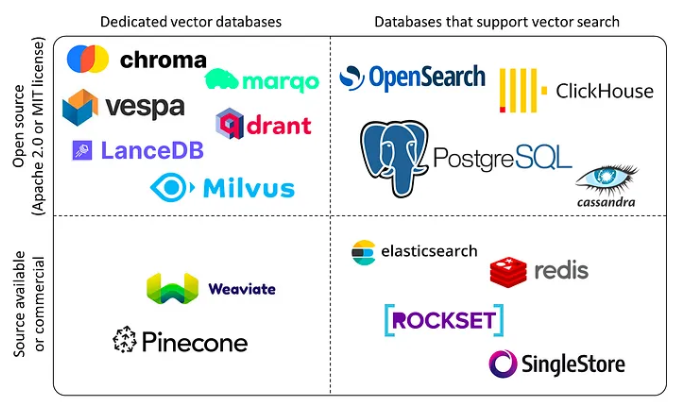
시장의 Vector DB는 (a) Database 용도가 Vector DB 전용인지 아니면 Vector search를 지원하는 일반 DB인지 여부, (b) Open source 인지 상업용인지 여부에 따라서 아래 그림처럼 4/4분위로 구분할 수 있습니다. 일반 DB가 최근 매우 빠른 속도로 Vector DB 기능 (벡터 데이터 유형 지원, 저장, 인덱싱, 검색 등) 을 지원하기 시작했습니다. 따라서 일반 DB가 Vector DB 기능을 지원하는 것은 시간 문제일것 같습니다.
이번 포스팅에서는 Vector DB 전용 (dedicated vector database) 이면서 오픈소스인 Croma DB를 사용해서 RAG 를 구현해 보겠습니다.
2. Croma Vector DB와 LangChain을 사용한 RAG(Retrieval-Augmented Generation) 구현
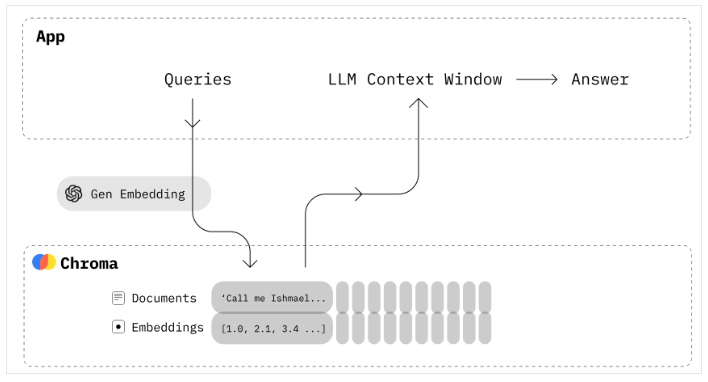
Chroma는 오픈소스 임베딩 데이터베이스 (Open-source Vector Database)입니다. Chroma는 지식, 사실, 기술을 LLM에 쉽게 플러그인 할 수 있게 함으로써 LLM 앱을 구축하는 것을 쉽게 해줍니다. Chroma DB 를 사용해서 텍스트 문서를 쉽게 관리하고, 텍스트를 임베딩으로 변환하며, 유사성 검색을 할 수 있습니다.
Chroma DB의 주요 기능으로는 다음과 같은 것이 있습니다.
- 풍부한 기능: 쿼리, 필터링, 밀도 추정, 그 외 여러 기능들 - LangChain (파이썬 및 자바스크립트), LlamaIndex 지원 가능 - 파이썬 노트북에서 실행되는 것과 동일한 API가 프로덕션 클러스터로 확장
# Load documents from web
from langchain.document_loaders import WebBaseLoader

web_loader = WebBaseLoader([
    "https://python.langchain.com/docs/get_started/introduction",   # LangChain Introduction
    "https://python.langchain.com/docs/modules/data_connection/" # LangChain Retrieval
    ]
)

data = web_loader.load()
(2) LangChain의 RecursiveCharacterTextSplitter()를 사용해서 문서를 Chunk 로 분할하기
# Split documents into chunks
from langchain.text_splitter import RecursiveCharacterTextSplitter

text_splitter = RecursiveCharacterTextSplitter(
    chunk_size = 500,
    chunk_overlap = 0
)

all_splits = text_splitter.split_documents(data)

all_splits[0]

# Document(page_content='Introduction | \uf8ffü¶úÔ∏è\uf8ffüîó Langchain',
# metadata={'source': 'https://python.langchain.com/docs/get_started/introduction',
# 'title': 'Introduction | \uf8ffü¶úÔ∏è\uf8ffüîó Langchain',
# 'description': 'LangChain is a framework for developing applications
# powered by language models. It enables applications that:',
# 'language': 'en'})
(3) OpenAIEmbeddings()를 사용해서 텍스트를 임베팅으로 변환하여 Chroma Vector DB에 저장하기
# Transform into Text Embeddings and Store at Chroma Vector DB
import os
from langchain.embeddings import OpenAIEmbeddings
from langchain.vectorstores import Chroma

os.environ["OPENAI_API_KEY"] = "sk-xxxxx...."

vectorstore = Chroma.from_documents(
    documents=all_splits,
    embedding=OpenAIEmbeddings()
    )
(4) LangChainHub에서 RAG Prompt 가져오기
필요에 따라서는 아래 RAG Prompt template을 참고해서 일부 수정해서 사용해도 됩니다.
# RAG prompt
from langchain import hub

prompt = hub.pull("rlm/rag-prompt")

print(prompt)
# ChatPromptTemplate(input_variables=['context', 'question'],
# messages=[HumanMessagePromptTemplate(prompt=PromptTemplate(
#    input_variables=['context', 'question'],
#    template=
#        "You are an assistant for question-answering tasks.
#         Use the following pieces of retrieved context to answer the question.
#         If you don't know the answer, just say that you don't know.
#         Use three sentences maximum and keep the answer concise.
#         \nQuestion: {question}
#         \nContext: {context}
#         \nAnswer:"))
# ])
(5) ChatOpenAI() 모델로 언어 모델 설정하기
model_name="gpt-4"로 설정해주었으며, temperature=0 으로 해서 보수적이고 일관적인 답변이 생성되도록 하였습니다.
# LLM model
from langchain.chains import RetrievalQA
from langchain.chat_models import ChatOpenAI

model = ChatOpenAI(model_name="gpt-4", temperature=0)
(6) RetrievalQA() 을 사용해서 LLM Model, Retriever, Prompt 를 하나의 객체로 묶기
# Retrieval QA
qa_chain = RetrievalQA.from_chain_type(
    llm=model,
    retriever=vectorstore.as_retriever(),
    chain_type_kwargs={"prompt": prompt}
)

question  ="What is a LangChain?"
result = qa_chain({"query": question})

result["result"]
# LangChain is a framework for developing applications powered by language models.
# It enables applications to be context-aware and reason based on provided context.
# The LangChain framework includes composable tools and integrations for working with
# language models, off-the-shelf chains for higher-level tasks,
# and allows for customization of existing chains and building new ones.
사용자의 질문과 관련이 있는 웹사이트 문서를 검색(Retrieval)하여 이를 Context 정보로 참조해서(Augmented) 답변을 잘 생성(Generation)하고 있네요.
question  ="What is Retrieval in LangChain?"
result = qa_chain({"query": question})

result["result"]
# Retrieval in LangChain is a part of the Retrieval Augmented Generation (RAG) process
# where external data is fetched and passed to the Language Model during the generation step.
# LangChain supports various retrieval algorithms and provides all the necessary components
# for RAG applications.
# It also allows for easy swapping between vector stores and supports simple semantic search
# along with a collection of algorithms to enhance performance.
이번 포스팅에서는 인메모리 키-값 저장소인 Redis 와 LangChain을 사용하여 이전 대화 내용에 대한 기억(memory, messages history)을 사용하여 답변을 할 수 있는 LLM 모델 체인을 만들어보겠습니다.
1. Redis란 무엇인가? (What is Redis?)
2. LangChain에서 Redis를 사용한 메시지 기록 (Use of Redis for Message History in LangChain)
3. LangChain, Redis를 이용하여 기억(Memory)을 가진 LLM 모델 체인 만들기
1. Redis란 무엇인가? (What is Redis?)
Redis는 고성능, 유연성 및 다양한 기능으로 알려진 오픈 소스, 인 메모리 키-값 저장소(in-memory key-value store)입니다. 일반적으로 데이터베이스, 캐시 및 메시지 브로커로 사용됩니다. 여기에서 Redis와 LangChain 애플리케이션에서의 메시지 기록 사용에 대해 간략히 설명하겠습니다.
(1) 인 메모리 저장 (In-Memory Storage): Redis는 데이터를 메모리에 저장하여 매우 빠른 읽기 및 쓰기 작업을 가능하게 합니다. 이는 속도가 중요한 시나리오에 이상적입니다.
(2) 키-값 저장소 (Key-Value Store): 키와 그 값이 쌍을 이루는 키-값 저장 모델로 작동합니다. 이 값들은 문자열, 해시, 리스트, 세트 등이 될 수 있습니다.
(3) 지속성 (Persistence): 메모리 기반임에도 불구하고, Redis는 디스크에 데이터를 지속시킬 수 있는 옵션을 제공하여, 재시작 시 데이터 손실을 방지합니다. 이는 스냅샷과/또는 추가 전용 파일(Append Only Files, AOF)을 사용하여 수행됩니다.
(4) 확장성 및 고가용성 (Scalability and High Availability): Redis는 마스터-슬레이브 복제를 지원하여 확장성을 높이고 가용성을 증가시킵니다. Redis Sentinel은 모니터링 및 장애 조치를 통해 고가용성을 제공합니다.
(5) 데이터 구조 (Data Structure): Redis는 문자열, 해시, 리스트, 세트, 정렬된 세트, 비트맵, 하이퍼로그로그, 지오스페이셜 인덱스 등 다양한 데이터 구조를 지원합니다.
2. LangChain에서 Redis를 사용한 메시지 기록 (Use of Redis for Message History in LangChain)
위의 Redis란 무엇인가라는 소개글에서 언급한 특성이 LangChain과 언어 모델을 사용하여 애플리케이션을 구축하기 위한 프레임워크에도 그대로 적용됩니다. Redis는 채팅 메시지 기록을 관리하는 데 효과적으로 사용될 수 있습니다.
(1) 대화 저장 (Storing Conversations): Redis는 사용자와 챗봇 또는 언어 모델 간에 교환된 각 메시지를 추적하여 대화 기록을 저장할 수 있습니다. 이는 지속적인 대화에서 맥락을 유지하는 데 중요합니다.
(2) 빠른 접근 (Fast Access): 인 메모리 특성 덕분에, Redis는 대화 기록에 대한 신속한 접근을 제공합니다. 이는 응답 시간이 중요한 실시간 애플리케이션에 필수적입니다.
(3) 확장성 (Scalability): LangChain 애플리케이션이 성장함에 따라, Redis는 증가된 데이터 부하와 더 많은 동시 대화를 수용할 수 있도록 확장할 수 있습니다.
(4) 지속성 (Persistence): 대화 기록이 항상 장기 저장이 필요한 것은 아니지만, Redis의 지속성 메커니즘은 시스템 재시작이나 실패 시 진행 중인 대화가 손실되지 않도록 보장합니다.
(5) 간편한 통합 (Easy Integration): Redis는 다양한 프로그래밍 언어와 프레임워크, LangChain을 포함하여 간편한 통합을 제공합니다. 이는 개발자에게 접근하기 쉬운 선택입니다.
요약하자면, Redis는 채봇과 상호작용에서 맥락과 연속성을 유지하는 데 필수적인 대화 데이터의 신속한 검색 및 조작을 보장함으로써, LangChain 애플리케이션에서 메시지 기록을 저장하고 관리하기 위한 고성능 데이터베이스 솔루션으로서 역할을 합니다.
대부분의 LLM 애플리케이션은 대화형 인터페이스를 가지고 있습니다. 대화의 필수적인 구성 요소 중 하나는 대화 중에 이전에 도입된 정보를 참조할 수 있는 능력입니다. 기본적으로 대화 시스템은 과거 메시지의 일부 창을 직접 접근할 수 있어야 합니다. 더 복잡한 시스템은 지속적으로 업데이트되는 세계 모델을 가질 필요가 있으며, 이를 통해 엔터티와 그 관계에 대한 정보를 유지하는 등의 작업을 수행할 수 있습니다.
우리는 과거 상호 작용에 대한 정보를 저장하는 이 능력을 '메모리(Memory)'라고 부릅니다. LangChain은 시스템에 메모리를 추가하기 위한 많은 유틸리티를 제공하며, Redis 가 대화 내역을 기록하는 메모리 (Memory) 역할을 해줄 수 있습니다. 이러한 유틸리티는 단독으로 사용되거나 체인에 원활하게 통합될 수 있습니다.
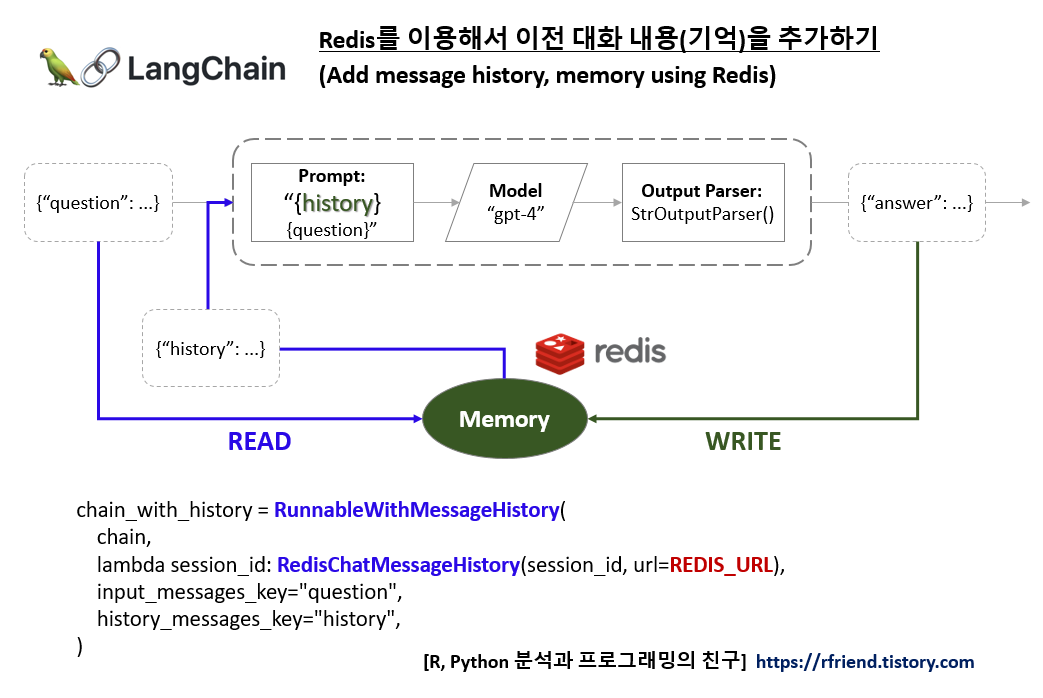
메모리 시스템은 두 가지 기본 작업, 즉 읽기와 쓰기(Read and Write)를 지원해야 합니다. 모든 체인이 특정 입력을 기대하는 핵심 실행 논리를 정의한다는 것을 기억하세요. 이러한 입력 중 일부는 사용자로부터 직접 옵니다만, 일부 입력은 메모리에서 올 수 있습니다. 체인은 주어진 실행에서 두 번 메모리 시스템과 상호 작용합니다.
1. 초기 사용자 입력을 받은 후(AFTER), 핵심 논리를 실행하기 전(BEFORE)에, 체인은 메모리 시스템에서 읽어 사용자 입력을 보완합니다.
2. 핵심 논리를 실행한 후(AFTER), 답변을 반환하기 전(BEFORE)에, 체인은 현재 실행의 입력 및 출력을 메모리에 기록하여, 미래의 실행에서 참조할 수 있도록 합니다.
LangChain - Redis 를 사용해서 이전 대화 내용을 기억으로 추가하기
3. LangChain, Redis를 이용하여 기억(Memory)을 가진 LLM 모델 체인 만들기
먼저, openai, langchain, redis 모듈이 설치되어 있지 않다면 pip install을 사용해서 설치하도록 합니다.
! pip install openai langchain redis
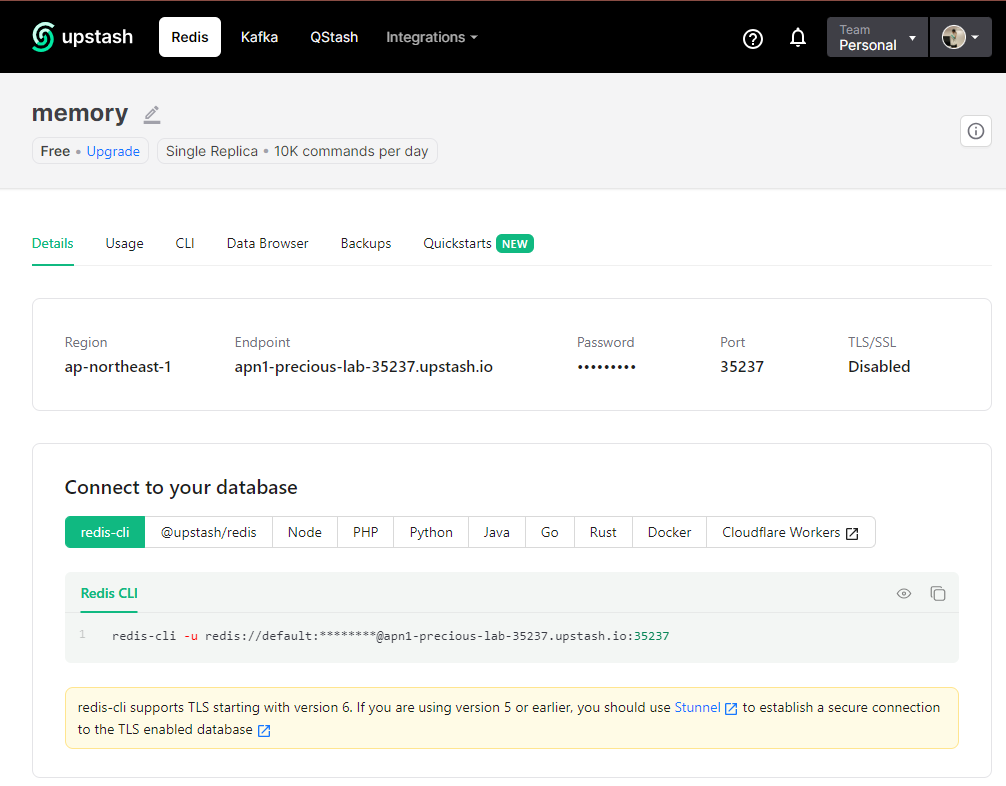
다음으로, Redis 데이터베이스를 만들어야 하는데요, 간단한 방법 중의 하나로 UpStash 에서 Redis database API 를 만들어보겠습니다. UpStash 사이트에서 회원가입하고 Create Redis Database 를 선택해서 'memory' 라는 이름을 부여해주면 됩니다. 사용량 만큼 과금하는 서비스인데요, 초반 무료 trial 시도해볼 수 있으므로 학습 용도로 사용해보기에 좋습니다.
아래 화면 캡쳐에서 하단의 "Connect to your database - redis-cli" 란에서 redis-cli -u 다음 부분부터 있는 URL을 복사해서 가져옵니다.
Serverless Database with Redis API by UpStash
Redis 를 사용하기 위한 URL을 가져왔습니다.
# Redis URL for access
REDIS_URL = 'redis://default:xxxxx...@apn1-precious-lab-35237.upstash.io:35237'
이전 대화에 대한 기억(Memory)을 가지고 있지 않은 ChatModel은 이전 대화에 기반한 연속적인 대화가 불가능합니다. 아래의 예처럼 "My name is neo." 라고 이미 말을 했는데, 다음번에 "What's my name?" 이라고 다시 물어보면 ChatModel은 모른다고 말합니다.
import os
from langchain.chat_models import ChatOpenAI

os.environ["OPENAI_API_KEY"] = "sk-xxxxx..."

## ChatModel doesn't have memory!
model = ChatOpenAI(model_name="gpt-4")
model.invoke("Hi, my name is Lion King.")

# Out[16]:
# AIMessage(content='Hello Lion King! How can I assist you today?')


## -- No memory of previous conversations! --
model.invoke("What's my name?")

# Out[17]:
# AIMessage(content="I'm sorry,
# but I don't have access to personal information about individuals
# unless it has been shared with me in the course of our conversation.")
이제 LangChain과 Redis를 사용해서 ChatModel에게 이전 대화에 대한 기억(Memory)을 추가해보겠습니다.
LangChain의 RunnableWithMessageHistory 클래스는 대화 기록 (Message History)를 추가할 수 있도록 해줍니다. 그리고 Langchain.memory.chat_message_histories 에서 RedisChatMessageHistory 메소드를 가져와서 Redis 에 대화 내역을 쓰고 Redis에서 읽어오기를 하도록 하겠습니다.
아래에 Prompt 에서 MessagePlaceholder(variable_name="history") 의 "history" key에는 과거 대화 기록이 인풋으로 들어가게 됩니다.
ChatModel 은 "gpt-4"로 설정했으며, '|' 으로 Prompt와 ChatModel을 chaining 하여 chain 이라는 이름으로 객체를 만들었습니다.
import os
from langchain.chat_models import ChatOpenAI
from langchain.memory.chat_message_histories import RedisChatMessageHistory
from langchain.prompts import ChatPromptTemplate, MessagesPlaceholder
from langchain_core.chat_history import BaseChatMessageHistory
from langchain_core.runnables.history import RunnableWithMessageHistory

os.environ["OPENAI_API_KEY"] = "sk-xxxxx..."

template = ChatPromptTemplate.from_messages(
    [
        ("system", "You're a trustworthy AI assistant. Answer the question below. \
                    If your don't know, just say you don't know it."),
        MessagesPlaceholder(variable_name="history"),
        ("human", "{question}"),
    ])

model = ChatOpenAI(model_name="gpt-4")
chain = template | model
다음으로, RunnableWithMessageHistory() 메소드에 앞에서 정의한 chain, 그리고 이전 대화를 쓰고 읽을 인메모리 키-값 저장소인 Redis를 사용하기 위해 RedisChatMessageHistory(session_id, url=REDIS_URL) 을 lambda 함수로 정의해주었습니다. 그리고
- input_messages_key="question",
- history_messages_key="history"
로 지정해서 사용자의 질문("question")과 이전 대화 기억 ("history") 을 읽어와서 인풋으로 사용할 수 있도록 해주었습니다.
## Chain with History by using Redis
chain_with_history = RunnableWithMessageHistory(
    chain,
    lambda session_id: RedisChatMessageHistory(session_id, url=REDIS_URL),
    input_messages_key="question",
    history_messages_key="history",
)
이제 다시 한번 이름을 알려주고, 다시 한번 이름이 뭔지 물어보겠습니다.
(session_id 는 사용자별로 혹은 대화 주제별로 unique 한 값으로 아무 값이나 넣어줘도 되며, 이후 동일한 사용자나 동일 대화 주제에 대해 이전 대화이 맥락을 고려한 연속적인 대화를 원할 때 동일한 session_id 를 넣어주면 됩니다.)
chain_with_history.invoke(
    {"question": "Hi, my name is Lion King."},
    config={"configurable": {"session_id": "123"}},
)

# AIMessage(content='Hello, Lion King! How can I assist you today?')

## This time, ChatModel has a memory of previous conversations!!
chain_with_history.invoke(
    {"question": "What's my name? Do you remember it?"},
    config={"configurable": {"session_id": "123"}}
)

# AIMessage(content='Yes, your name is Lion King.')
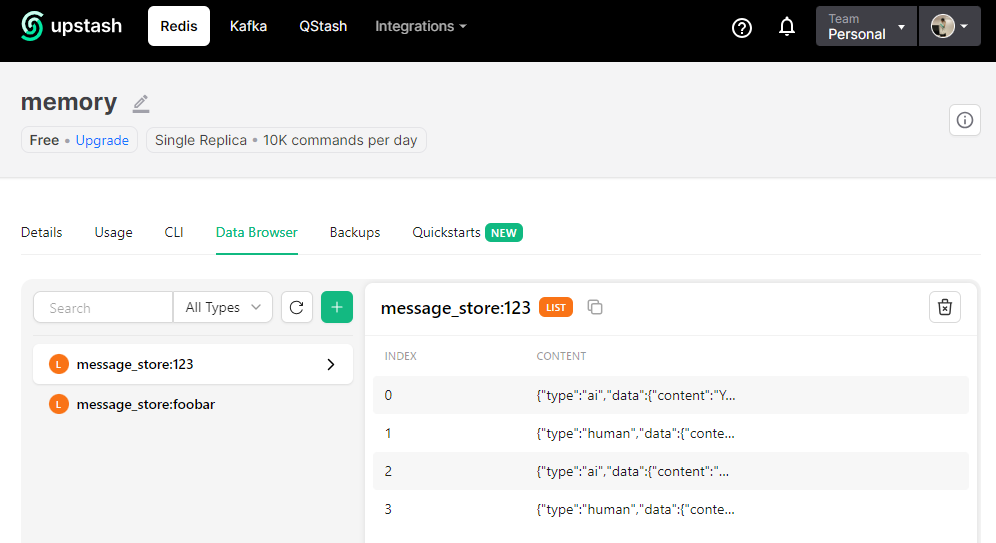
네, 이번엔 잘 기억하고 제대로 대답을 해주네요!
UpStash 사이트에 들어가서 "memory" 데이터베이스의 "Data Browser" 탭에 들어가서 보면 이전의 대화 기록 (Message Histories) 을 조회해서 확인해 볼 수 있습니다. (Redis에 이전 대화를 이처럼 쓰고, 읽기를 합니다.)