[LangChain] Chat Model로 Few-shot Prompting 하기
Deep Learning (TF, Keras, PyTorch)/Natural Language Processing 2024. 1. 3. 13:40Zero-shot, One-shot, Few-shot prompting은 특히 자연어 처리나 이미지 생성과 관련된 머신러닝 모델에서, 모델이 데이터를 어떻게 훈련하거나 사용하는지에 대해 설명할 때 사용됩니다. 이 용어들은 훈련 또는 추론 중에 모델에 제공되는 예제의 수와 관련이 있습니다.
1. Zero-Shot Prompting
- 이는 모델이 수행해야 할 작업에 대한 예제가 전혀 제공되지 않는 시나리오를 의미합니다. 모델은 오로지 사전 훈련과 프롬프트의 지시에만 의존합니다.
- 예시: 언어 모델에게 영어에서 프랑스어로 문장을 번역하라고 요청하는 것이며, 이때 이전의 번역 예제는 제공되지 않습니다.
2. One-Shot Prompting
- 이 경우 모델은 수행해야 할 작업의 한 가지 예제(a single example)를 제공받습니다. 이는 모델이 기대하는 형식이나 응답 유형을 이해하는 데 도움이 됩니다.
- 예시: 언어 모델에게 새로운 농담을 만들기 전에 한 가지 농담 예제를 보여주는 것입니다. 이 예제는 템플릿이나 가이드 역할을 합니다.
3. Few-Shot Prompting
- 여기서는 모델에게 작업을 더 잘 이해할 수 있도록 소수의 예제(하나 이상이지만 일반적으로 많지 않음)가 제공됩니다.
- 예시: 언어 모델에게 긴 텍스트를 한 단락으로 요약하는 세 가지 다른 예제를 제공한 후 새로운 텍스트를 요약하도록 요청하는 것입니다.
각 경우에서 모델은 제공된 프롬프트의 정보를 사용하여 요청된 작업을 더 잘 이해하고 완수합니다. Zero-shot, One-shot, Few-shot prompting의 효과는 작업의 복잡성과 모델의 능력에 따라 다를 수 있습니다.
지난번 포스팅에서는 LangChain과 LLM Models 을 사용하여 Few-shot Prompting 하는 방법을 소개하였습니다.
이번 포스팅에서는 LLM Models 대신에 Chat Models 과 LangChain을 사용하여 Few-shot Prompting 하는 방법을 소개하겠습니다.
(1) Chat Model 에 고정된 개수의 몇 개의 예시를 주는 Few-shot Prompting
(2) Chat Model 에 사용자 인풋과 유사한 top k 개의 예시를 선별해서 주는 Dynamic Few-shot Prompting

(1) Chat Model 에 고정된 개수의 몇 개의 예시를 주는 Few-shot Prompting
먼저 터미널에서 pip install 로 langchain, openai, faiss-cup 모듈을 설치합니다.
! pip install -q langchain openai faiss-cpu
그리고, 실습에 필요한 모듈을 importing 하고, Chat Model로 ChatGPT-4를 사용할 것이므로 OnenAI API Key를 등록해줍니다.
from langchain.embeddings import OpenAIEmbeddings
from langchain.prompts import FewShotPromptTemplate, PromptTemplate
from langchain.prompts.example_selector import SemanticSimilarityExampleSelector
from langchain.vectorstores import FAISS
#from langchain.llms import OpenAI
from langchain.chat_models import ChatOpenAI
from langchain_core.output_parsers import StrOutputParser

# set environment: OpenAI API Key
import os
os.environ["OPENAI_API_KEY"]="sk-xxxx..." # set with yours
(a) Few-shot Prompting에 사용할 몇 개의 예시를 작성합니다.
(b) 그리고 ChatPromptTemplate() 를 사용해서 ("human": "{input}"), ("ai", "{output}") 처럼 Human과 AI의 역할에 인풋과 아웃풋을 매핑해줍니다 (이 부분이 LLM Model과 Chat Model이 다른 부분임).
(c) 그 다음에 FewShotChatMessagePromptTemplate()에 앞서 정의해준 examples, example_prompt를 각 각 설정해줍니다.
(d) 마지막으로 ChatPromptTemplate.from_messages() 으로 앞에서 정의해준 예시와 Prompt 포맷을 다 조합해서 최종 Few-shot Prompt 를 작성해줍니다. 이때 "system"에게 페르소나를 지정해주는 것과 마지막에 "human"의 "input"이 추가되었습니다.
# (a) Fixed Examples
# Define examples of creating antonyms
examples = [
    {"input": "happy", "output": "sad"},
    {"input": "tall", "output": "short"},
    {"input": "sunny", "output": "rainy"},
    {"input": "surprised", "output": "calm"},
    {"input": "dry", "output": "humid"},
    {"input": "hot", "output": "cold"},
    {"input": "satisfied", "output": "dissatisfied"},
]


# (b) A prompt template used to format each individual example.
example_prompt = ChatPromptTemplate.from_messages(
    [
        ("human", "{input}"),
        ("ai", "{output}")
    ]
)

# (c) Assemble them into the few-shot prompt template
few_shot_prompt = FewShotChatMessagePromptTemplate(
    example_prompt = example_prompt,
    examples = examples,
)

print(few_shot_prompt.format())
# Human: happy
# AI: sad
# Human: tall
# AI: short
# Human: sunny
# AI: rainy
# Human: surprised
# AI: calm
# Human: dry
# AI: humid
# Human: hot
# AI: cold
# Human: satisfied
# AI: dissatisfied


# (d) Finally, assemble the final prompt and use it with a model
final_prompt = ChatPromptTemplate.from_messages(
    [
        ("system", "You are a trustwordy AI assistant."),
        few_shot_prompt,
        ("human", "{input}")
    ]
)
앞에서 정의한 Few-shot Prompt와 Chat Model, 그리고 Output Parser를 '|'를 사용해서 Chaining 해줍니다.
# Chat Model
model = ChatOpenAI(model="gpt-4")

# Output Parser
parser = StrOutputParser()

# Chaining
chain = final_prompt | model | parser
앞에서 정의한 chain을 invoke()를 사용해서 실행시켜줍니다.
chain.invoke({"input": "excited"}) ==> 'bored'
chain.invoke({"input": "snowy"}) ==> 'sunny'
라고 답변하는걸 보니 Few-shot Prompting이 잘 작동하네요.
## Run the chain

chain.invoke({"input": "excited"})
# 'bored'

chain.invoke({"input": "snowy"})
# 'sunny'
(2) Chat Model 에 사용자 인풋과 유사한 top k 개의 예시를 선별해서 주는 Dynamic Few-shot Prompting
LangChain은 여러개의 예시 중에서 몇 개의 예시만을 선별해서 Few-shot Prompting을 할 수 있도록 4가지 종류의 Example Selector를 제공합니다.
[ LangChain: Example Selector Types ]
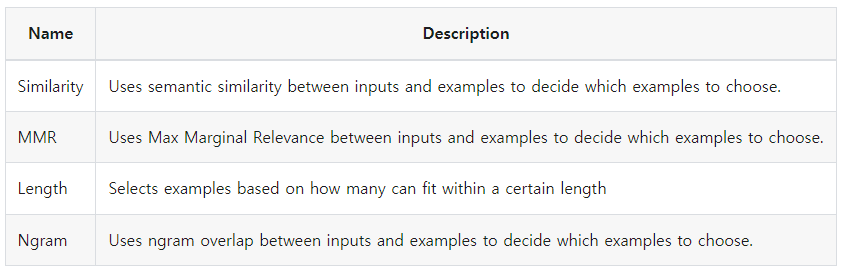
이중에서 인풋과 예시를 임베딩으로 변환한 후에, 각 임베딩 벡터간 코사인 유사도를 계산해서, 사용자의 인풋과 가장 유사한 k개의 예시를 선택해주는 Semantic Similarity Example Selector를 사용해보겠습니다. 임베팅 변환은 OpenAI의 OpenAIEmbeddings() 를 사용하였으며, 임베딩 벡터를 저장하고 유사도 검색을 하는 Vector DB는 FAISS를 사용하였습니다.
FewShotChatMessagePromptTemplate() 에 (예제 대신에) Example Selector를 설정해주고, ChatPromptTemplate.from_messages()에 "human"과 "ai"의 메시지 포맷을 설정해줍니다. 그리고 인풋으로 받는 변수 input_variables=["input"] 을 설정해주면 됩니다.
# Select examples based on similarity to the inputs
# by finding the examples with the embeddings that have the greatest cosine similarity with the inputs.
example_selector = SemanticSimilarityExampleSelector.from_examples(
    # the list of examples available to select from.
    examples,
    # The embedding class used to produce embeddings which are used to measure semantic similarity.
    OpenAIEmbeddings(),
    # The VectorStore class used to store the embeddings and do a similarity search over.
    FAISS,
    # the number of examples to produce.
    k=2,
)


similar_prompt = FewShotChatMessagePromptTemplate(
    # we provide an ExampleSelector instead of examples.
    example_selector=example_selector,
    # Define how each example will be formatted.
    example_prompt=ChatPromptTemplate.from_messages(
        [("human", "{input}"), ("ai", "{output}")]
    ),
    input_variables=["input"]
)
k=2 로서 사용자 인풋과 가장 유사한(즉, 인풋과 예제 임베딩 간 코사인 유사도가 가장 큰) 2개의 예제를 Example Selector를 사용해 선별해보겠습니다.
"excited"를 인풋으로 넣었더니 감정에 해당하는 예제 2개를 잘 선택했습니다.
"snowy"를 인풋으로 넣엏더니 날씨에 해당하는 예제 2개를 잘 선택했습니다. ^^b
# "excited" is a Feeling, k=2
example_selector.select_examples({"input": "excited"})
# [{'input': 'surprised', 'output': 'calm'}, {'input': 'happy', 'output': 'sad'}]


# "snowy" is a Weather, k=2
example_selector.select_examples({"input": "snowy"})
# [{'input': 'sunny', 'output': 'rainy'}, {'input': 'hot', 'output': 'cold'}]
ChatPromptTemplate.from_messages() 로 "system"의 페르소나를 지정해주고, 앞에서 Example Selector를 사용한 Few-shot Prompt 와 "human"의 "input" 까지 조합해주면 최종 프롬프트가 완성됩니다.
# Assemble the final prompt template
final_prompt = ChatPromptTemplate.from_messages(
    [
        ("system", "You are a trustwordy AI assistant."),
        similar_prompt,
        ("human", "{input}"),
    ]
)


print(final_prompt.format(input="excited"))
# System: You are a trustwordy AI assistant.
# Human: surprised
# AI: calm
# Human: happy
# AI: sad
# Human: excited
final_prompt, Chat Model, 그리고 Output Parser를 '|'를 사용해서 Chaining 해줍니다.
마지막으로 invoke()를 써서 chat_chain을 실행시켜주면 됩니다.
chat_chain.invoke({"input": "excited"}) ==> "relaxed"
chat_chain.invoke({"input": "snowy"}) ==> "clear"
라고 몇 개의 예제를 통해 과제에 대한 정보를 주었더니 Chat Model이 잘 이해해서 답변을 정확하게 생성했네요.
# Chaining
chat_chain = final_prompt | model | parser

# Run the chain
chat_chain.invoke({"input": "excited"})
# 'relaxed'

chat_chain.invoke({"input": "snowy"})
# 'clear'
[ Reference ]
- LangChain - Few-shot examples for chat models:
https://python.langchain.com/docs/modules/model_io/prompts/few_shot_examples_chat
- LangChain - Example Selector Types:
https://python.langchain.com/docs/modules/model_io/prompts/example_selector_types/
이번 포스팅이 많은 도움이 되었기를 바랍니다.
행복한 데이터 과학자 되세요! :-)

'Deep Learning (TF, Keras, PyTorch) > Natural Language Processing' 카테고리의 다른 글
Rfriend님의
글이 좋았다면 응원을 보내주세요!


