OpenAI의 프레임워크에서 "대규모 언어 모델(Large Language Model, LLM)"과 "챗 모델(Chat Model)"이라는 용어는 언어 모델의 두 가지 다른 측면이나 구현을 나타냅니다.  


1. LLM (Large Language Model) 

- 일반 설명: LLM은 OpenAI가 개발한 GPT-3나 GPT-4와 같은 대규모 언어 모델을 가리키는 광범위한 용어입니다. 이 모델들은 인간과 유사한 텍스트를 이해하고 생성할 수 있게 해주는 많은 수의 파라미터로 특징지어집니다. 

- 기능: LLM은 다양한 인터넷 텍스트로 훈련됩니다. 따라서 번역, 요약, 질문 답변 등 다양한 언어 작업을 수행할 수 있습니다. 

- 유연성: 이 모델들은 대화 작업을 위해 특별히 조정되지 않았습니다. 대신, 챗봇을 포함하여 다양한 애플리케이션에 적용될 수 있는 범용 모델입니다. 또한 콘텐츠 생성, 코딩 지원 등 다른 분야에도 확장됩니다. 

- 훈련 데이터: 이 모델들의 훈련 데이터는 인터넷에서 다양한 텍스트 소스를 포함하며, 언어, 맥락, 지식에 대한 광범위한 이해를 제공합니다. 


2. Chat Model

- 특징: 현재 여러분이 상호작용하고 있는 챗 모델처럼, 챗 모델은 대화 작업에 특화된 대규모 언어 모델의 더 전문화된 구현입니다. 

- 기능: 대화 참여, 질문 답변, 작업 지원, 그리고 여러 차례에 걸쳐 일관되고 맥락을 인식하는 대화를 유지(maintain a coherent and context-aware conversation over multiple turns)하는 데에 설계되었습니다.

- 훈련 및 조정: 일반 대규모 언어 모델을 기반으로 하지만, 대화적인 맥락에서 뛰어난 성능을 발휘하기 위해 추가적인 훈련이나 조정을 거칩니다. 이는 대화 데이터셋에 대한 훈련이나 대화에서의 성능을 개선하기 위한 강화 학습 기법을 사용할 수 있습니다. 

- 사용자 경험: 사용자 친화적이고 매력적인 대화 경험을 제공하는 데 중점을 둡니다. 종종 적절하고 맥락에 맞는 응답을 보장하기 위한 추가적인 안전장치나 지침이 포함됩니다. 


요약하자면, LLM은 다양한 언어 작업을 수행할 수 있는 범용 대규모 언어 모델인 반면, Chat Model은 대화 상호작용 및 대화에 최적화된 LLM의 특화된 버전(maintain a coherent and context-aware conversation over multiple turns)입니다. 


이번 포스팅에서는 LangChain으로 OpenAI의 ChatModel을 활용한 챗봇을 만들 때 인풋 메시지를 작성하는 방법을 소개하겠습니다. 


(1) SystemMessage(), HumanMessage()를 이용한 Messages 작성

(2) ChatPromptTemplate과 format_prompt()를 이용한 Formatted Prompts 작성

(3) ChatPromptTemplate 를 이용한 Formatted Prompts 작성


LangChain - OpenAI ChatModel - Messages


먼저 터미널에서 pip install 로 openai, langchain을 설치합니다. 


! pip install openai langchain


Prompt 작성과 Chat Model에 필요한 모듈을 importing 하고, 환경변수에 OpenAI API Key를 설정해줍니다. 


import os

from langchain.prompts import (
    ChatPromptTemplate, 
    SystemMessagePromptTemplate, 
    HumanMessagePromptTemplate,
)
from langchain.schema import SystemMessage, HumanMessage
from langchain.chat_models import ChatOpenAI

# set OpenAI API Key in your environment variables
os.environ["OPENAI_API_KEY"]="sk-xxxx..."


(1) SystemMessage(), HumanMessage()를 이용한 Messages 작성


Chat Model로는 OpenAI의 GPT-4 버전을 사용하겠습니다. 


# Chat Model
model = ChatOpenAI(temperature=0, model="gpt-4")


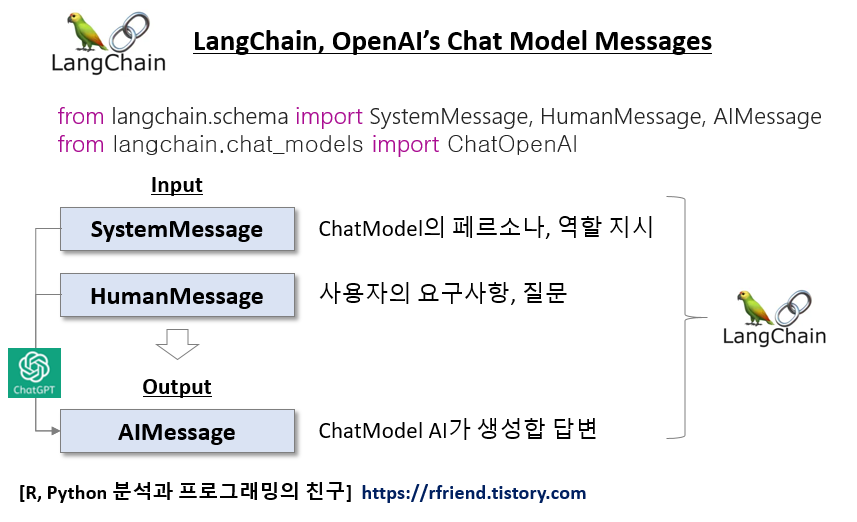
LangChain의 ChatModels 는 SystemMessage, HumanMessage, AIMessage의 3가지 종류의 메시지 클래스를 제공합니다. 


- (a) SystemMessage: 시스템 컴포넌트로부터의 메시지로, ChatModel에게 페르소나, 역할 설정.

- (b) HumanMessage: 사용자로부터의 메시지로, ChatModel에게 작업을 시키는 인풋 메시지.

- (c) AIMessage: AI 모델로부터의 메시지로, SystemMessage와 HumanMessage를 인풋으로 받아 아웃풋으로 반환하는 메시지 


아래 예에서는 langchain.schema 에서 SystemMessage, HumanMessage를 importing하여 리스트로 두 메시지를 묶어서 Chat Model 에 인풋으로 넣어주면 됩니다. 


Formatted message가 아닌 일반 메시지를 인풋으로 넣을 때 바로 사용할 수 있어서 편리합니다. 


# System, Human Messages
# Chat models accept List[BaseMessage] as inputs, 
# or objects which can be coerced to messages, 
# including str (converted to HumanMessage) and PromptValue.
messages = [
    SystemMessage(
        content="You are a helpful assisant that translate English to Korean."
    ), 
    HumanMessage(
        content="Translate this sentence from English to Korean: I love programming."
    ), 
]


model.invoke(messages)
# AIMessage(content='나는 프로그래밍을 사랑한다.')


(2) ChatPromptTemplate과 format_prompt()를 이용한 Formatted Prompts 작성


이번에는 Prompt 메시지의 내용을 기본 뼈대의 Template을 만들어놓고, Chat Model을 실행시킬 때 사용자가 맞춤형으로 Prompt의 일부 부분을 인풋으로 넣어주어 Formatted prompts 를 만들어 최종 Chat Model을 실행시킬 때 사용하는 ChatPromptTemplate을 소개하겠습니다. 


아래 Template 작성 예에서는 System template에서 {input_language}, {output_language} 부분, 그리고 Human template의 {text} 부분이 나중에 사용자가 최종 입력하는 값에 따라 입력이 되어서 최종 Formatted prompt 가 작성되는 방식입니다. 


먼저, System template, Human template을 만들고, 


# You can make use of templating by using a MessagePromptTemplate
# (a) System Message
system_template = """
You are a helpful assistant that translate {input_language} to {output_language}"""
system_message_prompt = SystemMessagePromptTemplate.from_template(system_template)


# (b) Human Message
human_template = "{text}"
human_message_prompt = HumanMessagePromptTemplate.from_template(human_template)


다음으로 ChatPromptTemplate.from_messages([템플릿 리스트...]) 를 사용하여 Chat Prompt를 만듭니다. 


# You can build a ChatPromptTemplate from one or more MessagePromptTemplates.
chat_prompt = ChatPromptTemplate.from_messages(
    [system_message_prompt, human_message_prompt]
)


마지막으로, chat_prompt.format_prompt() 에서 아래처럼 사용자 인풋에 해당하는 변수 별 값을 입력해주면 ChatPromptValue()를 반환합니다. 


# ChatPromptTemplate’s format_prompt – this returns a PromptValue, 
# which you can convert to a string or Message object, 
# depending on whether you want to use the formatted value as input to an llm or chat model.
chat_prompt.format_prompt(
    input_language="English", 
    output_language="Korean",
    text="I love programming.")

# ChatPromptValue(messages=[
# SystemMessage(content='\nYou are a helpful assistant that translate English to Korean'), 
# HumanMessage(content='I love programming.')])


chat_prompt.format_prompt().to_messages() 를 뒤에 붙여주면 [SystemMessage, HumanMessage]를 반환합니다. --> 다음 단계에서 ChatModel에 인풋으로 넣어줍니다. 


# to_messages()
chat_prompt.format_prompt(
    input_language="English", 
    output_language="Korean",
    text="I love programming.").to_messages()

# [SystemMessage(content='\nYou are a helpful assistant that translate English to Korean'),
#  HumanMessage(content='I love programming.')]


ChatModel 에 위에서 작성한 [SystemMessage, HumanMessage] 를 인풋으로 넣어 invoke()로 실행시킵니다. 


# Get a chat completion from the formatted messages
model.invoke(
    chat_prompt.format_prompt(
        input_language="English", 
        output_language="Korean",
        text="I love programming.").to_messages()
)

# AIMessage(content='나는 프로그래밍을 사랑한다.')


(3) ChatPromptTemplate 를 이용한 Formatted Prompts 작성


위의 (2)번 방법이 Formatted Prompts를 작성하는 방법이었는데요, 코드가 길고 좀 복잡한 면이 있습니다. 이번의 (3)번 방법은 보다 직관적이고 코드도 간결해서 사용하기에 상대적으로 편리합니다. 


ChatPromptTemplate.from_messages([("system", "Message..."), ("human", "Message...")]) 로 Chat Prompts 를 작성해줍니다. 


# Chat Prompts
final_prompt = ChatPromptTemplate.from_messages(
    [
        ("system", "You are a helpful assistant that translate {input_language} to {output_language}"), 
        ("human", "{text}")
    ]
)


'|'로 Prompt와 Chat Model을 Chaining 해주고, invoke({"인풋변수": "인풋 값"}) 형식으로 딕션어리에 키:값 쌍으로 입력해주면 됩니다. (2)번 방법보다 상대적으로 직관적이어서 이해하기 쉽습니다. 


# Chainning using '|' operator
chain = final_prompt | model


# Invoke a chain
chain.invoke({
    "input_language": "English", 
    "output_language": "Korean", 
    "text": "I love programming."}
)

# AIMessage(content='나는 프로그래밍을 사랑한다.')


[ Reference ]

- LangChain - ChatOpenAI: https://python.langchain.com/docs/integrations/chat/openai


이번 포스팅이 많은 도움이 되었기를 바랍니다. 

행복한 데이터 과학자 되세요!  :-)


728x90
반응형
Posted by Rfriend
,

Zero-shot, One-shot, Few-shot prompting은 특히 자연어 처리나 이미지 생성과 관련된 머신러닝 모델에서, 모델이 데이터를 어떻게 훈련하거나 사용하는지에 대해 설명할 때 사용됩니다. 이 용어들은 훈련 또는 추론 중에 모델에 제공되는 예제의 수와 관련이 있습니다. 


1. Zero-Shot Prompting

- 이는 모델이 수행해야 할 작업에 대한 예제가 전혀 제공되지 않는 시나리오를 의미합니다. 모델은 오로지 사전 훈련과 프롬프트의 지시에만 의존합니다. 

- 예시: 언어 모델에게 영어에서 프랑스어로 문장을 번역하라고 요청하는 것이며, 이때 이전의 번역 예제는 제공되지 않습니다. 


2. One-Shot Prompting 

- 이 경우 모델은 수행해야 할 작업의 한 가지 예제(a single example)를 제공받습니다. 이는 모델이 기대하는 형식이나 응답 유형을 이해하는 데 도움이 됩니다. 

- 예시: 언어 모델에게 새로운 농담을 만들기 전에 한 가지 농담 예제를 보여주는 것입니다. 이 예제는 템플릿이나 가이드 역할을 합니다. 


3. Few-Shot Prompting 

- 여기서는 모델에게 작업을 더 잘 이해할 수 있도록 소수의 예제(하나 이상이지만 일반적으로 많지 않음)가 제공됩니다. 

- 예시: 언어 모델에게 긴 텍스트를 한 단락으로 요약하는 세 가지 다른 예제를 제공한 후 새로운 텍스트를 요약하도록 요청하는 것입니다. 


각 경우에서 모델은 제공된 프롬프트의 정보를 사용하여 요청된 작업을 더 잘 이해하고 완수합니다. Zero-shot, One-shot, Few-shot prompting의 효과는 작업의 복잡성과 모델의 능력에 따라 다를 수 있습니다. 


지난번 포스팅에서는 LangChain과 LLM Models 을 사용하여 Few-shot Prompting 하는 방법을 소개하였습니다. 


이번 포스팅에서는 LLM Models 대신에 Chat Models 과 LangChain을 사용하여 Few-shot Prompting 하는 방법을 소개하겠습니다. 


(1) Chat Model 에 고정된 개수의 몇 개의 예시를 주는 Few-shot Prompting 

(2) Chat Model 에 사용자 인풋과 유사한 top k 개의 예시를 선별해서 주는 Dynamic Few-shot Prompting


LangChain - Few-shot Prompting for Chat Models


(1) Chat Model 에 고정된 개수의 몇 개의 예시를 주는 Few-shot Prompting 


먼저 터미널에서 pip install 로 langchain, openai, faiss-cup 모듈을 설치합니다. 


! pip install -q langchain openai faiss-cpu


그리고, 실습에 필요한 모듈을 importing 하고, Chat Model로 ChatGPT-4를 사용할 것이므로 OnenAI API Key를 등록해줍니다. 


from langchain.embeddings import OpenAIEmbeddings
from langchain.prompts import FewShotPromptTemplate, PromptTemplate
from langchain.prompts.example_selector import SemanticSimilarityExampleSelector
from langchain.vectorstores import FAISS
#from langchain.llms import OpenAI
from langchain.chat_models import ChatOpenAI
from langchain_core.output_parsers import StrOutputParser

# set environment: OpenAI API Key
import os
os.environ["OPENAI_API_KEY"]="sk-xxxx..." # set with yours


(a) Few-shot Prompting에 사용할 몇 개의 예시를 작성합니다.


(b) 그리고 ChatPromptTemplate() 를 사용해서 ("human": "{input}"), ("ai", "{output}") 처럼 Human과 AI의 역할에 인풋과 아웃풋을 매핑해줍니다 (이 부분이 LLM Model과 Chat Model이 다른 부분임).


(c) 그 다음에 FewShotChatMessagePromptTemplate()에 앞서 정의해준 examples, example_prompt를 각 각 설정해줍니다.


(d) 마지막으로 ChatPromptTemplate.from_messages() 으로 앞에서 정의해준 예시와 Prompt 포맷을 다 조합해서 최종 Few-shot Prompt 를 작성해줍니다. 이때 "system"에게 페르소나를 지정해주는 것과 마지막에 "human"의 "input"이 추가되었습니다. 


# (a) Fixed Examples
# Define examples of creating antonyms
examples = [
    {"input": "happy", "output": "sad"}, 
    {"input": "tall", "output": "short"}, 
    {"input": "sunny", "output": "rainy"}, 
    {"input": "surprised", "output": "calm"}, 
    {"input": "dry", "output": "humid"}, 
    {"input": "hot", "output": "cold"}, 
    {"input": "satisfied", "output": "dissatisfied"}, 
]


# (b) A prompt template used to format each individual example.
example_prompt = ChatPromptTemplate.from_messages(
    [
        ("human", "{input}"), 
        ("ai", "{output}")
    ]
)

# (c) Assemble them into the few-shot prompt template
few_shot_prompt = FewShotChatMessagePromptTemplate(
    example_prompt = example_prompt, 
    examples = examples,
)

print(few_shot_prompt.format())
# Human: happy
# AI: sad
# Human: tall
# AI: short
# Human: sunny
# AI: rainy
# Human: surprised
# AI: calm
# Human: dry
# AI: humid
# Human: hot
# AI: cold
# Human: satisfied
# AI: dissatisfied


# (d) Finally, assemble the final prompt and use it with a model
final_prompt = ChatPromptTemplate.from_messages(
    [
        ("system", "You are a trustwordy AI assistant."), 
        few_shot_prompt, 
        ("human", "{input}")
    ]
)


앞에서 정의한 Few-shot Prompt와 Chat Model, 그리고 Output Parser를 '|'를 사용해서 Chaining 해줍니다. 


# Chat Model
model = ChatOpenAI(model="gpt-4")

# Output Parser
parser = StrOutputParser()

# Chaining
chain = final_prompt | model | parser


앞에서 정의한 chain을 invoke()를 사용해서 실행시켜줍니다. 

chain.invoke({"input": "excited"})  ==> 'bored'

chain.invoke({"input": "snowy"})  ==> 'sunny'

라고 답변하는걸 보니 Few-shot Prompting이 잘 작동하네요. 


## Run the chain

chain.invoke({"input": "excited"})
# 'bored'

chain.invoke({"input": "snowy"})
# 'sunny'


(2) Chat Model 에 사용자 인풋과 유사한 top k 개의 예시를 선별해서 주는 Dynamic Few-shot Prompting


LangChain은 여러개의 예시 중에서 몇 개의 예시만을 선별해서 Few-shot Prompting을 할 수 있도록 4가지 종류의 Example Selector를 제공합니다. 


[ LangChain: Example Selector Types ]

LangChain Example Selector Types


이중에서 인풋과 예시를 임베딩으로 변환한 후에, 각 임베딩 벡터간 코사인 유사도를 계산해서, 사용자의 인풋과 가장 유사한 k개의 예시를 선택해주는 Semantic Similarity Example Selector를 사용해보겠습니다. 임베팅 변환은 OpenAI의 OpenAIEmbeddings() 를 사용하였으며, 임베딩 벡터를 저장하고 유사도 검색을 하는 Vector DB는 FAISS를 사용하였습니다. 


FewShotChatMessagePromptTemplate() 에 (예제 대신에) Example Selector를 설정해주고, ChatPromptTemplate.from_messages()에 "human"과 "ai"의 메시지 포맷을 설정해줍니다. 그리고 인풋으로 받는 변수 input_variables=["input"] 을 설정해주면 됩니다. 


# Select examples based on similarity to the inputs 
# by finding the examples with the embeddings that have the greatest cosine similarity with the inputs.
example_selector = SemanticSimilarityExampleSelector.from_examples(
    # the list of examples available to select from.
    examples, 
    # The embedding class used to produce embeddings which are used to measure semantic similarity.
    OpenAIEmbeddings(), 
    # The VectorStore class used to store the embeddings and do a similarity search over.
    FAISS, 
    # the number of examples to produce.
    k=2,
)


similar_prompt = FewShotChatMessagePromptTemplate(
    # we provide an ExampleSelector instead of examples.
    example_selector=example_selector, 
    # Define how each example will be formatted. 
    example_prompt=ChatPromptTemplate.from_messages(
        [("human", "{input}"), ("ai", "{output}")]
    ), 
    input_variables=["input"]
)


k=2 로서 사용자 인풋과 가장 유사한(즉, 인풋과 예제 임베딩 간 코사인 유사도가 가장 큰) 2개의 예제를 Example Selector를 사용해 선별해보겠습니다. 


"excited"를 인풋으로 넣었더니 감정에 해당하는 예제 2개를 잘 선택했습니다. 

"snowy"를 인풋으로 넣엏더니 날씨에 해당하는 예제 2개를 잘 선택했습니다. ^^b


# "excited" is a Feeling, k=2
example_selector.select_examples({"input": "excited"})
# [{'input': 'surprised', 'output': 'calm'}, {'input': 'happy', 'output': 'sad'}]


# "snowy" is a Weather, k=2
example_selector.select_examples({"input": "snowy"})
# [{'input': 'sunny', 'output': 'rainy'}, {'input': 'hot', 'output': 'cold'}]


ChatPromptTemplate.from_messages() 로 "system"의 페르소나를 지정해주고, 앞에서 Example Selector를 사용한 Few-shot Prompt 와 "human"의 "input" 까지 조합해주면 최종 프롬프트가 완성됩니다. 


# Assemble the final prompt template
final_prompt = ChatPromptTemplate.from_messages(
    [
        ("system", "You are a trustwordy AI assistant."),
        similar_prompt, 
        ("human", "{input}"),
    ]
)


print(final_prompt.format(input="excited"))
# System: You are a trustwordy AI assistant.
# Human: surprised
# AI: calm
# Human: happy
# AI: sad
# Human: excited


final_prompt, Chat Model, 그리고 Output Parser를 '|'를 사용해서 Chaining 해줍니다. 


마지막으로 invoke()를 써서 chat_chain을 실행시켜주면 됩니다. 


chat_chain.invoke({"input": "excited"}) ==> "relaxed"

chat_chain.invoke({"input": "snowy"}) ==> "clear"


라고 몇 개의 예제를 통해 과제에 대한 정보를 주었더니 Chat Model이 잘 이해해서 답변을 정확하게 생성했네요. 


# Chaining
chat_chain = final_prompt | model | parser

# Run the chain
chat_chain.invoke({"input": "excited"})
# 'relaxed'

chat_chain.invoke({"input": "snowy"})
# 'clear'


[ Reference ]

- LangChain - Few-shot examples for chat models: 
https://python.langchain.com/docs/modules/model_io/prompts/few_shot_examples_chat

- LangChain - Example Selector Types:

https://python.langchain.com/docs/modules/model_io/prompts/example_selector_types/


이번 포스팅이 많은 도움이 되었기를 바랍니다. 

행복한 데이터 과학자 되세요!  :-)


728x90
반응형
Posted by Rfriend
,

지난번 포스팅에서 LangChain 은 대규모 언어 모델을 사용해서 애플리케이션을 개발, 프로덕트화, 배포하는 것을 도와주는 프레임워크라고 소개했습니다. 그리고 LangChain Expression Language (LCEL) 는 LangChain의 기본적인 컴포넌트들을 chaining 기법을 써서 다단계 작업들의 연결 체인을 만들어 복잡한 기능을 구현할 수 있도록 해준다고 했습니다. 


이번 포스팅에서는 LangChain Expression Language (LCEL) 의 가장 간단한 형태의 chaining 예시를 들어보겠습니다. 


LCEL Chaining 기본 형태: Prompt + Model + Output Parser


이때 Model 로서 ChatModel과 LLM 모델을 사용할 때 input 과 output 이 조금 다르기 때문에, Model에 따라서 나누어서 소개하겠습니다. 


(1) ChatModel 사용 시 Pipeline: Input --> {Dict} --> PromptTemplate --> PromptValue --> ChatModel --> ChatMessage --> StrOutputParser --> String --> Result


(2) LLM 사용 시 Pipeline: Input String --> LLM --> Output String


LangChain: chaining a prompt, a model, and output parser


(1) ChatModel 을 사용한 Chaining 예: Prompt + ChatModel + Output Parser

: Input --> {Dict} --> PromptTemplate --> PromptValue --> ChatModel --> ChatMessage --> StrOutputParser --> String --> Result


만약 실습 환경에 langchain, openai 모듈이 설치가 안되어 있다면 termianl 이나 Jupyter Notebook (pip install 앞에 '!' 를 붙여서 사용) 에서 langchain, openai 모듈을 먼저 설치하기 바랍니다. 


! pip install -q langchain
! pip install openai


(1) 필요한 modules 을 불러옵니다. 

(2) OpenAI 의 API Key 를 설정해줍니다. 

(3) Prompt Template, Chat Model, Output Parser 의 인스턴스를 생성합니다. 

(4) '|' 를 사용해서 chain = promt | model | output_parser 를 연결(Chaining)해줍니다 

(5) chain.invoke() 를 사용해서 chain pipeline 을 실행시켜줍니다. 이때 invoke({"topic": "bird"}) 처럼 Dictionary 형태로 PromptTemplate 에 들어갈 Input을 넣어주면 됩니다. 


## (1) Importe modules
from langchain.prompts import ChatPromptTemplate
from langchain.chat_models import ChatOpenAI
from langchain_core.output_parsers import StrOutputParser

## (2) set with your openai api key
openai_api_key="sk-xxxxxx..."

## (3) Create instances of prompt, ChatModel, adn output parser
prompt = ChatPromptTemplate.from_template("tell me a short joke about {topic}")
model = ChatOpenAI(openai_api_key=openai_api_key)
output_parser = StrOutputParser()

## (4) Chaining a PromptTemplate + ChatModel + Output Parser using '|'
chain = prompt | model | output_parser

## (5) Run the whole pipeline of chain
chain.invoke({"topic": "bird"})

# \n\nWhy was the bird kicked out of the comedy club? Because it kept telling fowl jokes!


위에서 생성한 ChatPromptTemplate 의 인풋, 아웃풋을 단계별로 하나씩 살펴보겠습니다. 


    - ChatPromptValue: prompt.invoke()

    - Messages: prompt_value.to_messages()

    - HumanMessage: prompt_value.to_string()


ChatModel 은 인풋으로 PromptValue 를 받는 반면에, LLM 은 a string을 인풋으로 받는 차이점이 있습니다. (LLM도 PromptValue를 인풋으로 넣어줘도 작동합니다)


## ChatPromptValue
prompt_value = prompt.invoke({"topic": "bird"})

prompt_value
# ChatPromptValue(messages=[HumanMessage(content='tell me a short joke about bird')])

prompt_value.to_messages()
# Human: tell me a short joke about bird

prompt_value.to_string()
# Human: tell me a short joke about bird


다음으로, ChatModel의 아웃풋인 AIMessage 를 살펴보겠습니다. 


## ChatModel AIMessage
message = model.invoke(prompt_value)

message
# AIMessage(content="Why don't birds wear shoes? \n\nBecause they have talon-t!")


(2) LLM Model 을 사용 예

: Input String --> LLM --> Output String


LLM 모델로는 OpenAI의 OpenAI(model="gpt-3.5-turbo-instruct") 모델을 사용해서 예를 들어보겠습니다. LLM 모델의 인풋으로 string 을 받고, 아웃풋으로는 생성된 string 을 반환합니다. (위의 ChatModel 대비 인풋과 아웃풋이 모두 string 으로 상대적으로 간단합니다.)


# prompt + llm model + output parser
from langchain.llms import OpenAI

# Set your OpenAI API Key
openai_api_key="sk-xxxxx..."

# Create an instance of LLM model
llm = OpenAI(model="gpt-3.5-turbo-instruct", openai_api_key=openai_api_key)

# Run LLM model, put a string as an input, and outputs a string
llm.invoke("tell me a short joke about bird")
# \n\nWhy did the chicken go to the seance? To get in touch with its inner chick!


[Reference]

* LangChain Expression Language
https://python.langchain.com/docs/expression_language/get_started#basic-example-prompt-model-output-parser


이번 포스팅이 많은 도움이 되었기를 바랍니다. 

행복한 데이터 과학자 되세요!  :-)


728x90
반응형
Posted by Rfriend
,