[PyTorch] torchvision.datasets 모듈에 내장되어 있는 데이터 가져와서 시각화하기
Deep Learning (TF, Keras, PyTorch)/PyTorch basics 2023. 2. 26. 23:46이번 포스팅에서는 PyTorch 의 Torchvision.datasets 모듈에 내장되어 있는 데이터 중에서 하나를 가져와서 시각화해보는 작업을 소개하겠습니다.
(1) Torchvision.DataSets 모듈 소개
(2) torchvision.datasets 모듈에서 CIFAR10 데이터셋 다운로드하고 압축풀기
(3) torchvision.datasets 모듈에서 가져온 CIFAR10 데이터셋 살펴보기
(4) CIFAR10 이미지 시각화하기
(1) Torchvision.DataSets 모듈 소개
PyTorch 패키지의 Torchvision 은 torchvision.datasets 모듈에 다양한 종류의 내장된 데이터셋(built-in datasets)과 편리한 유틸리티 클래스(utility classes)를 제공합니다.
Torchvision 의 DataSets 모듈에 내장되어 있는 데이터셋의 과업 목적 종류별로 몇가지 예를 들어보면요,
- Image Classification: CIFAR10, CIFAR100, MNIST, FashionMNIST, Caltech101, ImageNet 등
- Image Detection or Segmentation: CocoDetection, celebA, Cityscapes, VOCSegmentation 등
- Optical Flow: FlyingChairs, FlyingThings3D, HD1K, KittiFlow, Sintel 등
- Stereo Matching: CarlaStereo, Kitti2015Stereo, CREStereo, SintelStereo 등
- Image Pairs: LFWPairs, PhotoTour
- Image Captioning: CocoCaptions
- Video Classification: HMDB51, Kinetics, UCF101
- Base Classes for Custom Datasets: DatasetFolder, ImageFolder, VisionDataset
등이 있습니다.
모든 데이터셋이 PyTorch의 torch.utils.data.Dataset 의 하위클래스이므로 __getitem__ 과 __len__ 메소드를 가지고 있으며, torch.utils.data.DataLoader 메소드를 적용해서 batch size 나 shuffle 여부 등의 매개변수를 적용해서 데이터 로딩을 편리하게 할 수 있습니다.
[참고 사이트] https://pytorch.org/vision/stable/datasets.html
(2) torchvision.datasets 모듈에서 CIFAR10 데이터셋 다운로드하고 압축풀기
아래와 같이 CIFAR10 을 다운로드할 경로를 설정해주고, datasets.CIFAR10(directory, download=True, train=True) 처럼 학습에 사용한다는 옵션(train=True) 부여해서 다운로드하면 됩니다. 데이터셋 크기가 꽤 큰 편이어서 시간이 좀 걸려요.
import torch
from torchvision import datasets
import numpy as np

print(torch.__version__)
# 1.10.0


## downloading CIFAR10 data from torchvision.datasets
## reference: https://pytorch.org/vision/stable/datasets.html
img_dir = '~/Downloads/CIFAR10'  # set with yours
cifar10 = datasets.CIFAR10(
    img_dir, download=True, train=True)

# Downloading https://www.cs.toronto.edu/~kriz/cifar-10-python.tar.gz to /Users/lhongdon/Downloads/CIFAR10/cifar-10-python.tar.gz
# 170499072/? [09:27<00:00, 300518.28it/s]

# Extracting /Users/lhongdon/Downloads/CIFAR10/cifar-10-python.tar.gz to /Users/lhongdon/Downloads/CIFAR10
[참고 사이트] CIFAR10 데이터셋에 대한 자세한 소개는 http://www.cs.toronto.edu/~kriz/cifar.html 를 참고하세요.
(3) torchvision.datasets 모듈에서 가져온 CIFAR10 데이터셋 살펴보기
CIFAR10 데이터셋은 이미지 데이터(data)와 분류 범주 (targets) 의 dictionary 로 되어있습니다.
## getting image data and targets
cifar10_data = cifar10.data
cifar10_targets = cifar10.targets


## information on FMNIST dataset
print('CIFAR10 data shape:', cifar10_data.shape) # array
print('CIFAR10 targets shape:', len(cifar10_targets)) # list

# CIFAR10 data shape: (50000, 32, 32, 3)
# CIFAR10 targets shape: 50000
이미지 데이터는 32 (폭) x 32 (높이) x 3 (RGB 채널) 크기의 데이터가 50,000 개 들어있는 다차원 배열 (ND array) 입니다.
## ND-array
cifar10_data[0]

# array([[[ 59,  62,  63],
#         [ 43,  46,  45],
#         [ 50,  48,  43],
#         ...,
#         [158, 132, 108],
#         [152, 125, 102],
#         [148, 124, 103]],

#        [[ 16,  20,  20],
#         [  0,   0,   0],
#         [ 18,   8,   0],
#         ...,
#         [118,  84,  50],
#         [120,  84,  50],
#         [109,  73,  42]],
#        ...,
#        [[177, 144, 116],
#         [168, 129,  94],
#         [179, 142,  87],
#         ...,
#         [216, 184, 140],
#         [151, 118,  84],
#         [123,  92,  72]]], dtype=uint8)
10개의 범주를 가지는 목표 범주(targets)는 0~9 의 정수가 들어있는 리스트(list) 입니다. cicar10.classes 로 각 범주의 이름에 접근할 수 있습니다.
## list
cifar10_targets[:20]

# [6, 9, 9, 4, 1, 1, 2, 7, 8, 3, 4, 7, 7, 2, 9, 9, 9, 3, 2, 6]


## target_labels : target_classes
for i in zip(np.unique(cifar10_targets), cifar10.classes):
    print(i[0], ':', i[1])

# 0 : airplane
# 1 : automobile
# 2 : bird
# 3 : cat
# 4 : deer
# 5 : dog
# 6 : frog
# 7 : horse
# 8 : ship
# 9 : truck
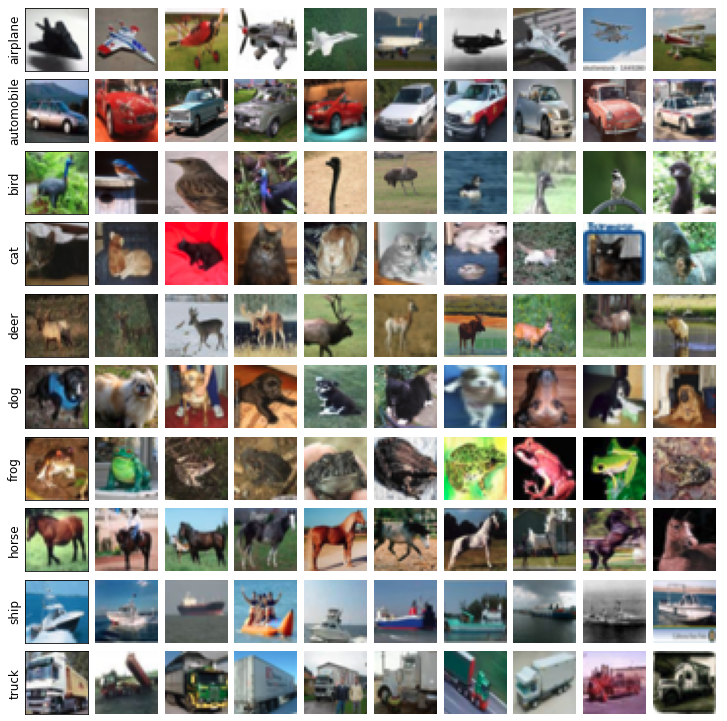
(4) CIFAR10 이미지 시각화하기
10개 범주의 각 클래스에서 10개의 이미지를 가져와서 10 x 10 grid 에 subplots 을 그려보겠습니다.
import matplotlib.pyplot as plt
import numpy as np

row_num, col_num = len(cifar10.classes), 10
fig, ax = plt.subplots(row_num, col_num, figsize=(10, 10))

for label_class, plot_row in enumerate(ax):
    ## array of index per each target classes
    label_idx = np.where(np.array(cifar10_targets) == label_class)[0]
    for i, plot_cell in enumerate(plot_row):
        if i == 0:
            ## adding class label at ylabel axis
            plot_cell.set_ylabel(cifar10.classes[label_class],
                                 fontsize=12)
            ## no ticks at x, y axis
            plot_cell.set_yticks([])
            plot_cell.set_xticks([])
            idx = label_idx[i]
            img = cifar10_data[idx]
            plot_cell.imshow(img)
        else:
            # turn off axis
            plot_cell.axis('off')
            # pick the first 10 images from each classes
            idx = label_idx[i]
            img = cifar10_data[idx]
            plot_cell.imshow(img)

# Adjust the padding between and around subplots
plt.tight_layout(pad=0.5)
이번 포스팅이 많은 도움이 되었기를 바랍니다.
행복한 데이터 과학자 되세요! :-)

'Deep Learning (TF, Keras, PyTorch) > PyTorch basics' 카테고리의 다른 글
| 기울기 소실 문제(Vanishing Gradient Problem)란 무엇이고, 어떻게 완화할 수 있나? (0) | 2023.12.13 |
|---|---|
| 딥러닝에서 오차역전파법 (Backpropagation, Backward Propagation of Errors) 이란? (0) | 2023.12.12 |
| [PyTorch] 텐서 나누기 (splitting a PyTorch tensor into multiple tensors) (0) | 2023.02.23 |
| [PyTorch] 텐서 합치기 (concat, stack) (0) | 2023.02.21 |
| [PyTorch] 텐서의 인덱싱과 슬라이싱 (indexing & slicing of PyTorch tensor) (0) | 2023.02.19 |