아직 OpenAI 회원가입을 하지 않았다면, 아래 사이트의 우측 상단에 있는 'Sign up' 메뉴를 선택해서 회원가입을 먼저 하면 됩니다.
OpenAI Platform Overview
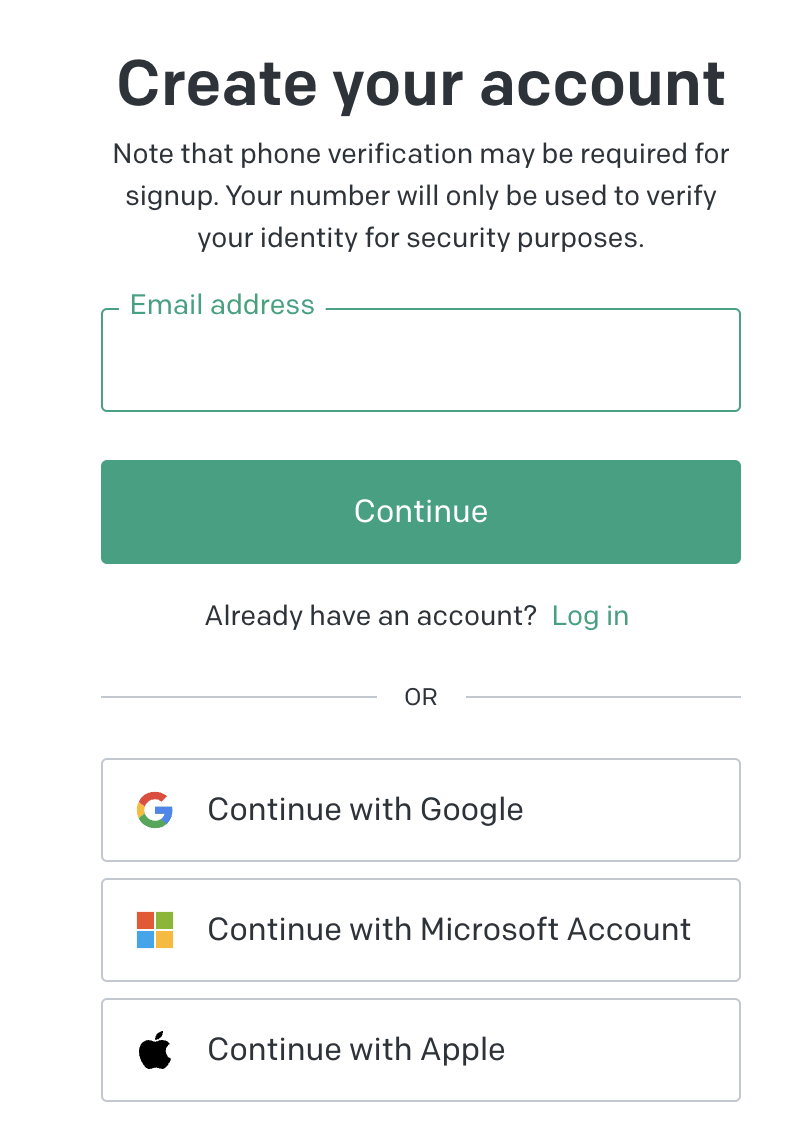
계정을 생성하는 회원 가입 페이지는 아래와 같습니다. Email 주소를 입력하거나, 아니면 Google, Microsoft, Apple 계정을 연동해서 쉽고 빠르게 회원가입을 진행할 수도 있습니다.
OpenAI Create your account
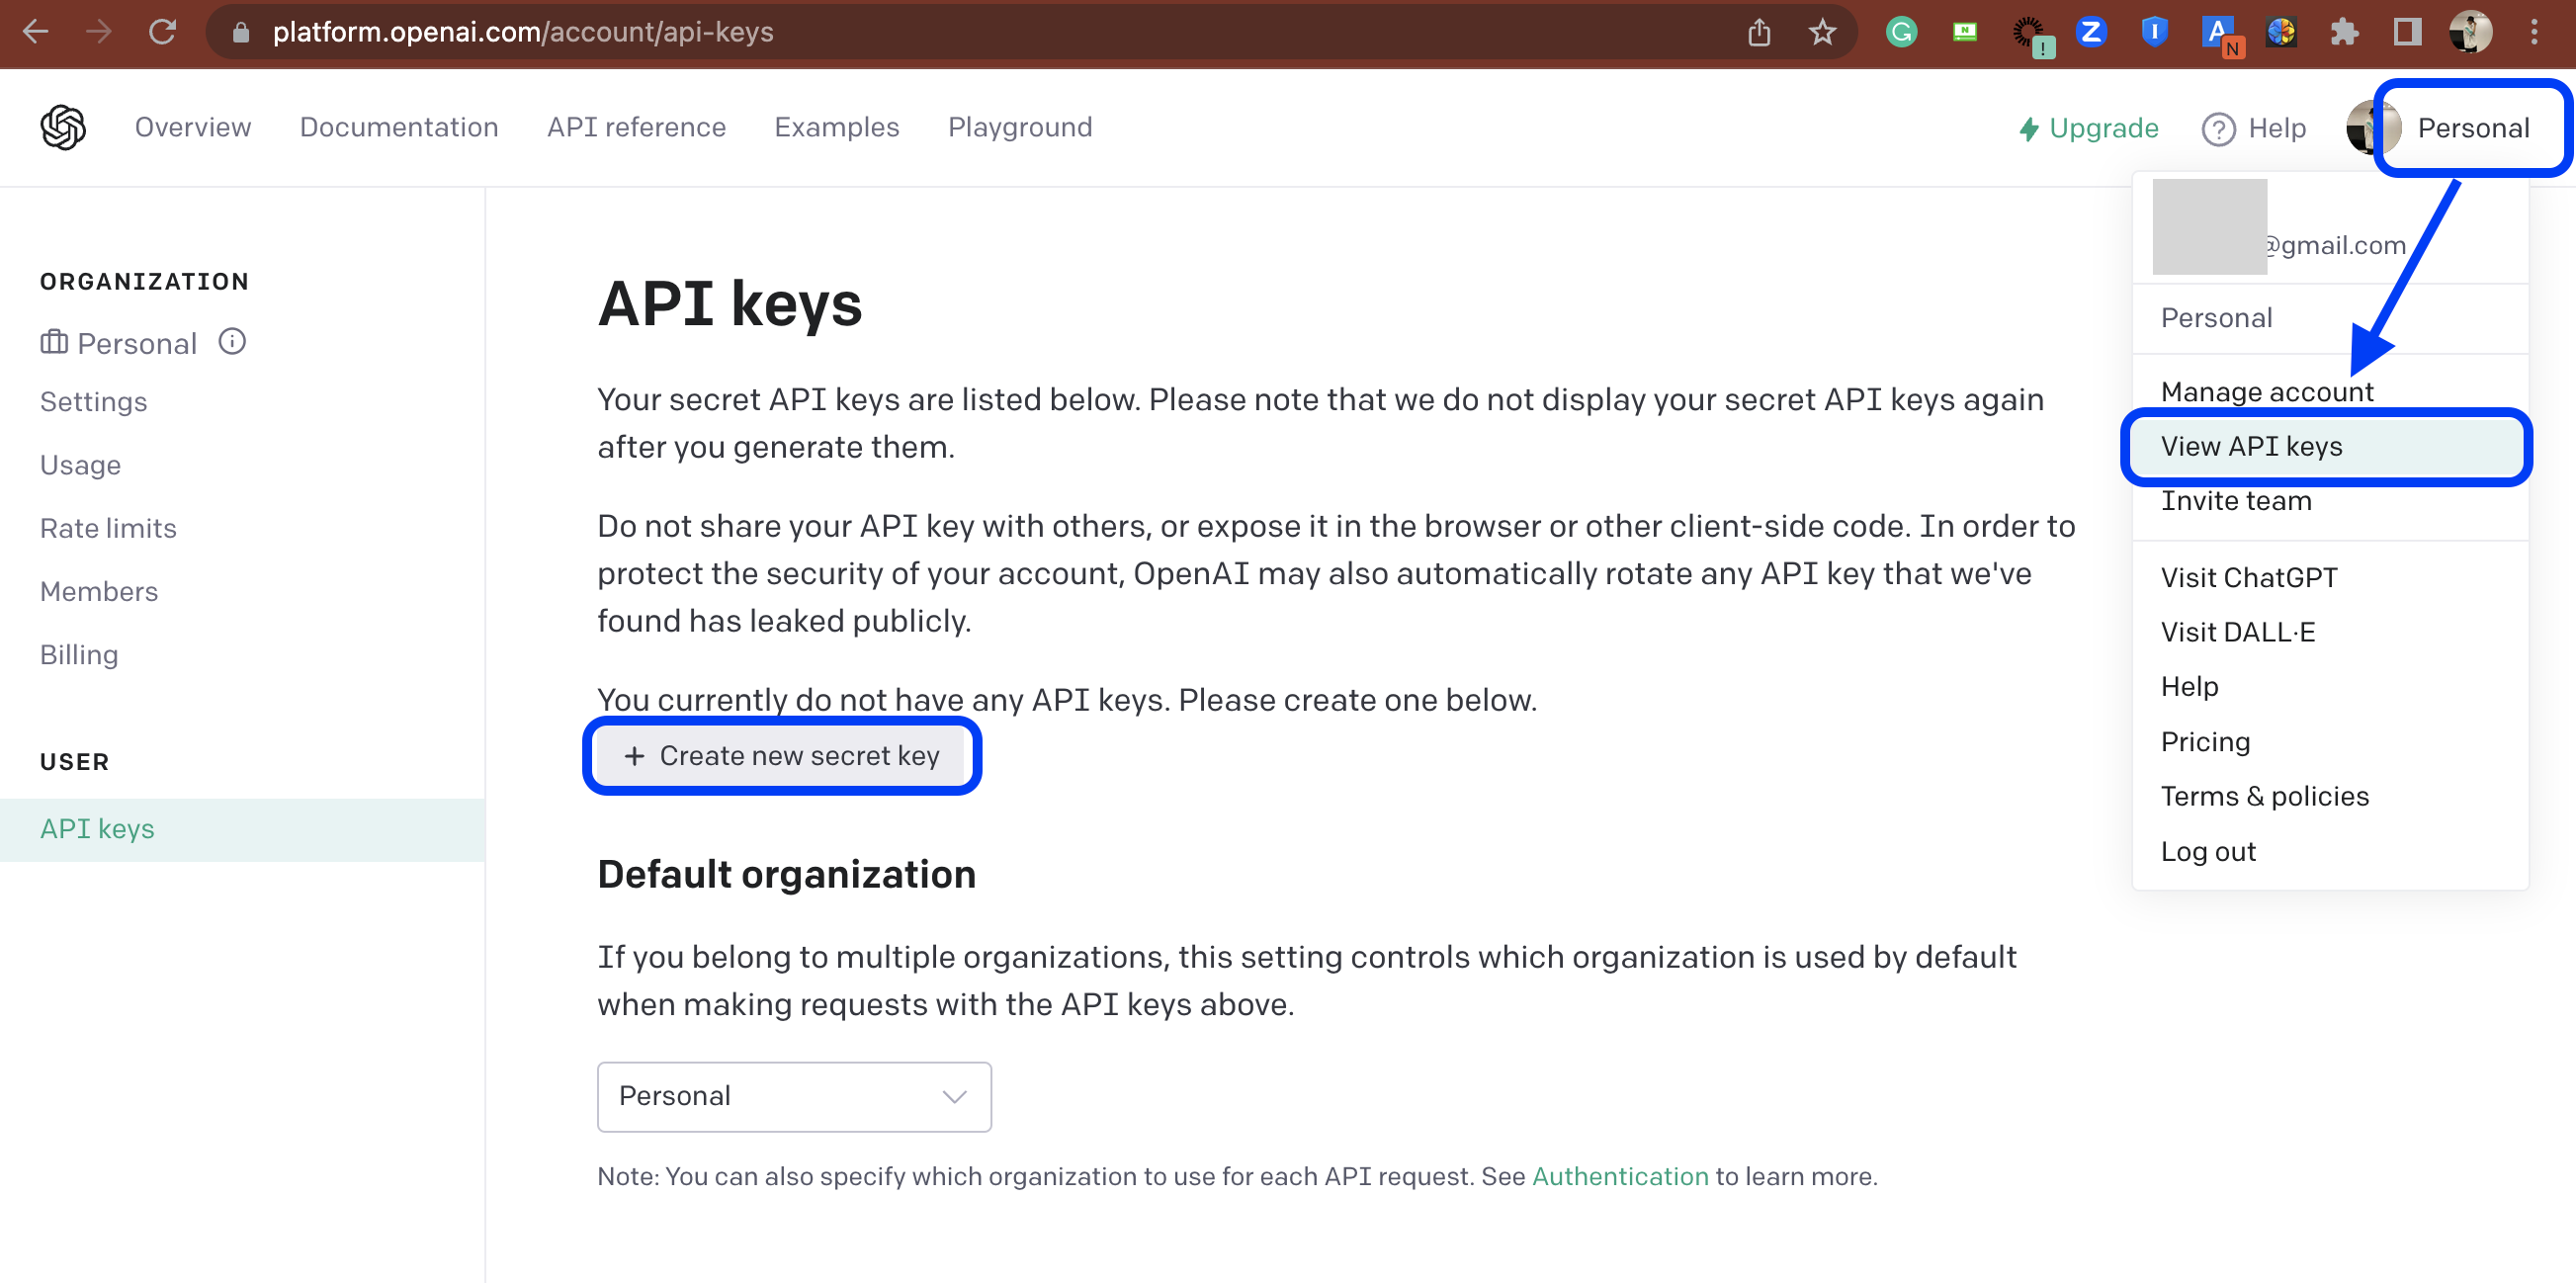
2. 로그인 후 'View API Keys' 메뉴로 가기
우측 상단의 Personal > View API keys 클릭 후 > 본문의 + Create enw secret key 메뉴 클릭
(만약 기존에 발급받았던 API keys 가 존재할 경우 API keys 페이지에 API Keys 리스트만 나오며, API Key 자체를 다 보여주지는 않습니다.).
OpenAI View API keys
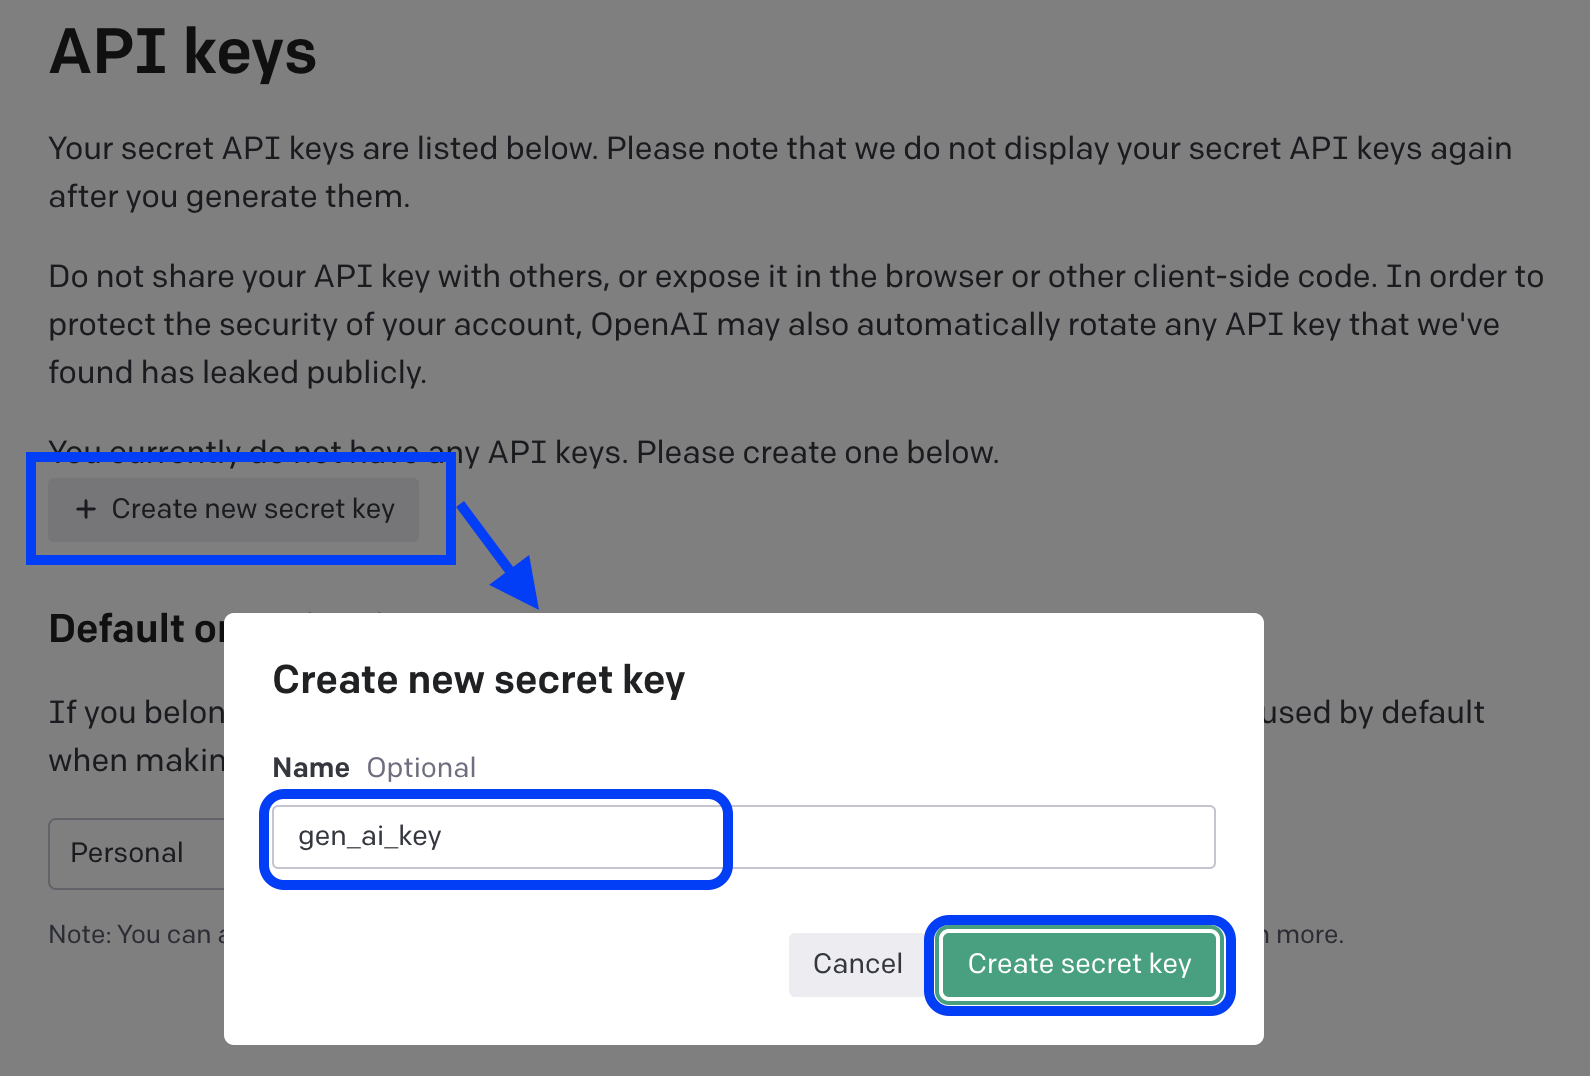
3. '+ Create new secret key' 메뉴 선택해서 API key 생성
API keys 페이지의 본문 중간에 있는 '+ Create new secret key' 메뉴를 클릭하면 아래에 보이는 바와 같이 'Create new secret key' 팝업 창이 뜹니다. 팝업 창의 가운데 빈칸에 key의 이름을 입력해주고 우측 하단에 'Create secret key' 단추를 클릭하면 API key 가 생성됩니다.
OpenAI API key creation
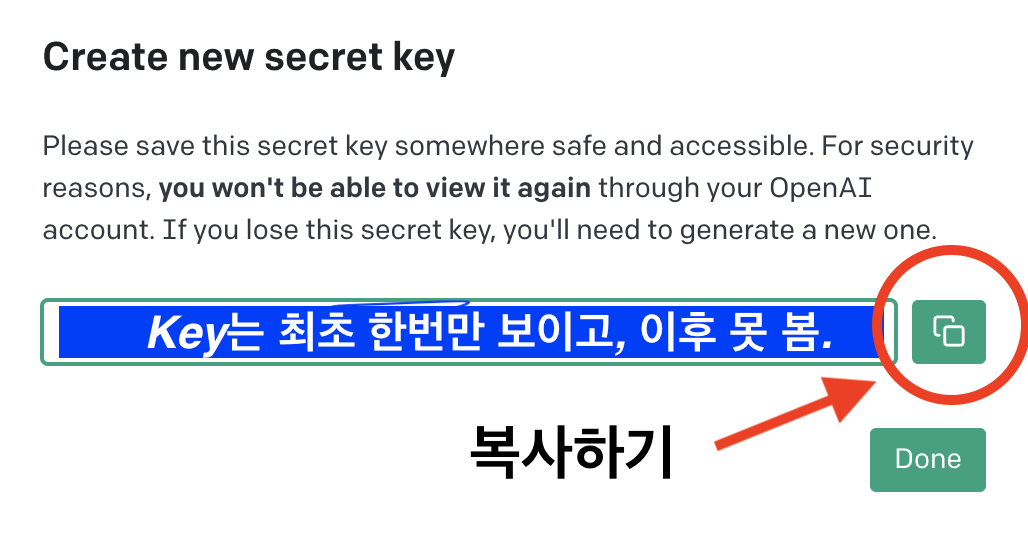
4. 새로 생성된 OpenAI API Key 복사 후 별도 저장
새로 생성된 API key 는 보안 상의 이유로 해서 최초로 생성되는 시점에 딱 한번만 볼 수 있으며, 이후에는 다시 볼 수 없습니다. 따라서 아래 복사를 해서 안전한 곳에 보관을 해서 사용해야 합니다. 만약 API key 를 잃어버렸다면 새로 발급받는 방법밖에 없으므로 보관에 유의하시기 바랍니다.
OpenAI API key copy
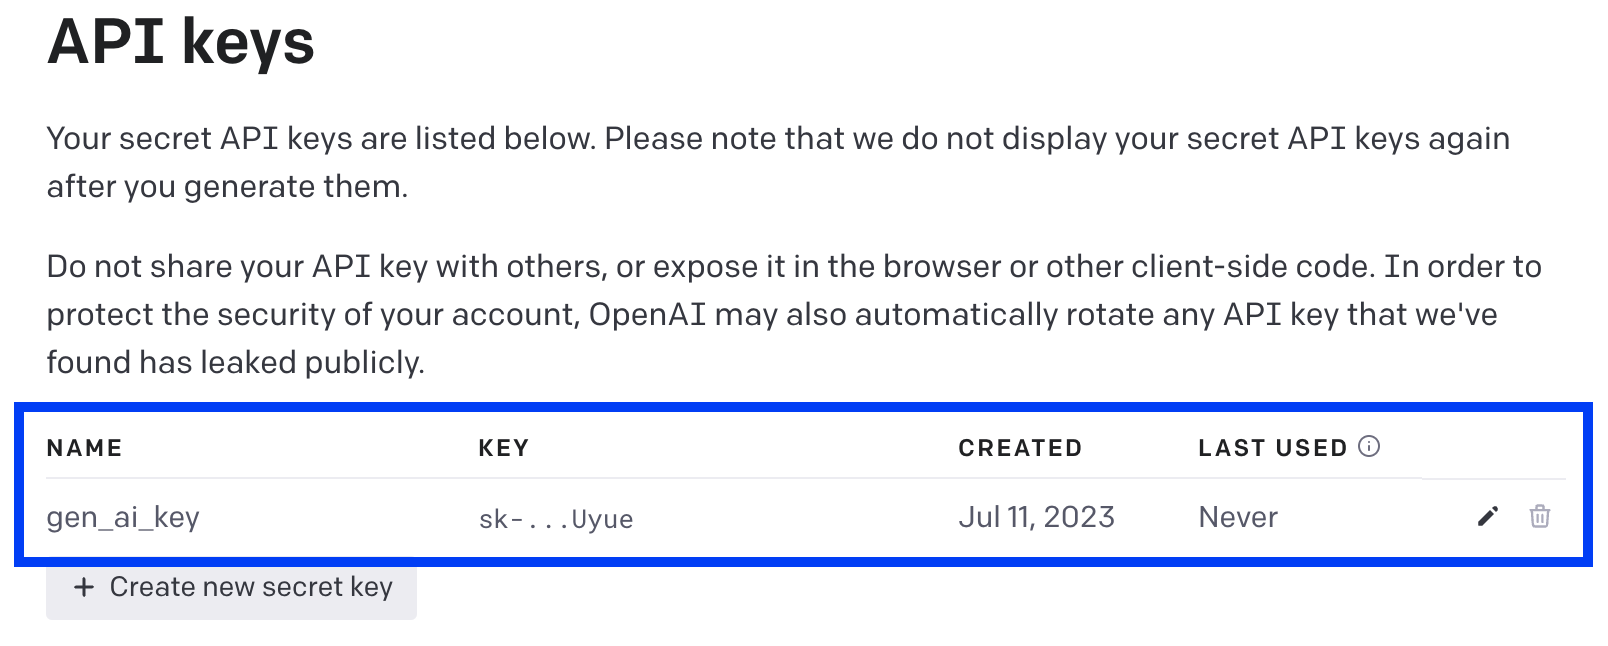
5. 생성된 OpenAI API keys 목록 조회
위에서 생성한 API key 에 대해서 아래의 화면처럼 "이름(name)-키(key)-생성일(created)-최종사용일(last used)" 의 내용으로 확인할 수 있습니다. (이때 API key는 보안 이유로 볼 수 없습니다.)
API key 는 다른 사람과 공유할 수 없으며, 브라우저나 클라이언트 쪽의 코드에 노출하면 안됩니다. 각 사용자의 보안을 보호하기 위해서 OpenAI 회사가 공개적으로 노출된 사용자의 API Key를 찾는다면 자동으로 API key를 변경할 수 있다고 하네요. 보안뿐만 아니라 비용 과금과도 관련되었으므로 API key는 노출되지 않게 잘 관리해야 겠지요.
이제 API key 생성이 끝났으므로, 애플리케이션 개발에 API key를 사용하면 됩니다.
OpenAI API keys: generated lists
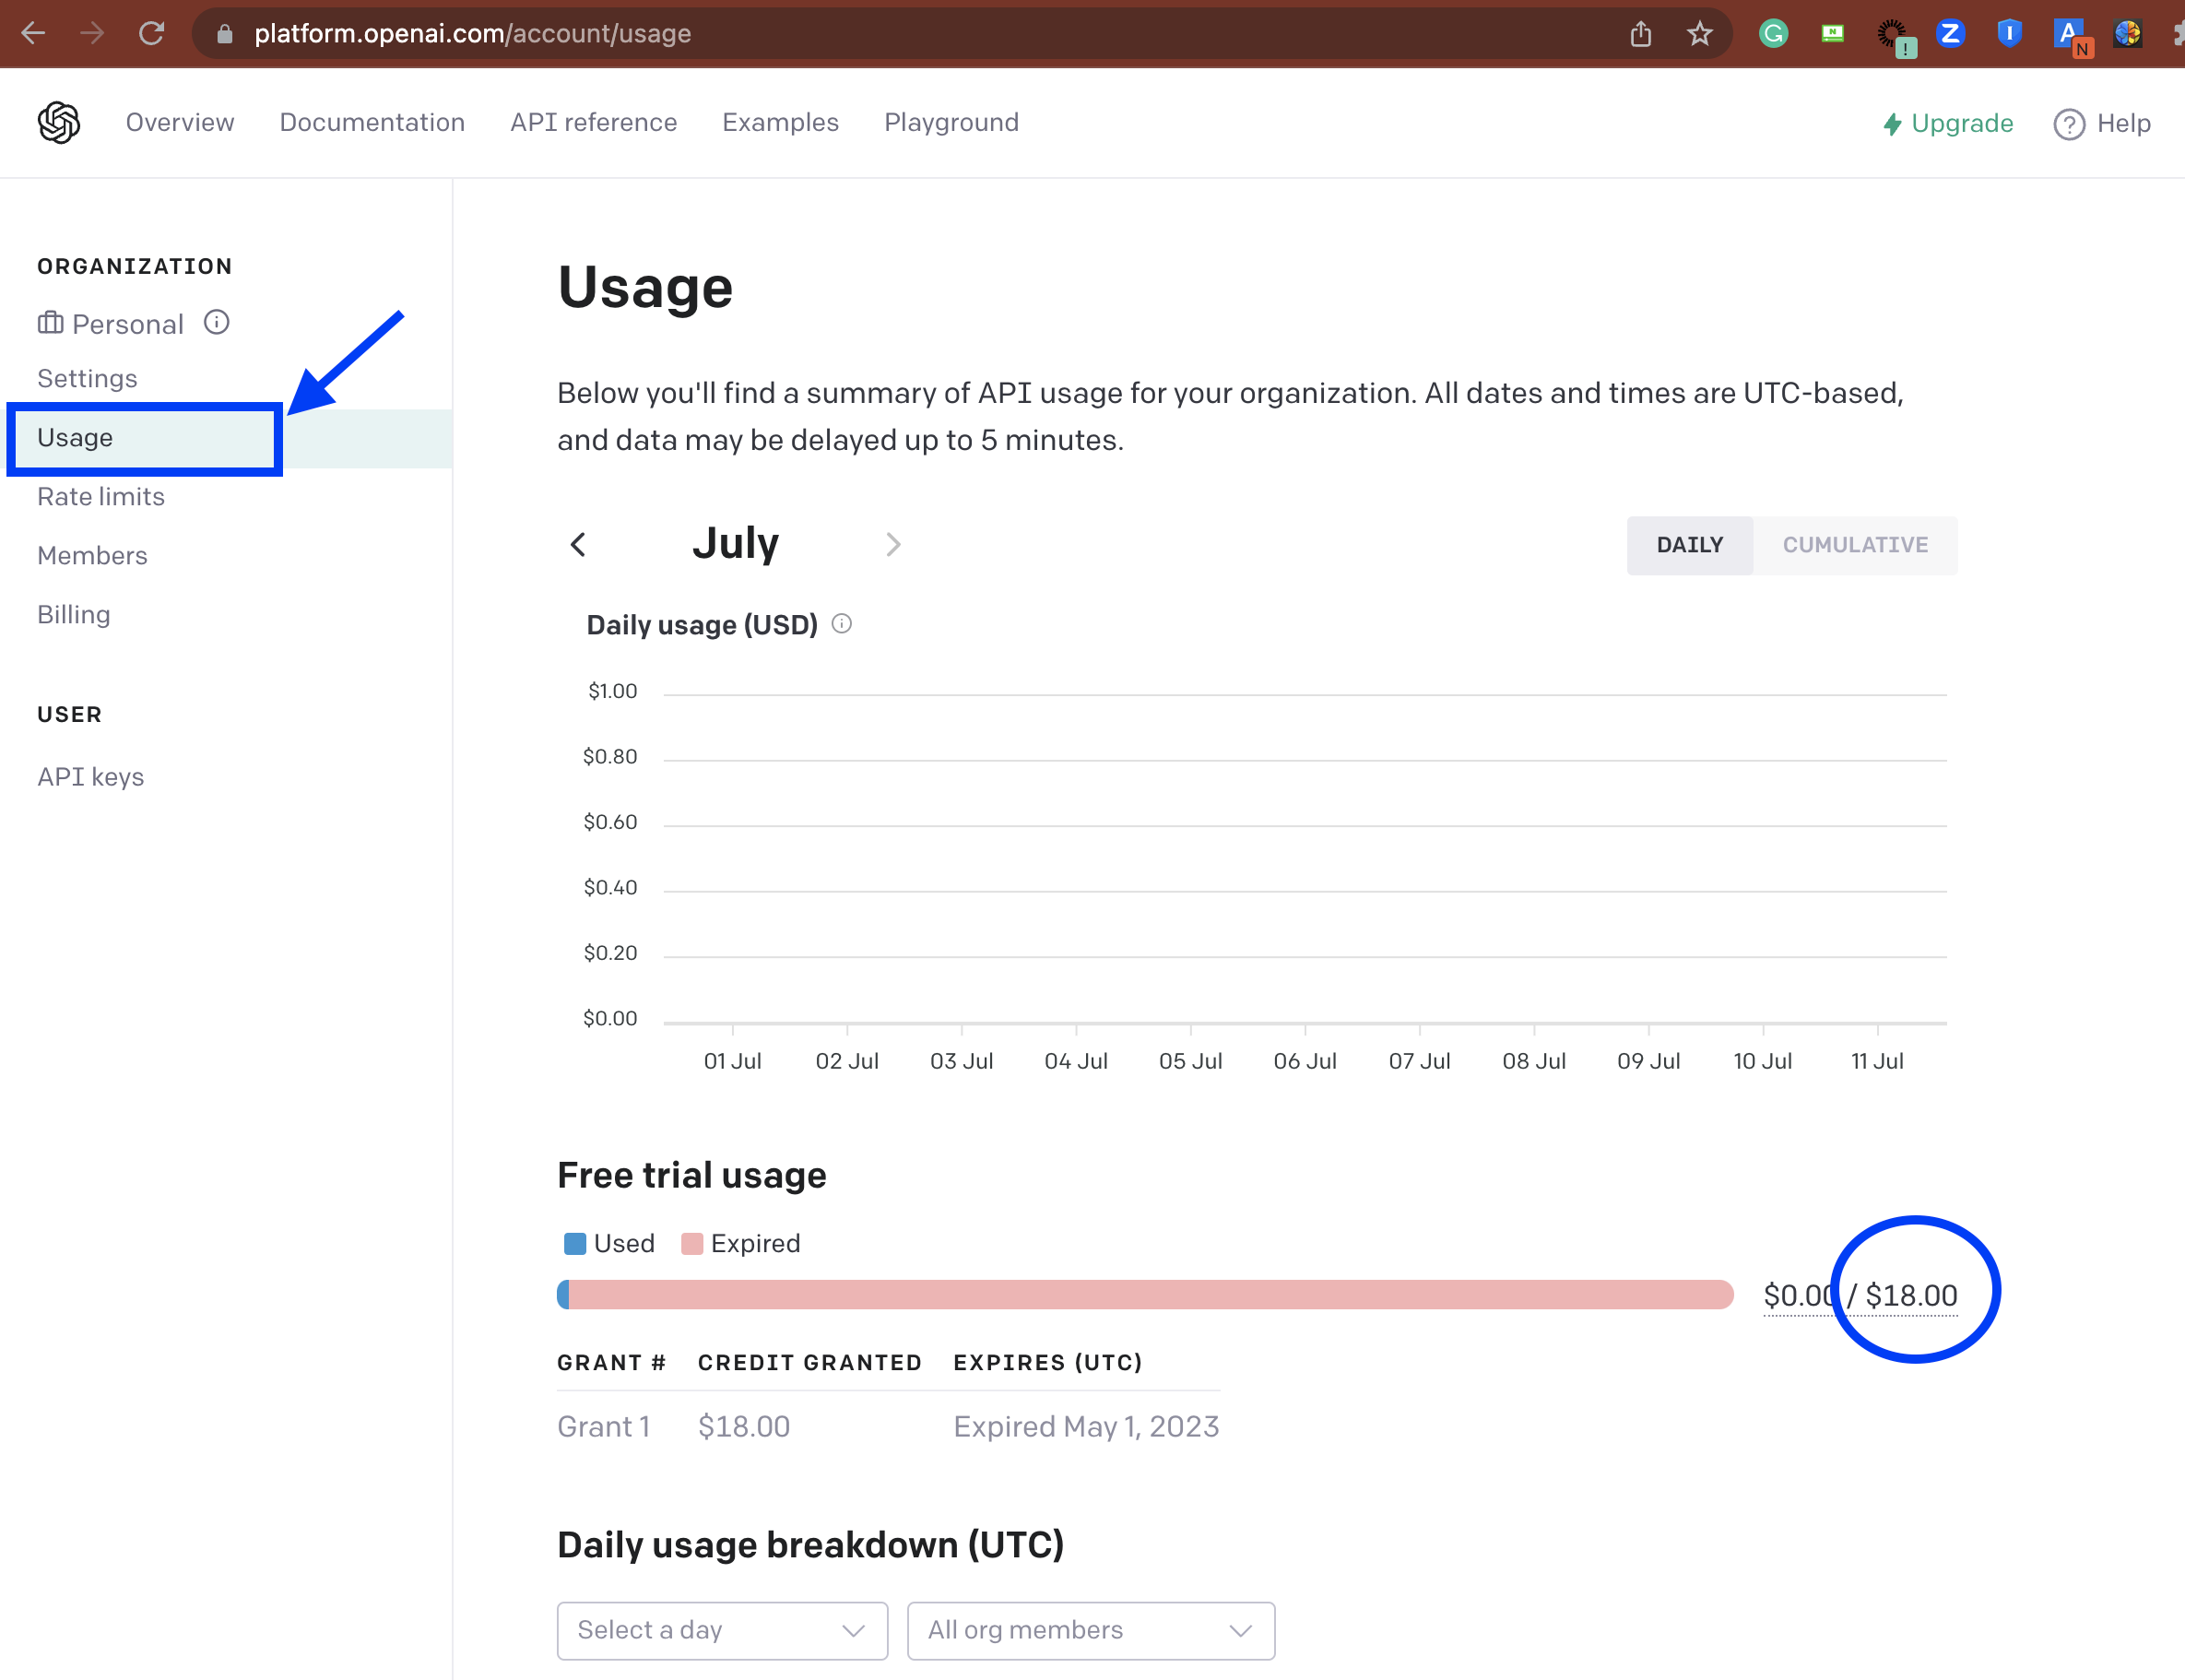
6. OpenAI API 사용량 확인
좌측의 'Usage' 메뉴를 선택하면 개인이나 조직의 일별 API 사용량 (Daily usage) 을 확인할 수 있습니다.
계정별로 $18 의 무료 시범 사용 (Free trial usage) 이 가능합니다. 공부하는 개인이라면 $18 로 API 테스트를 해보기에 부족함이 없을 것 같아요.
OpenAI API usage
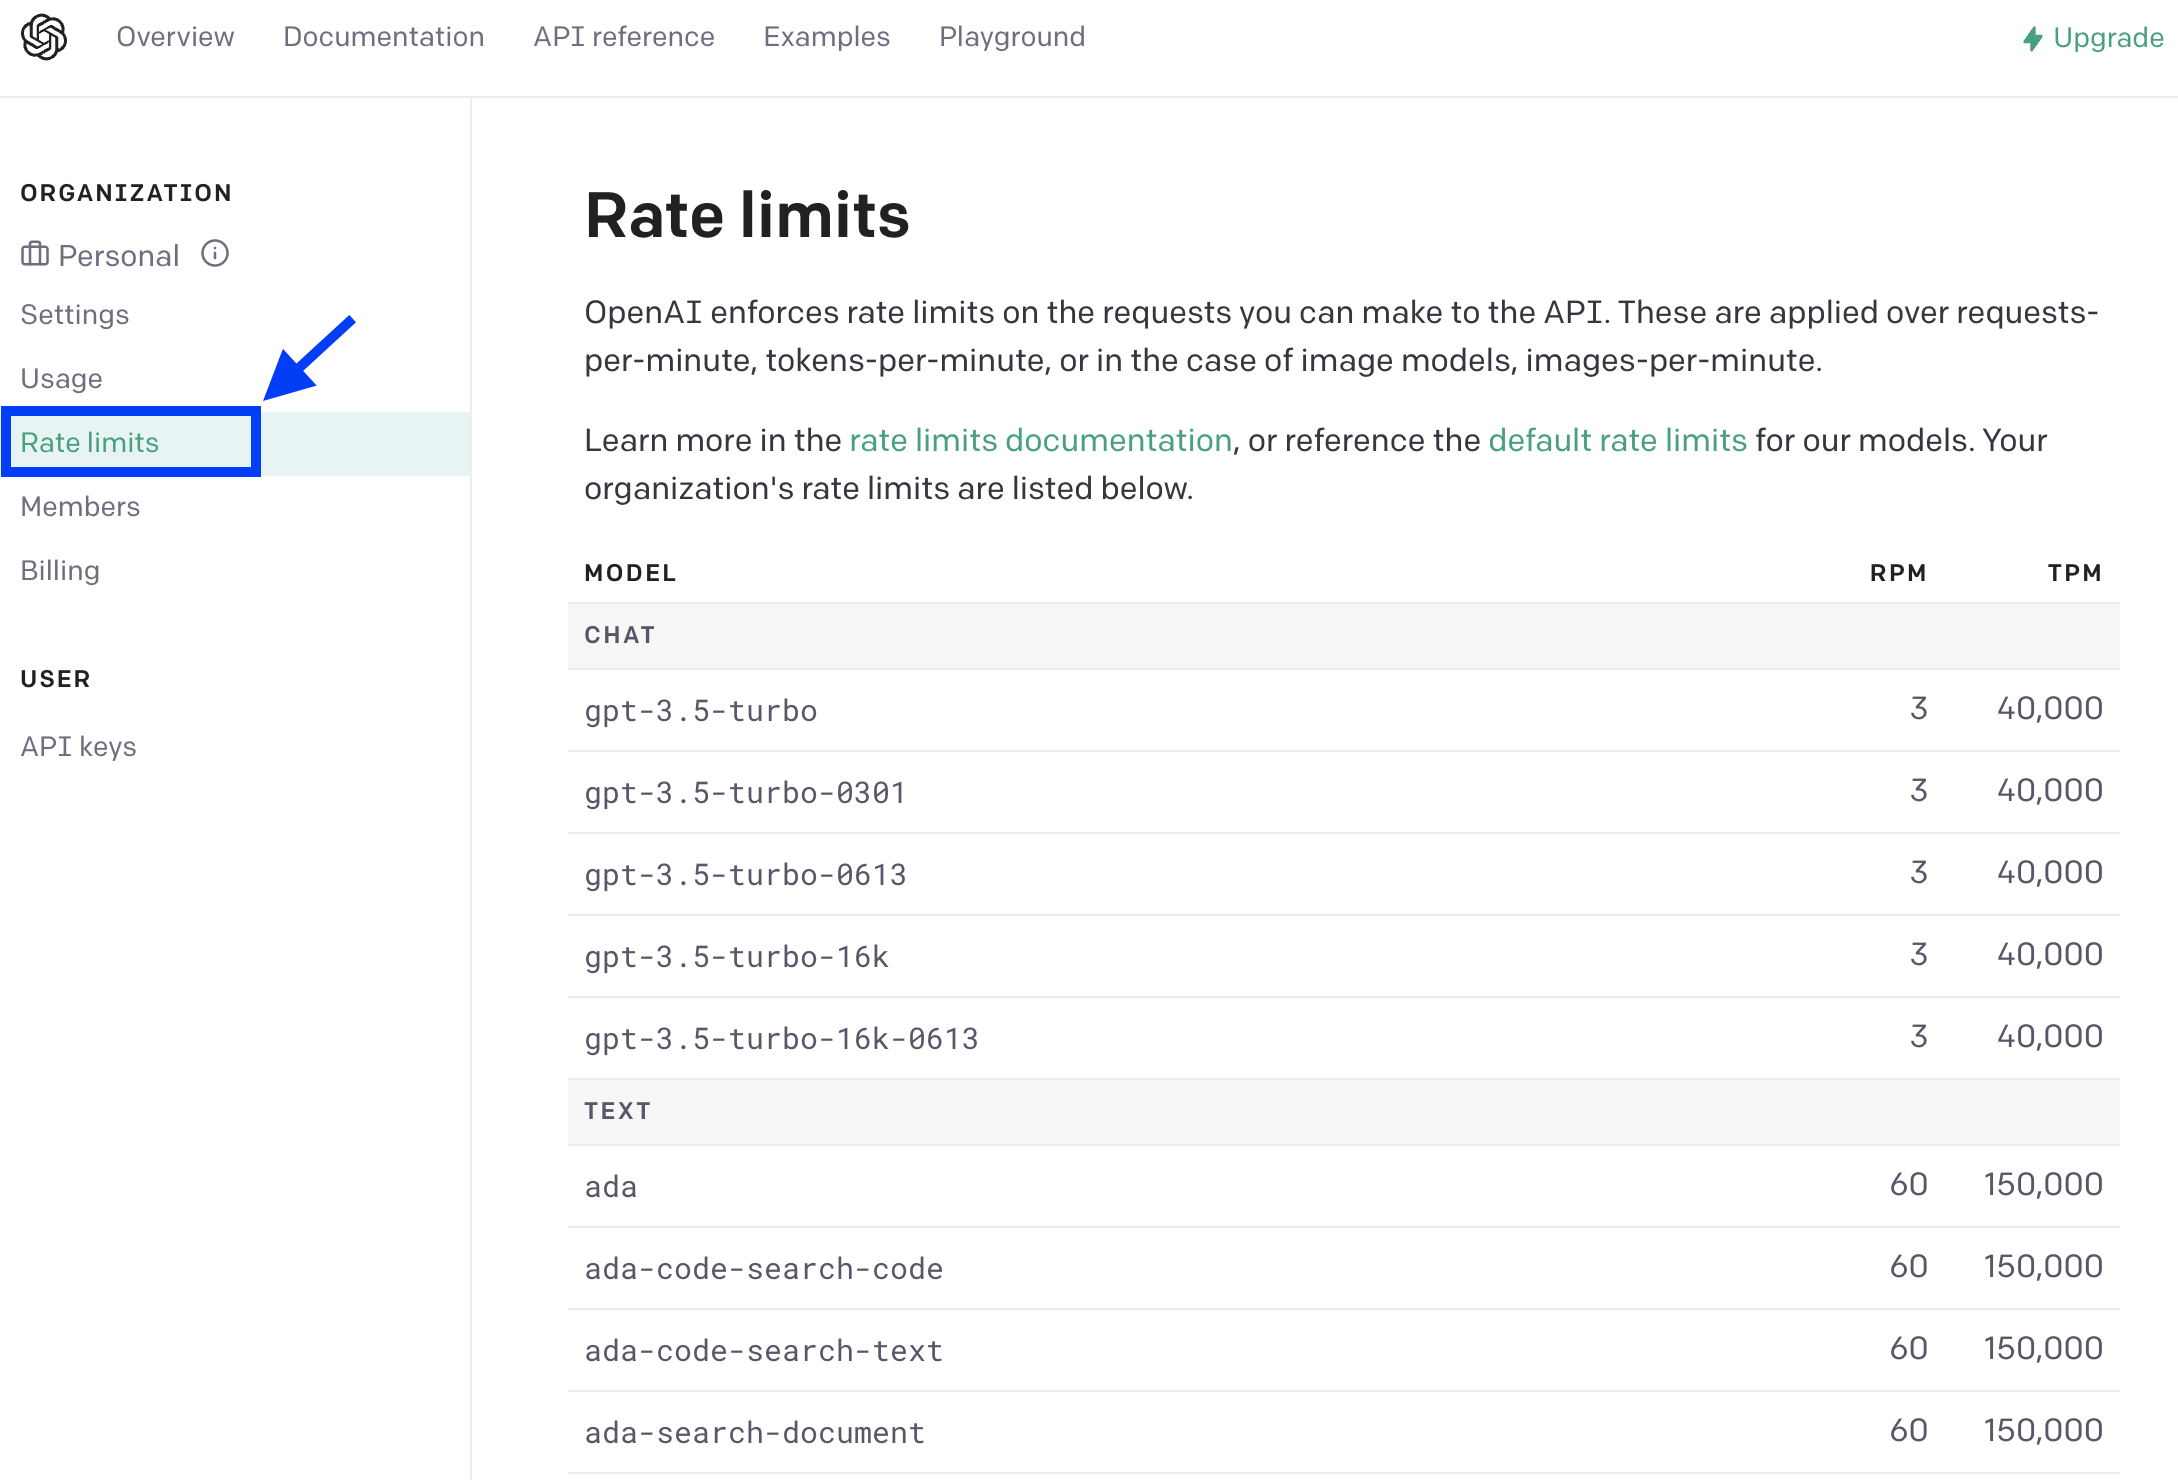
7. Rate limits
API 를 사용함에 있어 requests-per-minute, tokens-per-minute, images-per-minite 별 제한이 있으므로 애플리케이션 개발에 참고하시기 바랍니다. (좌측의 'Rate limits' 메뉴에서 조회)
다음번 포스팅에서는 API key를 사용해서 Python으로 ChatGPT 를 실제로 사용해보는 예제를 소개하겠습니다.
* 참고: OpenAI의 API와 Greenplum, PostgreSQL의 pgvector 를 연동해서 Semantic search, Question & Answering 에 활용하는 방법은 https://rfriend.tistory.com/804 를 참고하세요.
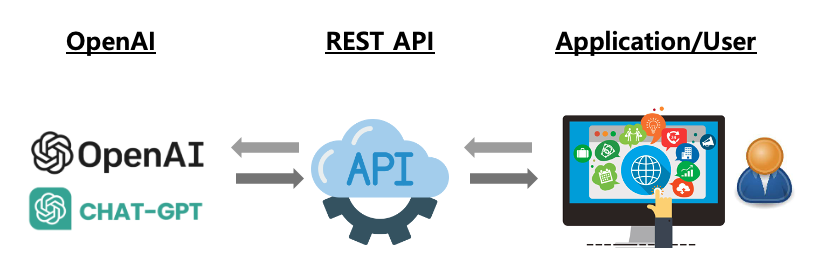
이번 포스팅에서는 애플리케이션을 개발할 때 REST API 로 OpenAI의 서비스를 사용할 수 있는
(1) OpenAI API 를 이용해서 GPT-3 Text Embeddings 를 하는 방법
(2) OpenAI API 를 이용해서 ChatGPT 채팅을 하는 방법
을 소개하겠습니다.
Application using OpenAI's REST API
먼저, openai 모듈이 없으면 터미널에서 openai 파이썬 모듈을 설치해야 합니다
-- terminal 에서 모듈 설치

pip install openai
pip install --force-reinstall charset-normalizer==3.1.0
그리고, Billing method 에서 API를 사용한 만큼의 비용을 결제할 때 사용하는 신용카드를 등록해야 합니다.
(1) OpenAI API 를 이용해서 GPT-3 Text Embeddings 를 하는 방법
텍스트 임베팅 (Text Embeddings)은 텍스트 유사성(text similarity), 텍스트 군집화(clustering), 토픽 모델링(topic modeling), 텍스트 검색(text search), 코드 검색(code search) 등에 사용됩니다.
openai.Embedding.create() 함수에 텍스트 문장을 input 으로 넣어주면, 1,536 차원의 리스트(list) 데이터 유형의 embeddings 를 output 으로 반환합니다.
OpenAI API Key는 외부로 노출되지 않도록 보안에 유의하시기 바랍니다. (사용한 만큼 과금이 됩니다!)
## OpenAI API key
## how to get key: https://rfriend.tistory.com/794
openai_key = "Your_OpenAI_API_Key_here"


## Getting Embeddings
def get_embedding(content, openai_key):
    import openai

    openai.api_key = openai_key

    text = content

    response = openai.Embedding.create(
        model="text-embedding-ada-002",
        input = text.replace("\n", " ")
        )

    embedding = response['data'][0]['embedding']

    return embedding


## run the UDF above
content = """What is love?"""

text_embs = get_embedding(content, openai_key)


## sentence embeddings in detail
type(text_embs)
# list

len(text_embs)
# 1536

print(text_embs)
# [0.010716659016907215, -0.019867753610014915,
#. -0.010219654999673367, -0.008119810372591019,
#  ......
#  0.014152202755212784, -0.022837355732917786,
#. -0.0026341236662119627, -0.03941245377063751]
(2) OpenAI API 를 이용해서 ChatGPT 채팅을 하는 방법
messages 에 {"role": "system", "content": "You are an intelligent assistant."} 를 설정해주고, input("User : ") 를 통해 사용자의 질문을 input으로 입력받아 {"role": "user", "content": message} 를 함께 묶어서 (append) OpenAI API 를 통해 ChatGPT 모델에 전달합니다.
그러면 OpenAI의 서버에서 openai.ChatCompletion.create(model="gpt-3.5-turbo", messages=messages) 함수가 GPU를 사용해서 열심히 Text Generation Inference 를 해서 답변(reply)를 API를 통해 사용자에게 반환합니다.
제일 마지막에 있는 messages.append({"role": "assistant", "content": reply}) 는 ChatGPT 가 답변한 내용(reply)를 messages 에 합쳐 놓아서 이후의 이어지는 질문에 이전 답변을 참고하는데 사용됩니다. (ChatGPT는 이전 상태에 대한 기억이 없기 때문에 이렇게 해주는 것임).
#%% AI-assisted Chatting
import openai

opneai_key = "Your_OpenAI_API_Key_here"
openai.api_key = opneai_key


messages = [ {"role": "system",
              "content": "You are an intelligent assistant."} ]

message = input("User : ")
if message:
    messages.append(
        {"role": "user",
         "content": message},
    )
    chat = openai.ChatCompletion.create(
        model="gpt-3.5-turbo",
        messages=messages
    )


reply = chat.choices[0].message.content

print(f"ChatGPT: {reply}")

messages.append({"role": "assistant", "content": reply})


## 챗팅 결과
# User :  What is love?

# ChatGPT: Love is a complex emotion and can mean different things to different people.
# Generally, love refers to a deep affection, care, and attachment felt towards someone or something.
# It involves feelings of intense happiness, contentment, and a sense of connection.
# Love can exist in various forms, such as romantic love, familial love, platonic love,
# or even love for hobbies and interests. It is often characterized by selflessness,
# understanding, support, and the desire to nurture and protect the well-being of the loved one.
# Love can bring joy, fulfillment, and a sense of purpose to our lives, but it can also be challenging
# and require effort, compromise, and understanding. Ultimately,
# love is a fundamental aspect of human experience that enriches relationships
# and contributes to personal growth and happiness.
텍스트 데이터 전처리를 하는데는 (a) Python의 텍스트 처리 내장 메소드 (Python built-in methods)와 (b) 정규 표현식 매칭 연산(regular expression matching operations)을 제공하는 Python re 패키지를 사용하겠습니다. re 패키지는 Python을 설치할 때 디폴트로 같이 설치가 되므로 별도로 설치할 필요는 없습니다.
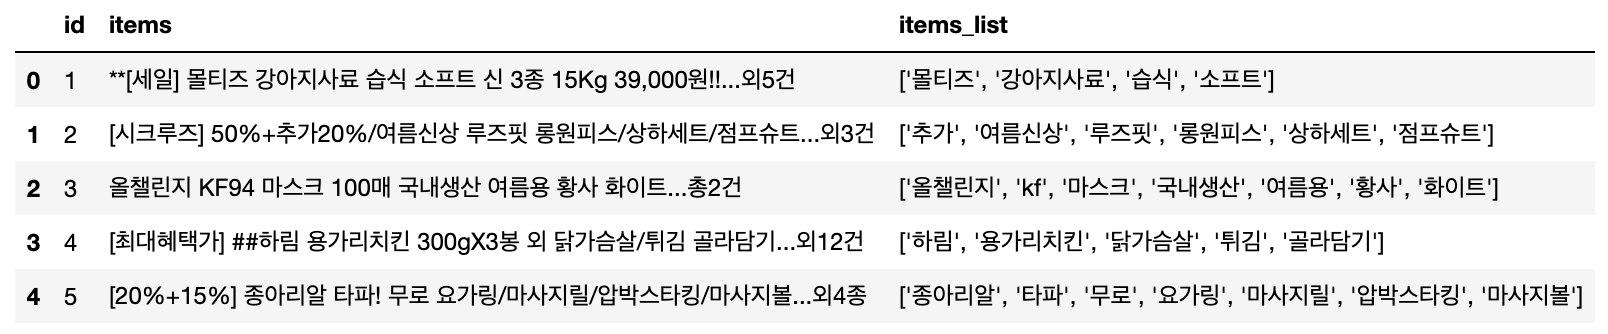
예제로 사용할 Input 텍스트는 인터넷쇼핑몰의 고객별 거래내역에 있는 구매 품목 텍스트 데이터이며, Output 은 텍스트 전처리 후의 고객별 구매 품목의 리스트입니다.
(1-7) 텍스트 데이터 전처리 사용자 정의함수(User Defined Function) 정의
(1-8) pandas DataFrame의 텍스트 칼럼에 데이터 전처리 사용자 정의함수 적용
(1-1) [], (), {}, <> 괄호와 괄호 안 문자 제거하기
Python의 정규 표현식(regular expression)을 다루는 re 패키지를 사용해서 다양한 형태의 괄호와 괄호안의 문자를 매칭한 후에 '' 로 대체함으로써 결과적으로 제거하였습니다. re.sub() 는 pattern 과 매치되는 문자열을 repl 의 문자열로 대체를 시켜줍니다.
정규표현식에서 문자 클래스를 만드는 메타 문자인 [ ]로 만들어지는 정규표현식은 [ ]사이에 들어가는 문자 중 어느 한개라도 매치가 되면 매치를 시켜줍니다. 가령, [abc] 의 경우 'a', 'b', 'c' 중에서 어느 하나의 문자라도 매치가 되면 매치가 되는 것으로 간주합니다.
## Python Regular expression operations
import re

## sample text
s = '**[세일]** 말티즈 강아지사료 습식 소프트 신 3종 15Kg 39,000원!!...외5건'


## (1-1) [], (), {}, <> 괄호와 괄호 안 문자 제거하기
pattern = r'\([^)]*\)'  # ()
s = re.sub(pattern=pattern, repl='', string=s)

pattern = r'\[[^)]*\]'  # []
s = re.sub(pattern=pattern, repl='', string=s)

pattern = r'\<[^)]*\>'  # <>
s = re.sub(pattern=pattern, repl='', string=s)

pattern = r'\{[^)]*\}'  # {}
s = re.sub(pattern=pattern, repl='', string=s)

print(s)
[Out]
# **** 말티즈 강아지사료 습식 소프트 신 3종 15Kg 39,000원!!...외5건
(1-2) '...외', '...총' 제거하기
Python의 내장 문자열 메소드인 replace() 를 사용해서 '...외', '...총' 을 ' ' 로 대체함으로써 제거하였습니다.
## (1-2) '...외', '...총' 제거하기
s = s.replace('...외', ' ')
s = s.replace('...총', ' ')

print(s)
[Out]
# **** 말티즈 강아지사료 습식 소프트 신 3종 15Kg 39,000원!! 5건
(1-3) 특수문자, 숫자 제거
정규표현식에서 하이픈(-)은 from ~ to 의 범위를 나타냅니다. [a-zA-Z] 는 소문자와 대문자 영어 모두를 의미하며, [가-힣] 은 한글 전체를 의미합니다.
정규표현식에서 [^] 는 not 의 의미이며, 아래의 [^a-zA-Z가-힣] 은 앞에 '^' 가 붙었으므로 영어와 한글이 아닌(not, ^) 문자, 즉 특수문자와 숫자와 매칭이 됩니다.
## (1-3) 특수문자, 숫자 제거
pattern = r'[^a-zA-Z가-힣]'
s = re.sub(pattern=pattern, repl=' ', string=s)

print(s)
[Out]
# 말티즈 강아지사료 습식 소프트 신  종   Kg       원    건
(1-4) 단위 제거: cm, km, etc.
## (1-4) 단위 제거: cm, km, etc.
units = ['mm', 'cm', 'km', 'ml', 'kg', 'g']
for unit in units:
    s = s.lower() # 대문자를 소문자로 변환
    s = s.replace(unit, '')

print(s)
[Out]
# 말티즈 강아지사료 습식 소프트 신  종          원    건
(1-5) 공백 기준으로 분할하기
Python 내장형 문자열 메소드인 split() 을 사용해서 공백(space)을 기준으로 문자열을 분할하였습니다.
글자 길이가 1 보다 큰 (len(word) != 1) 글자만 s_list 의 리스트에 계속 추가(append) 하였습니다.
## (1-6) 글자 1개만 있으면 제외하기
s_list = []
for word in s_split:
    if len(word) !=1:
        s_list.append(word)

print(s_list)
[Out]
# ['말티즈', '강아지사료', '습식', '소프트']
(1-7) 텍스트 데이터 전처리 사용자 정의함수(User Defined Function) 정의
위의 (1-1) ~ (1-6) 까지의 텍스트 전처리 과정을 아래에 사용자 정의함수로 정의하였습니다. 문자열 s 를 input으로 받아서 텍스트 전처리 후에 s_list 의 단어들을 분할해서 모아놓은 리스트를 반환합니다.
## 텍스트 전처리 사용자 정의함수(UDF of text pre-processing)
def text_preprocessor(s):
    import re

    ## (1) [], (), {}, <> 괄호와 괄호 안 문자 제거하기
    pattern = r'\([^)]*\)'  # ()
    s = re.sub(pattern=pattern, repl='', string=s)

    pattern = r'\[[^)]*\]'  # []
    s = re.sub(pattern=pattern, repl='', string=s)

    pattern = r'\<[^)]*\>'  # <>
    s = re.sub(pattern=pattern, repl='', string=s)

    pattern = r'\{[^)]*\}'  # {}
    s = re.sub(pattern=pattern, repl='', string=s)

    ## (2) '...외', '...총' 제거하기
    s = s.replace('...외', ' ')
    s = s.replace('...총', ' ')

    ## (3) 특수문자 제거
    pattern = r'[^a-zA-Z가-힣]'
    s = re.sub(pattern=pattern, repl=' ', string=s)

    ## (4) 단위 제거: cm, km, etc.
    units = ['mm', 'cm', 'km', 'ml', 'kg', 'g']
    for unit in units:
        s = s.lower() # 대문자를 소문자로 변환
        s = s.replace(unit, '')

    # (5) 공백 기준으로 분할하기
    s_split = s.split()

    # (6) 글자 1개만 있으면 제외하기
    s_list = []
    for word in s_split:
        if len(word) !=1:
            s_list.append(word)

    return s_list


## sample text
s = '**[세일]** 말티즈 강아지사료 습식 소프트 신 3종 15Kg 39,000원!!...외5건'

## apply the UDF above
s_list = text_preprocessor(s)
print(s_list)
[Out]
# ['말티즈', '강아지사료', '습식', '소프트']
(1-8) pandas DataFrame의 텍스트 칼럼에 데이터 전처리 사용자정의함수 적용
pandas DataFrame에 위의 (1-7) 텍스트 전처리 사용자 정의함수를 적용하기 위해서는 apply() 와 lambda function 을 사용합니다.
위에 Jupyter Notebook 에서 pandas DataFrame을 출력한 결과가 중앙 정렬로 되어있어서 보기가 불편한데요, 아래처럼 좌측 정렬 (left alignment) 을 해서 보기에 편하도록 해보았습니다.
## align text of pandas DataFrame to left in Jupyter Notebook
dfStyler = df.style.set_properties(**{'text-align': 'left'})
dfStyler.set_table_styles([dict(selector='th', props=[('text-align', 'left')])])
text preprocessing using regular expressions
(2) 토큰화 (tokenization)
토큰화(Tokenization)는 말뭉치(Corpus)를 토큰이라고 불리는 단어 또는 문장으로 나누는 것을 말합니다. 이러한 토큰은 문맥(Context)을 이해하거나 NLP에 대한 모델을 개발하는 데 사용됩니다.
POS 태킹 (Part-of-Speech Tagging) 은 널리 사용되는 자연어 처리 프로세스로, 단어의 정의와 문맥에 따라 언어의 특정 부분에 대응하여 텍스트(corpus)의 단어를 분류하는 것을 말합니다.
아래 코드는 위 (1)번의 텍스트 전처리에 이어서, 띄어쓰기가 제대로 되지 않아서 붙어 있는 단어들을, Python KoNLpy 패키지를 사용해서 형태소 분석의 명사를 기준으로 단어 토근화를 한 것입니다. ((2)번 words_tokonizer() UDF 안에 (1)번 text_preprocessor() UDF가 포함되어 있으며, 순차적으로 수행됩니다.)
KoNLpy 패키지는 Python으로 한국어 자연어 처리(NLP) 을 할 수 있게 해주는 패키지입니다. 그리고 Kkma 는 서울대학교의 IDS 랩에서 JAVA로 개발한 형태소 분석기(morphological analyzer)입니다.
## insatll konlpy if it is not istalled yet
# ! pip install konlpy


## KoNLpy : NLP of the Korean language
## reference ==> https://konlpy.org/en/latest/
## Kkma is a morphological analyzer
## and natural language processing system written in Java,
## developed by the Intelligent Data Systems (IDS) Laboratory at SNU.
from konlpy.tag import Kkma


## define words tokenizer UDF
def words_tokonizer(text):
    from konlpy.tag import Kkma # NLP of the Korean language
    kkma = Kkma()

    words = []

    # Text preprocessing using the UDF above
    s_list = text_preprocessor(text)

    # POS tagging
    for s in s_list:
        words_ = kkma.pos(s)

        # NNG indexing
        for word in words_:
            if word[1] == 'NNG':
                words.append(word[0])

    return words


## apply the UDF above as an example
words_tokonizer('강아지사료')
[Out] ['강아지', '사료']


words_tokonizer('상하세트')
[Out] ['상하', '세트']
위의 (2) words_tokenizer() UDF를 pandas DataFrame에 적용하기 위해서 apply() 함수와 lambda function 을 사용하면 됩니다.
## apply the text tokenization UDF to pandas DataFrame using apply() and lambda function
df['items'].apply(lambda text: words_tokonizer(text))

[Out]
# 0 [몰티즈, 강아지, 사료, 습식, 소프트]
# 1 [추가, 여름, 신상, 루즈, 핏, 원피스, 상하, 세트, 점프, 슈트]
# 2 [챌린지, 마스크, 국내, 생산, 여름, 황사, 화이트]
# 3 [하림, 용가리, 치킨, 닭, 가슴살, 튀김]
# 4 [종아리, 타파, 무로, 요가, 링, 마사지, 압박, 스타, 킹, 마사지]
# Name: items, dtype: object
이번 포스팅에서는 텍스트를 컴퓨터가 이해할 수 있도록 재표현해주는 text representation 방법 중에서 vectorization approaches 의 하나로서 TF-IDF (Term Frequency - Inverse Document Frequency) 의 개념, 수식에 대해서 알아보고, 간단한 예제 텍스트를 사용해서 설명을 해보겠습니다. 그리고 Python 의 Scikit-Learn 모듈을 사용해서 분석을 해보겠습니다.
(1) TF-IDF (Term Frequency - Inverse Document Frequency) 개념 및 예시
(2) Python scikit-learn 모듈을 사용한 실습
(1) TF-IDF (Term Frequency - Inverse Document Frequency) 개념 및 예시
vectorization apporached 의 text representation 방법으로는
- One-Hot Encoding
- Bag of Words (BoW)
- Bag of N-Grams (BoN)
- Term Frequency - Inverse Document Frequency (TF-IDF)
등이 있습니다.
이중에서 One-Hot Encoding, Bag of Words (BoW), Bag of N-Grams (BoN) 의 방법은 텍스트 안의 모든 단어를 동일하게 중요하다고 간주합니다. 반면에, TF-IDF 는 문서와 말뭉치에서 어떤 단어가 주어졌을 때 다른 단어 대비 상대적인 중요도를 측정한다는 차이가 있습니다.
만약 어떤 단어 w 가 문서 Di 에서 자주 나타나지만, 다른 문서 Dj 에서는 별로 나타나지 않을 때, 단어 w 는 문서 Di 에서 매우 중요하다고 볼 수 있습니다.
- TF의 핵심 개념: 단어 w의 중요도는 문서 d(i) 에서 출현하는 빈도에 비례해서 증가.
- IDF의 핵심 개념: 반면에, 단어 w가 말뭉치의 중요도는 다른 문서 d(j) 에서의 출현 빈도에는 비례해서 감소.
TF-IDF 점수는 TF 점수와 IDF 점수를 곱해서 구합니다. (수식은 아래 참조)
TF-IDF
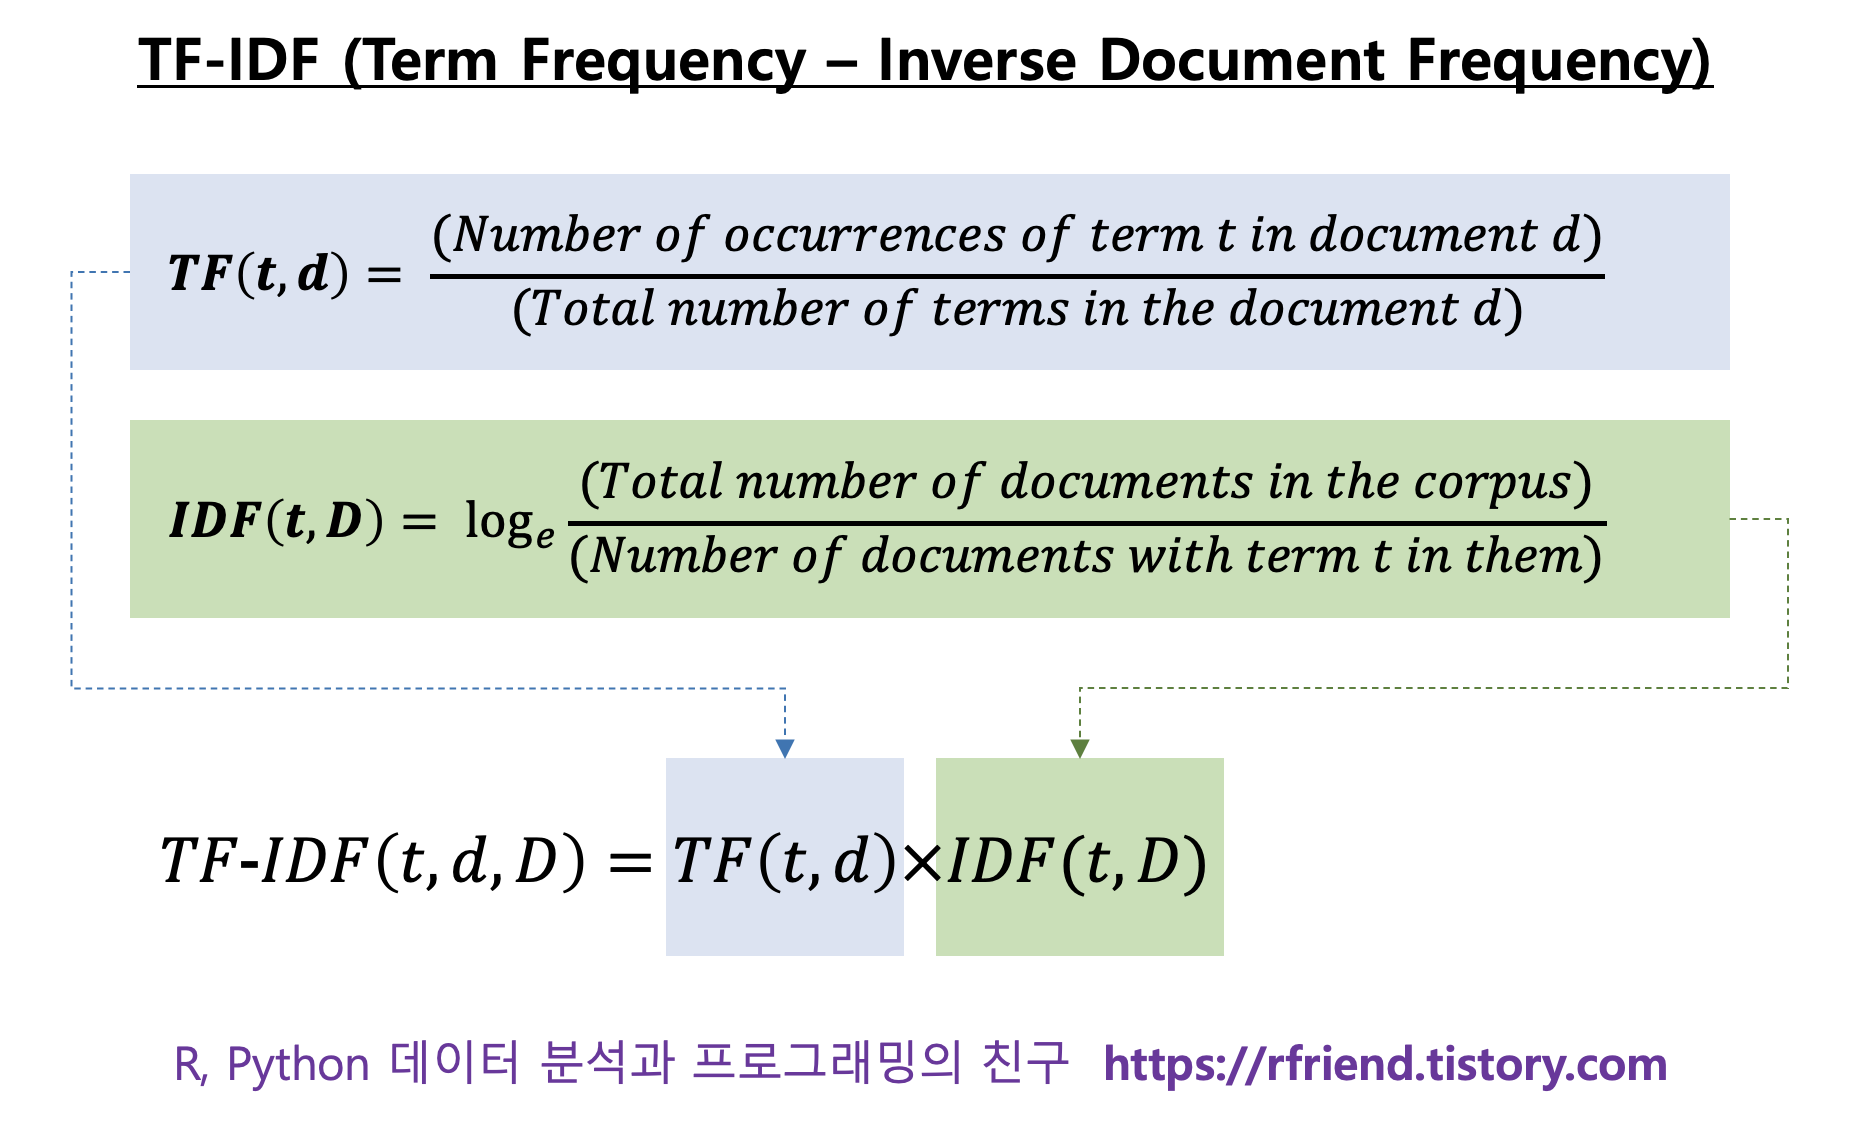
TF (Term Freqneucy) 는 문서(document)에서 주어진 단어(term t) 가 얼마나 자주 출현하는지를 측정합니다. 말뭉치(corpus) 안의 여러 문서들은 길이가 서로 다를텐데요, 아무래도 주어진 단어는 길이가 짧은 문서보다는 길이가 긴 문서에서 더 자주 출현할 가능성이 높습니다. 따라서 이런 문제를 해결하기 위해 문서 d(i)에서 단어 t (term t)의 출현 빈도를 문서 d(i)의 총 단어의 수로 나누어서 표준화를 해줍니다.
TF(t, d) = (문서 d 에서 단어 t 의 출현 빈도) / (문서 d 에서 총 단어의 수)
IDF (Inverse Document Frequency) 는 말뭉치(corpus)에서 단어 t 의 중요도를 측정합니다. 앞서 TF 를 계산할 때 모든 단어에는 동일한 중요도(가중치)가 부여되었습니다. 하지만 관사(a, the), be 동사(is, am, are) 등의 불용어(stop words)와 같이 문서에서 자주 출현하지만 별로 중요하지 않은 단어도 있습니다. 이런 문제를 해결하기 위해, IDF 는 말뭉치의 여러 문서에 공통적으로 출현하는 단어에 대해서는 중요도(가중치)를 낮추고, 반대로 말뭉치의 여러 문서 중에서 일부 문서에만 드물게 출현하는 단어에 대해서는 중요도(가중치)를 높입니다.
IDF(t, D) = log(말뭉치에서 총 문서의 개수 / 단어 t를 포함하는 문서의 개수)
TF-IDF score 는 위의 TF점수와 IDF 점수를 곱해주면 됩니다.
TF-IDF(t, d, D) = TF(t, d) x IDF(t, D)
아래에는 4개의 문서에 나오는 단어를 추출하여 만든 말뭉치를 가지고 TF-IDF 점수를 계산해본 예제입니다.
"Practical Natural Language Processing" (Sowmya Vajjala, et.al. 저) 책의 예제를 사용했는데요, 원서의 계산이 틀렸길레 수정해서 올립니다. (원서에서는 dog와 man의 TF score 가 틀리게 계산됨. IDF score 계산할 때는 밑이 e 이 자연 log 가 아니라 밑이 2인 log를 사용해서 계산함. 암튼, 원서 계산 다 틀렸음)
TF-IDF example
Bag of Words(BoW)와 비슷하게 TF-IDF 벡터는 코사인 거리(cosine distance)나 유클리디언 거리(euclidean distance) 를 사용하여 두 텍스트의 유사성을 계산하는데 사용할 수 있습니다. TF-IDF 는 정보 추출(information retrieval) 이나 텍스트 분류(text classification)에 많이 사용되고 있습니다.
TF-IDF 는 단어 간의 관계를 파악하는데는 한계가 있습니다. 그리고 TF-IDF 는 텍스트를 희소하고 고차원(sparse and high-dimensional)의 행렬로 표현하므로 차원의 저주(curse of dimensionality) 문제가 있습니다. 또한 학습 데이터셋에 없는 단어에 대해서는 처리를 못하는 한계(Out of Vocabulary problem)가 있습니다.
(2) Python scikit-learn 모듈을 사용한 실습
먼저, 실습에 사용할 텍스트로서 4개 문서의 간단한 문장을 아래와 같이 리스트로 입력해주고, 대문자를 소문자로 변환하고 불용어(stop words)인 마침표(.)는 없애주는 텍스트 데이터 전처리를 해보겠습니다.
앞에서 전처리한 텍스트 리스트를 TfidfVectorizer().fit_transform() 메소드를 사용하면 단어 추출과 TF-IDF 점수 계산이 한꺼번에 됩니다.
- tfidf.fit_transform() : 말뭉치 안의 단어 추출 및 TF-IDF 점수 계산
- tfidf.get_feature_names() : 말뭉치 안의 모든 단어 리스트
- sorted(tfidf.vocabulary_.items(), key=lambda x: x[1]) : 단어 사전을 index 기준으로 내림차순 정렬
- tfidf.idf_ : IDF score
##------------------------------
## TF-IDF using sklearn module
##------------------------------

from sklearn.feature_extraction.text import TfidfVectorizer

tfidf = TfidfVectorizer()
bow_rep_tfidf = tfidf.fit_transform(processed_docs)


## All words in the vocabulary.
print(tfidf.get_feature_names())
#[Out] ['bites', 'dog', 'eats', 'food', 'man', 'meat']


## sorting vocabulary dict by values in ascending order
sorted(tfidf.vocabulary_.items(), key=lambda x: x[1])
#[Out] [('bites', 0), ('dog', 1), ('eats', 2), ('food', 3), ('man', 4), ('meat', 5)]


## IDF for all words in the vocabulary
print("IDF :",tfidf.idf_)
#[Out] IDF : [1.51082562 1.22314355 1.51082562 1.91629073 1.22314355 1.91629073]
본문 상단에 제시한 예제에서 손으로 계산한 TF-IDF 점수와 아래에 Scikit-learn 의 TfidfVedtorizer() 메소드로 계산한 TF-IDF 점수가 서로 다릅니다.
두가지 이유가 있는데요, 첫째 Scikit-learn 에서 사용한 IDF 수식이 조금 다릅니다. (소스코드 공식은 여기 참조). 분모가 '0' 일때 'Zero Division Error' 가 발생하지 않도록 분모에 '1'을 더해주었으며, 분자에도 log(0) 도 계산이 안되므로 에러가 발생하지 않도록 분자에도 '1' 을 더해주었고, 전체 값이 '1'을 더해주었습니다.
Scikit-Learn의 TF-IDF score 가 원래 TF-IDF 결과와 다른 두번째 이유는 위의 Scikit-Learn 의 TF-IDF 점수 계산 결과를 유클리디언 거리를 사용해서 표준화를 해주기 때문입니다. (자세한 설명은 여기 참조)
## IDF for all words in the vocabulary
## “Sklearn’s TF-IDF” vs “Standard TF-IDF”
## : https://towardsdatascience.com/how-sklearns-tf-idf-is-different-from-the-standard-tf-idf-275fa582e73d
## Scikit-Learn's IDF: IDF(t) = log((1+n)/(1+df(t))) + 1
## normalization by the Euclidean norm

print("IDF :",tfidf.idf_)
#[Out] IDF : [1.51082562 1.22314355 1.51082562 1.91629073 1.22314355 1.91629073]


# IDF for 'dog' word
# number of documents, nN=4
# number of documents which include term t, df(t) = 3
import numpy as np

np.log((1+4)/(1+3)) + 1 # IDF(t) = log((1+n)/(1+df(t))) + 1
#[Out] 1.2231435513142097
- bow_rep_tfidf.toarray() : 말뭉치의 모든 문서 내 단어에 대한 TF-IDF 점수를 2차원 배열로 표현
## TF-IDF representation for all documents in our corpus
print("TF-IDF representation for all documents in our corpus\n", bow_rep_tfidf.toarray())

#[Out] TF-IDF representation for all documents in our corpus
# [[0.65782931 0.53256952 0.         0.         0.53256952 0.        ]
# [0.65782931 0.53256952 0.         0.         0.53256952 0.        ]
# [0.         0.44809973 0.55349232 0.         0.         0.70203482]
# [0.         0.         0.55349232 0.70203482 0.44809973 0.        ]]
- tfidf.transform(new document) : 새로운 문서 내 단어에 대한 TF-IDF 점수 계산
## Get the TF-IDF score using this vocabulary, for a new text
temp = tfidf.transform(["dog and man are friends"])
print("Tfidf representation for 'dog and man are friends':\n", temp.toarray())

#[Out] Tfidf representation for 'dog and man are friends':
# [[0.         0.70710678 0.         0.         0.70710678 0.        ]]
[Reference]
(1) Sowmya Vajjala, et.al., "Practical Natural Language Processing", O'Reilly
아래의 도식은 Sowmya Vajjala, et.al, "Practical Natural Language Processing", O'REILLY (2020) 에서 인용한 'Building Blocks of Language Structure'와 언어의 각 구성요소별 NLP 응용분야를 정리한 것입니다. 음소, 형태소 & 어휘항목, 구문, 문맥 순서대로 하나씩 소개해보겠습니다. (영어 단어가 생소해서 원서로 처음 읽을 때 뭔 소리인가 했어요..)
Building blocks of language structure
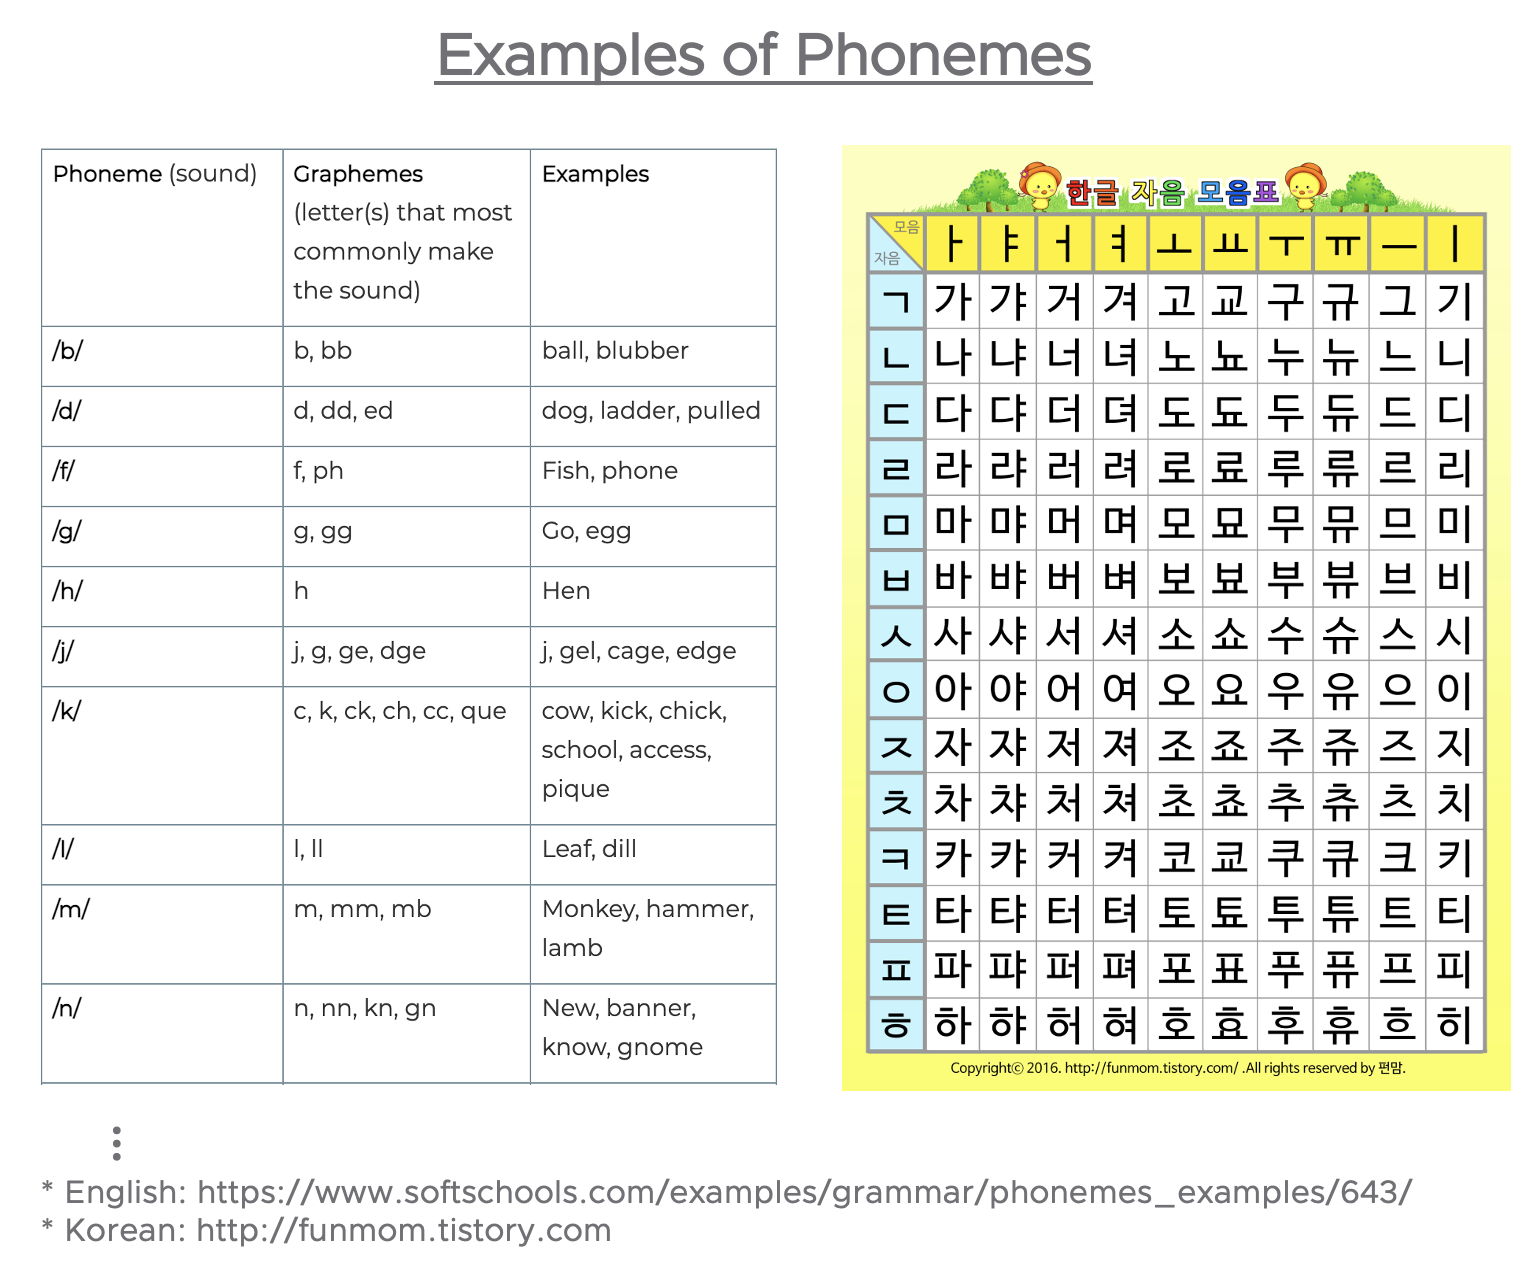
(2-1) 음소 (Phonemes) : 말과 소리 (Speech & Sounds)
음소(Phonemes)는 언어에서 말과 소리의 가장 작은 단위(the smallest units of sound in a language)입니다. 음소는 그 자체로는 아무런 의미도 없지만, 다른 음소들과 함께 사용이 되면 의미를 가지게 될 수 있습니다.[1] 음운론(Phonology)과 언어학(Linguistics)에서 음소는 특정 언어에서 한 단어와 다른 단어를 구별할 수 있는 소리의 단위입니다.[2]
아래는 영어와 한글의 음소 예시예요. 영어에는 44개의 다른 소리의 음소가 있고, 한글에는 14개의 자음과 10개의 모음 소리의 음소가 있습니다.
음소 (phonemes)
음소(Phonemes)는 말을 글로 변환하기(Speech to Text), 글을 말로 변환하기(Text to Speech), 화자 파악하기 (Speaker Identification) 등의 영역에 활용이 됩니다.
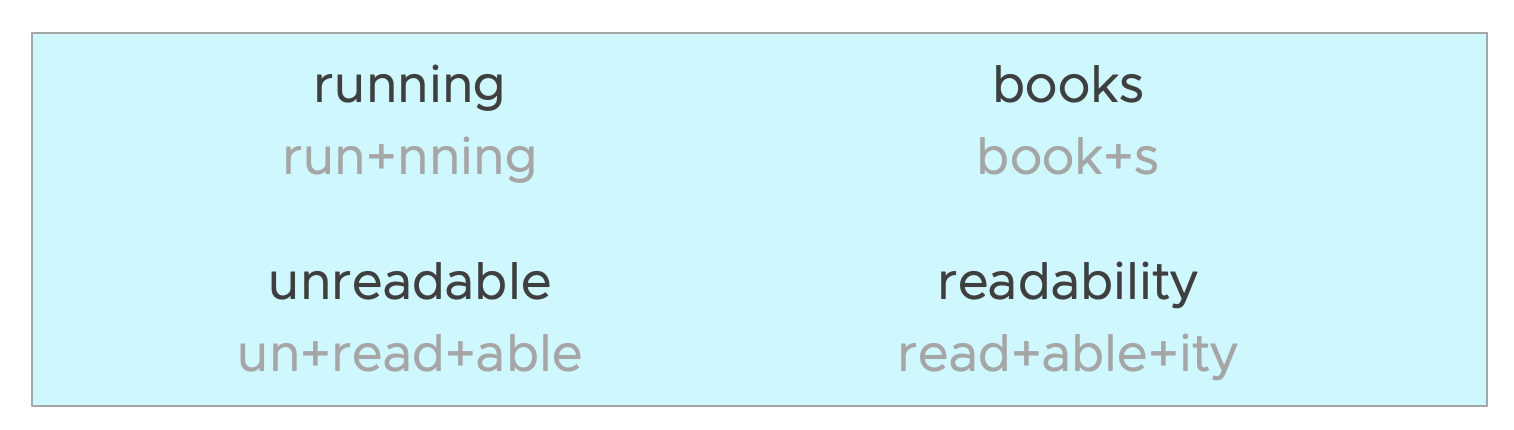
형태소(Morphemes) 는 의미를 가지는 언어의 가장 작은 단위(the smallest unit of language) 이며, 음소(phonemes)의 조합을 통해서 만들어집니다.[1] 형태소는 단어(Words)처럼 보이기는 하지만, 그렇다고 행태소가 곧 단어는 아닙니다. 형태소와 단어의 차이점은, 형태소는 홀로 사용될 수 없지만, 단어는 그 정의상 항상 홀로 자기완결적으로 사용될 수 있다는 점입니다.[3]
아래 예에서는 영어 단어를 형태소로 분리해본 것인데요, 아무래도 예를 보는 것이 형태소를 이해하는데 직관적으로 와 닿을것 같습니다. (예: running => run + nning, books => book + s, unreadable => un+read+able, readability => read+able+ity) unreadable 에서 접두사 'un'이나 접미사 'able'은 모두 형태소로서, 단어의 뜻을 바꾸어줍니다.
[ 단어에서 형태소 분리 예시 (examples of morphemes in words) ]
형태소 (morphemes)
어휘항목(Lexemes) 또는 어휘소는 의미에 의해서 서로 관련되어 있는 형태소의 구조적인 변형(the structural variations of morphemes related to one another by meaning)입니다.[1] 어휘항목(어휘소)는 변형을 통해 관련되는 단어들의 기초가 되는 어휘적 의미의 단위입니다. 어근 단어(root word)에 의해 대략적으로 일치하는 형태소 분석의 단위인 기본 추상적 의미 단위입니다.[4] (위키피디아 번역하려니 쉽지가 않네요. -,-;) 예를 들어, 영어에서 Run, Runs, Ran, Running은 "RUN"으로 표현될 수 있는 동일한 어휘소의 형태입니다. 예를 보면 금방 이해가 될 것 같습니다.
[ 어휘항목(어휘소, Lemexmes) 예시 ]
어휘항목, 어휘소 (lexemes)
형태소와 어휘소는 토큰화(Tokenization), 단어 임베팅(Word Embedding), 형태소(품사) 분석(POS Tagging: Part-Of-Speech Tagging) 등의 영역에 사용됩니다.
(2-3) 구문 (Syntax) : 문장 (Phrases & Sentences)
언어학에서 구문론(Syntax)은 단어(Words)와 형태소(Morphemes)가 어떻게 결합되어 구(Phrases)나 문장(Sentences)과 같은 더 큰 단위를 형성하는지 연구하는 학문입니다. 구문론의 중심 관심사는 어순(Word Order), 문법적 관계(Grammatical Relations), 계층적 문장 구조(구성)(Hierarchical Sentence Structure, Constituency), 교차 언어적 변형의 특성(the nature of crosslinguistic variation), 형태와 의미 사이의 관계(the relationship between form and meaning)를 포함합니다. 구문론에는 중심 가정과 목표가 다른 수많은 접근법이 있습니다.[5]
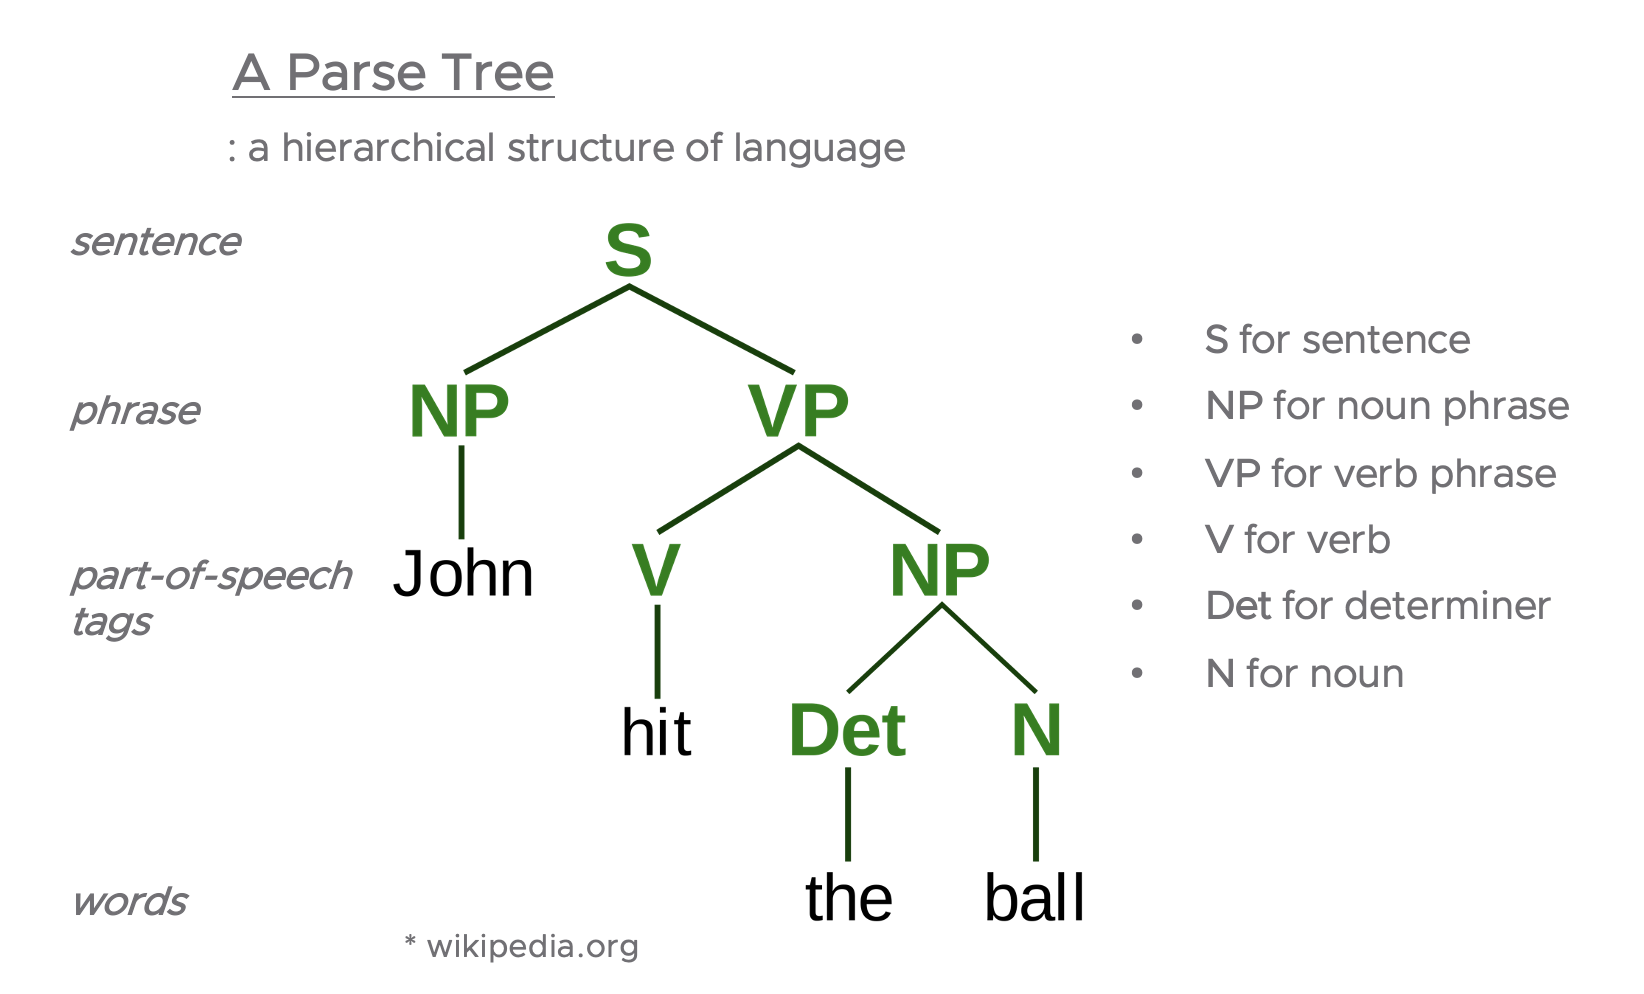
언어학에서 구문론적인 구조는 많은 다양한 형태로 제시될 수 있습니다. 그중에서 문장을 표현하는 일반적인 방법으로 'a Parse Tree' 이 있습니다. Parse Tree는 언어의 계층적 구조(a hierarchical structure of language)를 가지고 있으며, 아래의 예시에서 보는 바와 같이, 제일 밑에는 단어(words), 그 위에는 형태소(품사) 태깅(POS tagging, Part-Of-Speech Tagging), 그 위에는 구(phrase), 제일 위에는 문장(sentence)으로 하여 계층적 구조를 시각화해서 나타내줍니다.[1]
[ A Parse Tree 예시 ]
Syntax: a parse tree
* image: wikipedia.org
언어학의 구문론(Syntax)은 파싱(Parsing), 객체 추출(Entity Extraction), 관계 추출(Relation Extraction)에 사용됩니다.
(2-4) 문맥 (Context) : 의미 (Meaning)
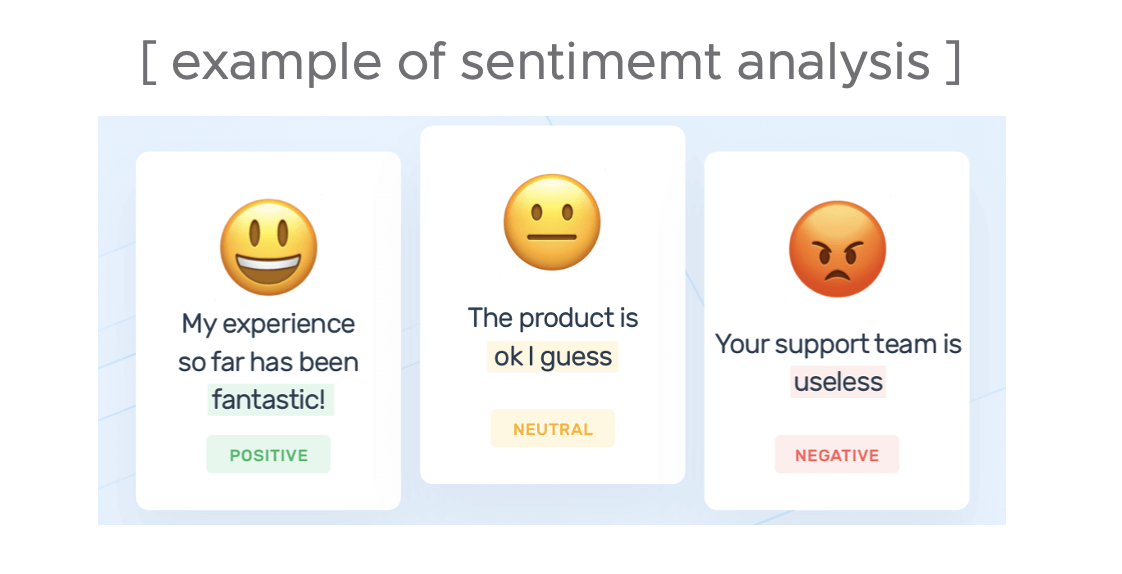
문맥(Context)은 언어의 사용, 언어의 변화, 대화/문장의 요약에 영향을 미치는 의사소통 상황과 관련된 제약을 말합니다.[6] 문맥은 언어의 각 요소들이 합쳐져서 특정 의미(meaning)를 가지고 만드는 것과 관련이 있습니다. 문맥은 단어와 구문의 문자 그대로의 의미(literal meaning of words and phrases)와 함께 장기간의 참조(long-term references), 세계 지식(world knowledge), 상식(common sense)을 포함한다. 문장의 의미는 문맥에 따라 달라질 수 있는데, 이는 단어와 구절이 때로는 여러 의미를 가질 수 있기 때문입니다.[1].
바로 언어의 이런 문맥이 가지는 특성 때문에 상식을 배우지 못하는 기계 번역이 굉장히 어려운 과제인 것입니다. 사람도 문맥을 잘 파악하지 못하면 엉뚱하게 해석해서 곤란한 경우가 자주 있는데, 인공지능이라고 예외는 아니겠죠.
example of sentiment analysis
문맥은 문서 요약(Summarization), 토픽 모델링(Topic Modeling), 감성분석(Sentiment Analysis), 냉소적인 표현 탐지(Sarcasm Detection) 등의 분야에 활용됩니다.
이상으로 언어 구조의 구성요소로서 음소(Phonemes), 형태소와 어휘소(Morphemes & Lexemes), 구문(Syntax), 문맥(Context) 에 대한 소개를 마치겠습니다. (저는 언어학 전공이 아닌지라 공부하면서 번역하는데 용어가 좀 어려웠습니다. ㅋ)
[ Reference ]
[1] Sowmya Vajjala el.al., "Practical Natural Language Processing: A Comprehensive Guide to Building Real-World NLP Systems", O'REILLY (2020)
빅데이터의 시대에 매 순간 엄청난 양의 텍스트 비정형 데이터가 생성/ 저장/ 분석이 되고 있습니다. 그리고 특히 최근에는 딥러닝을 자연어 처리에 적극 활용함으로써 기존에는 할 수 없었던 놀라운 성과가 속속 나오고 있습니다.
이번 포스팅에서는 자연어 처리(NLP: Natural Language Processing)에 대한 첫발을 떼는 개요로서,
(1) 자연어 처리 이란 무엇인가? (What is NLP?)
(2) 자연어 처리의 응용분야 (NLP Tasks)에는 무엇이 있나?
에 대해서 소개하겠습니다.
(1) 자연어 처리 (NLP: Natural Language Processing) 이란 무엇인가?
자연어 처리(NLP, Natural Language Processing)는 컴퓨터와 인간 언어, 특히 대량의 자연어 데이터를 처리하고 분석하도록 컴퓨터를 프로그래밍하는 방법과 관련된 언어학, 컴퓨터 과학, 인공지능의 하위 분야입니다. [1]
(Natural language processing (NLP) is a subfield of linguistics, computer science, and artificial intelligence concerned with the interactions between computers and human language, in particular how to program computers to process and analyze large amounts of natural language data.)
자연어 처리와 유사한 의미로 많이 사용되는 용어인 텍스트 마이닝(text mining)은 텍스트 분석(text analytics, text analysis), 텍스트 데이터 마이닝 (text data mining)이라고도 하며, 텍스트에서 고품질 정보를 얻는 과정을 말합니다. 텍스트 마이닝은 컴퓨터를 사용해서 텍스트로부터 정보를 자동으로 추출함으로써, 이전에 알려지지 않았던 새로운 정보를 발견을하는 것을 포함합니다. [2] (Text mining, also referred to as text data mining, similar to text analytics, is the process of deriving high-quality information from text. It involves "the discovery by computer of new, previously unknown information, by automatically extracting information from different written resources)
(2) 자연어 처리의 응용분야 (NLP Tasks)에는 무엇이 있나?
아래의 도식은 상대적인 난이도에 따라서 자연어 처리의 응용분야 (NLP Tasks) 를 나열해 본 것입니다. [3]
아래 도식에 소개된 자연어처리(NLP)의 쉬운 과업부터 어려운 과업까지 순서대로 간략하게 설명을 해보겠습니다.
NLP Tasks
* 출처: Sowmya Vajjala et.al,"Practical Natural Language Process: A Comprehensive Guide to Building Real-World NLP Systems", O'REILLY, 2020
* 맞춤법 검사 (Spell Checking)
맞춤법 검사기 (또는 맞춤법 검사기)는 소프트웨어에서 텍스트의 오타를 검사하는 소프트웨어 기능입니다. 워드 프로세서 사용하다 보면 오타에 빨간줄 밑줄 그어진거 보셨을 거예요. 철자 검사 기능은 워드 프로세서, 전자 메일 클라이언트, 전자 사전 또는 검색 엔진과 같은 소프트웨어나 서비스에 내장되어 있는 경우가 많습니다. Grammarly 와 같은 맞춤법 검사 및 문법 검사 서비스 광고를 요즘 많이 보게 되네요.
* 키워드 기반 정보 검색 (Keyword-Based Information Retrieval)
정보 검색은 대규모의 문서를 모아놓은 곳에서 사용자 쿼리와 관련된 문서를 찾는 작업입니다. 구글 검색(Google Search)과 같은 애플리케이션은 정보 검색의 대표적인 사례입니다.
* 토픽 모델링 (Topic Modeling)
토픽 모델링은 문서들에 대한 비지도 분류 학습 방법(a method for unsupervised classification of documents)으로, 우리가 무엇을 찾아야 하는지 확실하지 않은 경우에도 자연스러운 항목 그룹을 찾는 숫자 데이터에 대한 클러스터링과 유사합니다. 토픽 모델링은 거대한 문서들의 집합에서 토픽 구조를 발견하는데 사용합니다. 잠재 디리클레 할당(LDA: Latent Dirichlet Allocation) 은 주제 모델을 적합시키기 위해 특히 인기 있는 기법입니다.
* 텍스트 분류 (Text Classification)
텍스트 분류는 텍스트를 내용에 따라 알려진 범주 집합으로 분류하는 작업입니다. 텍스트 분류는 자연어 처리(NLP)에서 단연코 가장 인기 있는 작업이며, 전자 메일 스팸 식별에서 감성 분석(sentiment analysis)에 이르기까지 다양한 도구에 사용됩니다.
* 정보 추출 (Information Extraction)
정보 추출은 이메일이나 소셜 미디어 게시물에서 언급된 사람의 이름과 같은 관련 정보를 텍스트에서 추출하는 작업입니다.
* 텍스트 요약 (Text Summarization)
자동 텍스트 요약(Automatic Text Summary)은 원본 내용 내에서 가장 중요하거나 관련 있는 정보를 나타내는 부분 집합(요약)을 만들기 위해 계산적으로 데이터 집합을 요약, 단축하는 과정을 말합니다.
* 질의 응답 (Question Answering)
질의 응답(QA)은 정보 검색 및 자연어 처리(NLP) 분야의 컴퓨터 과학 분야로, 자연 언어로 인간이 제기하는 질문에 자동으로 답변하는 시스템을 구축하는 것과 관련이 있습니다.
* 기계 번역 (Machine Translation)
기계 번역은 텍스트나 음성을 한 언어에서 다른 언어로 번역하는 소프트웨어의 사용을 연구하는 컴퓨터 언어학의 하위 분야입니다. Google Translator, Papago 번역기 등이 대표적인 예가 되겠습니다.
* 열린 주제의 대화 에이전트 (Open Domain Conversational Agent)
대화 시스템 또는 대화 에이전트(CA)는 인간과 대화하기 위한 컴퓨터 시스템입니다. 대화 시스템은 입력 채널과 출력 채널 모두에서 통신을 위해 하나 이상의 텍스트, 음성, 그래픽, 촉감, 제스처 및 기타 모드를 사용합니다. (위 도식의 오른쪽 부분 워크 플로우별 과업 참조). 애플의 Siri, Kakao Mini 등의 인공지능 스피커가 대화 에이전트(CA)의 대표적인 예가 되겠네요.
희소행렬(Sparse matrix)은 대부분의 값이 원소 '0'인 행렬, '0'이 아닌 원소가 희소(sparse)하게, 듬성듬성 있는 행렬을 말합니다. 반대로 밀집행렬(Dense matrix)은 대부분의 원소 값이 '0'이 아닌 행렬을 말합니다.
자연어처리 분석을 할 때 문서 내 텍스트를 컴퓨터가 이해할 수 있는 형태의 자료구조로 만들 때 텍스트 파싱을 거쳐 단어-문서 행렬(Term-Document matrix) (or 문서-단어 행렬, Document-Term matrix) 를 만드는 것부터 시작합니다.
문서별로 많은 수의 단어가 포함되어 있고, 또 단어별로 발생 빈도가 보통은 드물기 때문에, 문서에서 단어를 파싱하여 Term-Document 행렬을 만들면 대부분은 희소행렬(Sparse matrix)을 얻게 됩니다.
이번 포스팅에서는
(1) 문서별 단어로 부터 CSR 행렬(Compressed Sparse Row matrix) 을 만들고,
(2) CSR 행렬을 이용해 NumPy array의 Term-Document 행렬 만들기
를 해보겠습니다.
단, 이번 포스팅의 주 목적은 문서로부터 문서-단어 CSR 행렬을 만들고 --> 이를 NumPy array의 Term-Document 행렬을 만드는 과정에 집중해서 소개하는 것으로서, 텍스트 파싱하는데 필요한 세부 절차(가령 문장 분리, 대문자의 소문자로 변환, Stop words 생략 등)는 생략합니다.
(1) 문서별 단어로 부터 CSR 행렬(Compressed Sparse Row matrix) 을 만들기
먼저, NumPy와 SciPy 모듈을 importing 하겠습니다.
import numpy as np
from scipy.sparse import csr_matrix
아래와 같이 리스트 [] 하나를 문서(Document) 하나로 간주했을 때, 총 3개의 문서를 가진 "docs" 로 부터 단어(Term)를 파싱해서 단어집(Vocabulary) 사전형(dictionary)을 만들고, 압축 희소 행기준 행렬(Compressed Sparse Row matrix) 을 만들기 위해 필요한 indptr, indices, data 객체를 for loop 문을 써서 만들어보겠습니다.
위의 (1)번에서 만든 SciPy CSR(Compressed Sparse Row) matrix를 csr_matrix.toarray() 또는 csr_matrix.todense() 메소드를 사용해서 NumPy array 행렬로 변환해보겠습니다. 이로부터 Term-Document Matrix를 만들었습니다.
# converting SciPy CSR matrix to NumPy array
term_document_arr = term_document_mat.toarray() # or todense()
WordNet은 어휘에 중점을 둔 영어 사전 Database 로서, 전통적인 Thesaurus (유의어 사전)와 유사한 측면이 있지만 보다 풍성한 구조를 가지고 있습니다. 1985년부터 프린스턴 대학교에서 구축하기 시작하였으며, 약 16만개의 단어(155287 words)와 12만개의 유사어 집합(117,659 synonym sets)을 포함하고 있는 방대한 Thesaurus 입니다.
NLTK와 WordNet에 대한 간단한 소개를 마쳤으니 이제 직접 코드를 짜보면서 예를 들어보겠습니다. 먼저, 명령 프롬프트 창에서 pip install로 NLTK 라이브러리를 설치하고 pip show로 버전과 내용을 확인해보겠습니다. (Anaconda 배포판으로 Python 가상 환경을 만들었다면 아마 디폴트로 NLTK 모듈이 설치되어 있을 겁니다.)
품사 태깅을 하려면 먼저 nltk.download('averaged_perceptron_tagger') 로 태깅에 필요한 자원을 다운로드 해줍니다. 그리고 nltk.pos_tag() 메소드를 사용해서 위의 (1)번에서 만든 단어 토큰들에 대해서 품사 태킹을 할 수 있습니다.
#%% word tagging
# Please use the NLTK Downloader to obtain the resource:
nltk.download('averaged_perceptron_tagger')
tagged = nltk.pos_tag(tokens)
tagged
Out[2]:
[('NLTK', 'NNP'),
('is', 'VBZ'),
('a', 'DT'),
('leading', 'VBG'),
('platform', 'NN'),
('for', 'IN'),
('building', 'VBG'),
('Python', 'NNP'),
('programs', 'NNS'),
('to', 'TO'),
('work', 'VB'),
('with', 'IN'),
('human', 'JJ'),
('language', 'NN'),
('data', 'NNS'),
('.', '.')]
위의 단어 태킹 예에서 보면, ('NLTK', 'NNP') 처럼 (단어 토큰, 품사) 의 쌍을 이룬 튜플들의 리스트로 되어있습니다. 품사의 약어가 무엇을 의미하는지는 아래의 품사 약어를 참고하시기 바랍니다.
(예: ('is', 'VBZ') 에서 'VBZ'는 verb, 3rd person sing. present takes 입니다)
POS tag list:
CCcoordinating conjunction
CDcardinal digit
DTdeterminer
EXexistential there (like: "there is" ... think of it like "there exists")
WordNet을 처음 사용하는 사용자라면 먼저 nltk.download('wordnet') 을 다운로드 해줍니다. 그리고 from nltk.corpus import wordnet as wn 으로 WordNet을 wn 이라는 alias로 importing 해주었습니다.
단어의 의미가 여러개가 있을 수 있는데요, NLTK WordNet에서 wordnet.synsets() 함수를 사용해서 동의어 집합을 찾을 수 있습니다. 아래 예에서는 'car'라는 단어가 5개의 단어 집합을 가지고 있네요.
#%% Senses and Synonyms from Wordnet
# Please use the NLTK Downloader to obtain the resource:
nltk.download('wordnet')
from nltk.corpus import wordnet as wn
wn.synsets('car')
Out[3]:
[Synset('car.n.01'),
Synset('car.n.02'),
Synset('car.n.03'),
Synset('car.n.04'),
Synset('cable_car.n.01')]
가령, Synset('car.n.01') 는 '단어.품사.그룹인덱스' 를 나타내는데요, 특정 의미의 단어를 보려면 '그룹인덱스'를 사용해서 명시적으로 지정을 해줘야 합니다. 아래 예에서는 첫번째 인덱스의 'car.n.01' 표제어의 c단어 정의(definition())와, 동의어 단어 집합(lemma_names())을 알아보겠습니다.
car =wn.synset('car.n.01')
car.definition()
Out[4]: 'a motor vehicle with four wheels; usually propelled by an internal combustion engine'
위의 (3)번에서는 WordNet에서 동의어(Synonym)를 찾아보았다면, 이제는 WordNet에서 반대말, 반의어(Antonym)를 찾아보겠습니다. 가령, 아래 예에서는 공급(supply)의 반대말은 수요(demand), 왕(king)의 반대말은 여왕(queen) 이라고 대답해주네요.
#%% antonym
wn.lemma('supply.n.02.supply').antonyms()
Out[7]: [Lemma('demand.n.02.demand')]
wn.lemma('king.n.01.king').antonyms()
Out[8]: [Lemma('queen.n.02.queen')]
(5) WordNet에서 단어 위계구조 (Hierarchy) 찾기
WordNet에는 단어 간의 관계를 상/하 위계구조로 정리가 되어있습니다. 'car.n.01' 표제어에 대해서 상/하 위계구조를 hypernym_paths() 메소드를 사용해서 찾아보면 아래와 같이 2개가 나옵니다. car.hypernym_paths()[0] 으로 '0' 번째 것만 indexing 해서 볼 수 있습니다.
#%% The Wordnet Hierarchy
# 상위어 (hypernym)
fromnltk.corpusimportwordnetaswn
car =wn.synset('car.n.01')
car.hypernym_paths()
Out[9]:
[[Synset('entity.n.01'),
Synset('physical_entity.n.01'),
Synset('object.n.01'),
Synset('whole.n.02'),
Synset('artifact.n.01'),
Synset('instrumentality.n.03'),
Synset('container.n.01'),
Synset('wheeled_vehicle.n.01'),
Synset('self-propelled_vehicle.n.01'),
Synset('motor_vehicle.n.01'),
Synset('car.n.01')],
[Synset('entity.n.01'),
Synset('physical_entity.n.01'),
Synset('object.n.01'),
Synset('whole.n.02'),
Synset('artifact.n.01'),
Synset('instrumentality.n.03'),
Synset('conveyance.n.03'),
Synset('vehicle.n.01'),
Synset('wheeled_vehicle.n.01'),
Synset('self-propelled_vehicle.n.01'),
Synset('motor_vehicle.n.01'),
Synset('car.n.01')]]
# indexing
car.hypernym_paths()[0]
Out[10]:
[Synset('entity.n.01'),
Synset('physical_entity.n.01'),
Synset('object.n.01'),
Synset('whole.n.02'),
Synset('artifact.n.01'),
Synset('instrumentality.n.03'),
Synset('container.n.01'),
Synset('wheeled_vehicle.n.01'),
Synset('self-propelled_vehicle.n.01'),
Synset('motor_vehicle.n.01'),
Synset('car.n.01')]
위에 위계구조 리스트를 상/하 네트워크 그래프로 시각화해서 보면 좀더 직관적으로 이해할 수 있습니다. 이때 노드(nodes, vertex)는 동의어 집합(synsets)에 해당하며, 연결선(edges, links)은 단어 개념 상의 상/하 관계(hypernym/hyponym relation)을 나타냅니다.
먼저, 경로 거리 유사도는 위의 (5)번에서 소개했던 단어 간 상/하 위계구조에서의 최단 경로 (Shortest Path)의 거리를 기반으로 유사도를 0~1 사이의 실수로 측정합니다. (즉, 경로 거리가 가까울 수록 유사하고, 거리가 멀 수록 유사하지 않게 평가하며, 유사도가 1에 가까울 수록 유사한 것을 의미함).
아래 예에서는 고래 right whale 과 orca, minke whale 는 경로 거리 유사도가 높게 나왔고, 거북이 tortoise 는 좀 낮게 나왔으며, 소설 novel 은 매우 낮게 나왔습니다. 상식과 어느정도 부합하네요.
Leacock Chodorow 유사도는 단어 간 위계구조에서의 최단 거리(shortest path)와 단어 의미가 발생하는 최대 깊이(maximum depth)에 기반해서 유사도를 계산합니다. 위의 path_similarity() 가 0~1 사이의 표준화된 값을 반환하는 반면에, lch_similarity() 는 표준화되지 않은 차이가 있습니다.
아래 예에서 right whale 과 minke whale, tortoise, novel 간의 Leacock Chordorow 유사도와 위의 (6-1) Path distance similarity 의 경향, 유사도 순서는 비슷하게 나왔습니다.
# (3) Leacock Chordorow (LCH) Similarity
right_whale.lch_similarity(orca)
Out[15]: 1.845826690498331
right_whale.lch_similarity(minke)
Out[16]: 2.2512917986064953
right_whale.lch_similarity(tortoise)
Out[17]: 1.072636802264849
right_whale.lch_similarity(novel)
Out[18]: 0.5020919437972361
(6-3) Wu-Palmer 유사도 (Wu-Palmer Similarity)
Wu-Palmer 유사도는 단어 위계구조에서 두 단어의 깊이(depth of the tow senses in the taxonomy)와 단어 간의 최소 공통 포함(Least Common Subsumer)에 기반해서 유사도를 계산합니다.
# (2) Wu-Palmer Similarity
right_whale.wup_similarity(orca)
Out[19]: 0.8484848484848485
right_whale.wup_similarity(minke)
Out[20]: 0.9090909090909091
right_whale.wup_similarity(tortoise)
Out[21]: 0.6
right_whale.wup_similarity(novel)
Out[22]: 0.08333333333333333
위의 3가지 외에도 NLTK 라이브러리는 최소 공통 포함 Information Content (IC of the Least Common Subsumer) 기반의 Resnik Similarity, Lin Similarity, Jiang-Conrath Similarity 등의 알고리즘을 제공합니다. (* reference: http://jaganadhg.github.io/wornet-nltk-sense/)
텍스트 분석을 할 때 제일 처음 하는 일이 문서, 텍스트를 분석에 적합한 형태로 전처리 하는 일입니다.
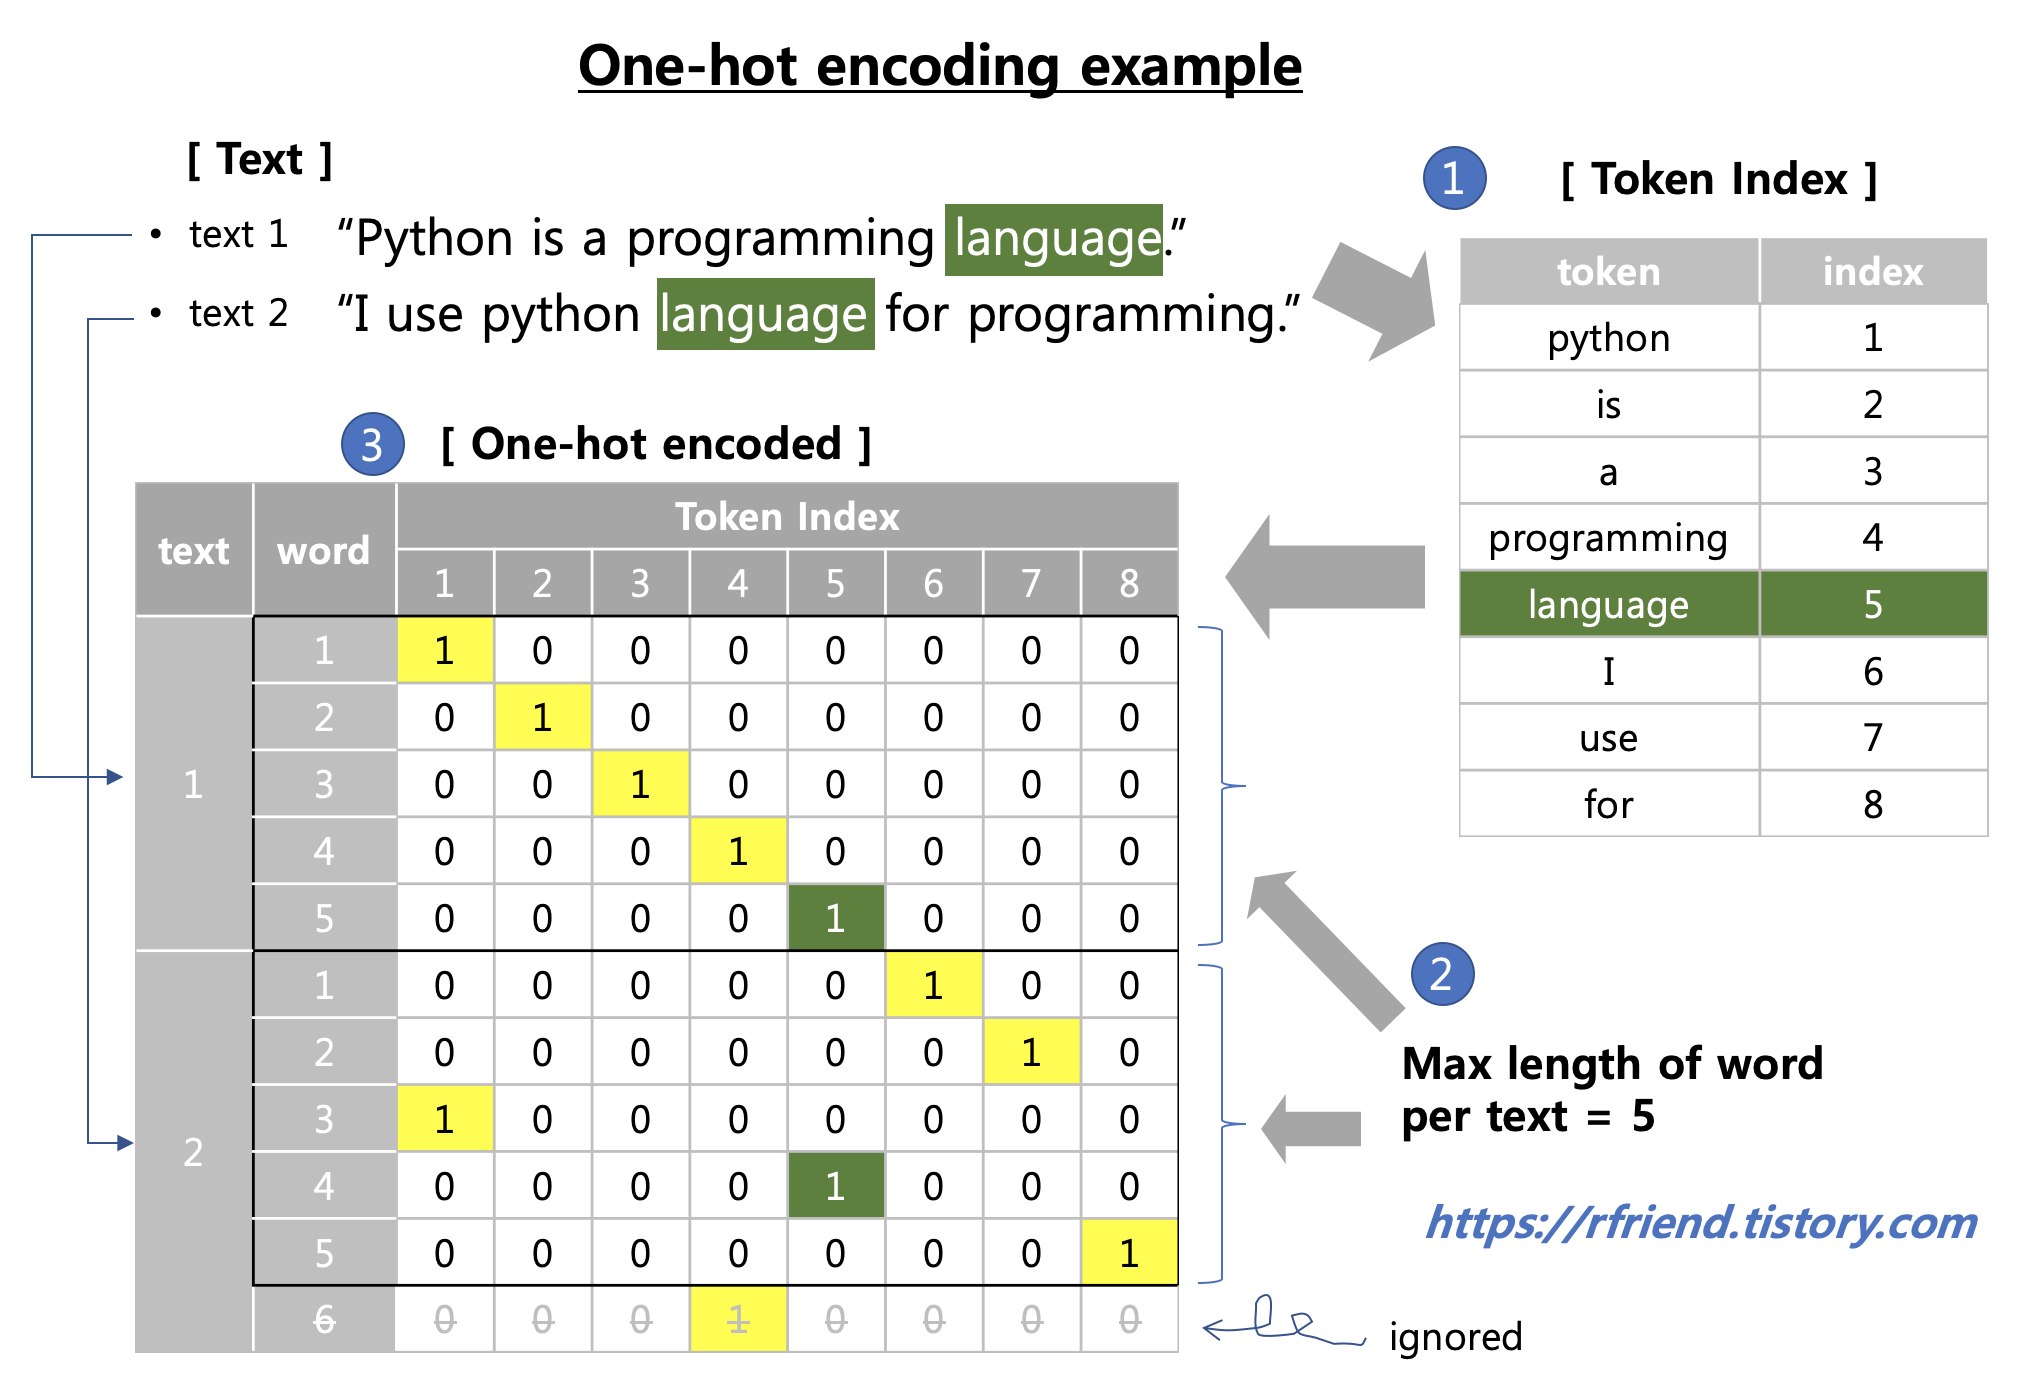
이번 포스팅에서는 (1) 텍스트 데이터를 Python의 string methods 를 이용하여 단어 단위로 파싱(parsing text at word-level) 한 후에, 단어별 index를 만들고, (2) 텍스트를 단어 단위로 one-hot encoding 을 해보겠습니다.
one-hot encoding of text at a word-level
1. 텍스트 데이터를 Python string methods를 사용하여 단어 단위로 파싱하고, 단어별 token index 만들기
# import modules
import numpy as np
import os

# set directory
base_dir = '/Users/ihongdon/Documents/Python/dataset'
file_name = 'python_wikipedia.txt'
path = os.path.join(base_dir, file_name)

# open file and print it as an example
file_opened = open(path)
for line in file_opened.readlines():
    print(line)
Python programming language, from wikipedia
Python is an interpreted, high-level, general-purpose programming language. Created by Guido van Rossum and first released in 1991, Python's design philosophy emphasizes code readability with its notable use of significant whitespace. Its language constructs and object-oriented approach aims to help programmers write clear, logical code for small and large-scale projects.[26]
Python is dynamically typed and garbage-collected. It supports multiple programming paradigms, including procedural, object-oriented, and functional programming. Python is often described as a "batteries included" language due to its comprehensive standard library.[27]
Python was conceived in the late 1980s as a successor to the ABC language. Python 2.0, released 2000, introduced features like list comprehensions and a garbage collection system capable of collecting reference cycles. Python 3.0, released 2008, was a major revision of the language that is not completely backward-compatible, and much Python 2 code does not run unmodified on Python 3. Due to concern about the amount of code written for Python 2, support for Python 2.7 (the last release in the 2.x series) was extended to 2020. Language developer Guido van Rossum shouldered sole responsibility for the project until July 2018 but now shares his leadership as a member of a five-person steering council.[28][29][30]
Python interpreters are available for many operating systems. A global community of programmers develops and maintains CPython, an open source[31] reference implementation. A non-profit organization, the Python Software Foundation, manages and directs resources for Python and CPython development.
아래는 Python string method를 사용해서 텍스트에서 단어를 파싱하고 전처리할 수 있는 사용자 정의 함수 예시입니다. 가령, 대문자를 소문자로 바꾸기, stop words 제거하기, 기호 제거하기, 숫자 제거하기 등을 차례대로 적용할 수 있는 기본적인 예시입니다. (이 역시 텍스트 분석용 Python module 에 잘 정의된 함수들 사용하면 되긴 합니다. ^^;)
# UDF of word preprocessing
def word_preprocess(word):
    # lower case
    word = word.lower()

    # remove stop-words
    stop_words = ['a', 'an', 'the', 'in', 'with', 'to', 'for', 'from', 'of', 'at', 'on',
                  'until', 'by', 'and', 'but', 'is', 'are', 'was', 'were', 'it', 'that', 'this',
                  'my', 'his', 'her', 'our', 'as', 'not'] # make your own list
    for stop_word in stop_words:
        if word != stop_word:
            word = word
        else:
            word = ''

    # remove symbols such as comma, period, etc.
    symbols = [',', '.', ':', '-', '+', '/', '*', '&', '%', '[', ']', '(', ')'] # make your own list
    for symbol in symbols:
        word = word.replace(symbol, '')

    # remove numbers
    if word.isnumeric():
        word = ''

    return word
다음으로, python_wikipedia.txt 파일을 열어서(open) 각 줄 단위로 읽고(readlines), 좌우 공백을 제거(strip)한 후에, 단어 단위로 분할(split) 하여, 위에서 정의한 word_preprocess() 사용자 정의 함수를 적용하여 전처리를 한 후, token_idx 사전에 단어를 Key로, Index를 Value로 저장합니다.
# blank dictionary to store
token_idx = {}

# opening the file
file_opened = open(path)

# catching words and storing the index at token_idx dictionary
for line in file_opened.readlines():
    # strip leading and trailing edge spaces
    line = line.strip()

    # split the line into word with a space delimiter
    for word in line.split():

        word = word_preprocess(word) # UDF defined above

        # put word into token_index
        if word not in token_idx:
            if word != '':
                token_idx[word] = len(token_idx) + 1
단어를 Key, Index를 Value로 해서 생성된 token_idx Dictionary는 아래와 같습니다.
총 123개의 단어가 있으며, 이 중에서 'python'이라는 단어는 token_idx에 '1' 번으로 등록이 되어있습니다.
max(token_idx.values())
123
token_idx.get('python')
1
2. 텍스트를 단어 단위로 One-hot encoding 하기
하나의 텍스트 문장에서 고려할 단어의 최대 개수로 max_len = 40 을 설정하였습니다. (한 문장에서 41번째 부터 나오는 단어는 무시함). 그리고 One-hot encoding 한 결과를 저장할 빈 one_hot_encoded 다차원 배열을 np.zeros() 로 만들어두었습니다.
# consider only the first max_length words in texts
max_len = 40

# array to store the one_hot_encoded results
file_opened = open(path)

one_hot_encoded = np.zeros(shape=(len(file_opened.readlines()),
                                  max_len,
                                  max(token_idx.values())+1))
one_hot_encoded 는 (5, 40, 124) 의 다차원 배열입니다. 5개의 텍스트 문장으로 되어 있고, 40개의 최대 단어 길이(max_len) 만을 고려하며, 총 124개의 token index 에 대해서 해당 단어가 있으면 '1', 없으면 '0'으로 one-hot encoding을 하게 된다는 뜻입니다.
one_hot_encoded.shape
(5, 40, 124)
아래는 파일을 열고 텍스트를 줄 별로 읽어 들인 후에, for loop 을 돌면서 각 줄에서 단어를 분할하고 전처리하여, token_idx.get(word) 를 사용해서 해당 단어(word)의 token index를 가져온 후, 해당 텍스트(i), 단어(j), token index(idx)에 '1'을 입력하여 one_hot_encoded 다차원 배열을 업데이트 합니다.
file_opened = open(path)
for i, line in enumerate(file_opened.readlines()):
    # strip leading and trailing edge spaces
    line = line.strip()

    for j, word in list(enumerate(line.split()))[:max_len]:

        # preprocess the word
        word = word_preprocess(word)

        # put word into token_index
        if word != '':
            idx = token_idx.get(word)
            one_hot_encoded[i, j, idx] = 1.
이해를 돕기 위하여 python_wikipedia.txt 파일의 첫번째 줄의, 앞에서 부터 40개 단어까지의 단어 중에서, token_idx 의 1번~10번 까지만 one-hot encoding이 어떻게 되었나를 단어와 token_idx 까지 설명을 추가하여 프린트해보았습니다. (말로 설명하려니 어렵네요. ㅜ_ㅜ)
# sort token_idx dictionary by value
import operator
sorted_token_idx = sorted(token_idx.items(), key=operator.itemgetter(1))

# print out 10 words & token_idx of 1st text's 40 words as an example
for i in range(10):
    print('word & token_idx:', sorted_token_idx[i])
    print(one_hot_encoded[0, :, i+1])