[TensorFlow, Keras] 손실함수 sparse_categorical_crossentropy vs. categorical_crossentropy
Deep Learning (TF, Keras, PyTorch)/TensorFlow basics 2021. 12. 31. 12:03이번 포스팅에서는 TensorFlow Keras의 손실함수 중에서 다중분류 문제(multiclass classification problem) 에 대한 딥러닝 모델을 훈련할 때 사용하는 손실함수에 대해서 소개하겠습니다.
(1) 손실함수란 무엇인가?
(2) 문제 유형별 Keras의 손실함수는 무엇이 있나?
(3) 교차 엔트로피(Cross Entropy) 란 무엇인가?
(4) sparse_categorical_crossentropy() vs. categorical_crossentropy() 비교
(1) 손실함수란 무엇인가?
기계학습(Machine Learning), 딥러닝(Deep Learning) 은 손실함수(Loss Function)을 통해서 학습합니다. 손실함수는 다른 이름으로 비용함수(Cost Function)라고도 합니다.
손실함수는 특정 알고리즘이 주어진 데이터를 얼마나 잘 모델링하는지를 측정하는 방법입니다. 만약 학습모델을 사용해 예측한 값(predicted value)이 참 값(true value, actual value)과 차이가 많이 날 경우 손실함수의 값은 매우 커지게 되며, 손실함수 값이 작을 수록 알고리즘이 주어진 데이터를 잘 모델링했다고 평가할 수 있습니다.
기계학습, 딥러닝에서는 손실함수의 손실값(loss value)을 점점 작게 해서 최소의 손실 값을 찾아가는 최적화 함수(optimization function)을 사용해서 데이터로 부터 모델을 학습하게 됩니다. 최적화 함수에 대해서는 별도의 포스팅을 통해서 나중에 소개하도록 하겠습니다.
(2) 문제 유형별 Keras의 손실함수는 무엇이 있나?
모든 문제에 공통으로 적용할 수 있는 만능의 손실함수는 없습니다. 각 문제 유형(예: 회귀, 분류)과 데이터 형태(y label 이 정수, onehot encoded), 미분 계산의 용이성, 이상치(outliers)의 포함 정도 등에 따라서 사용하는 손실함수는 달라집니다.
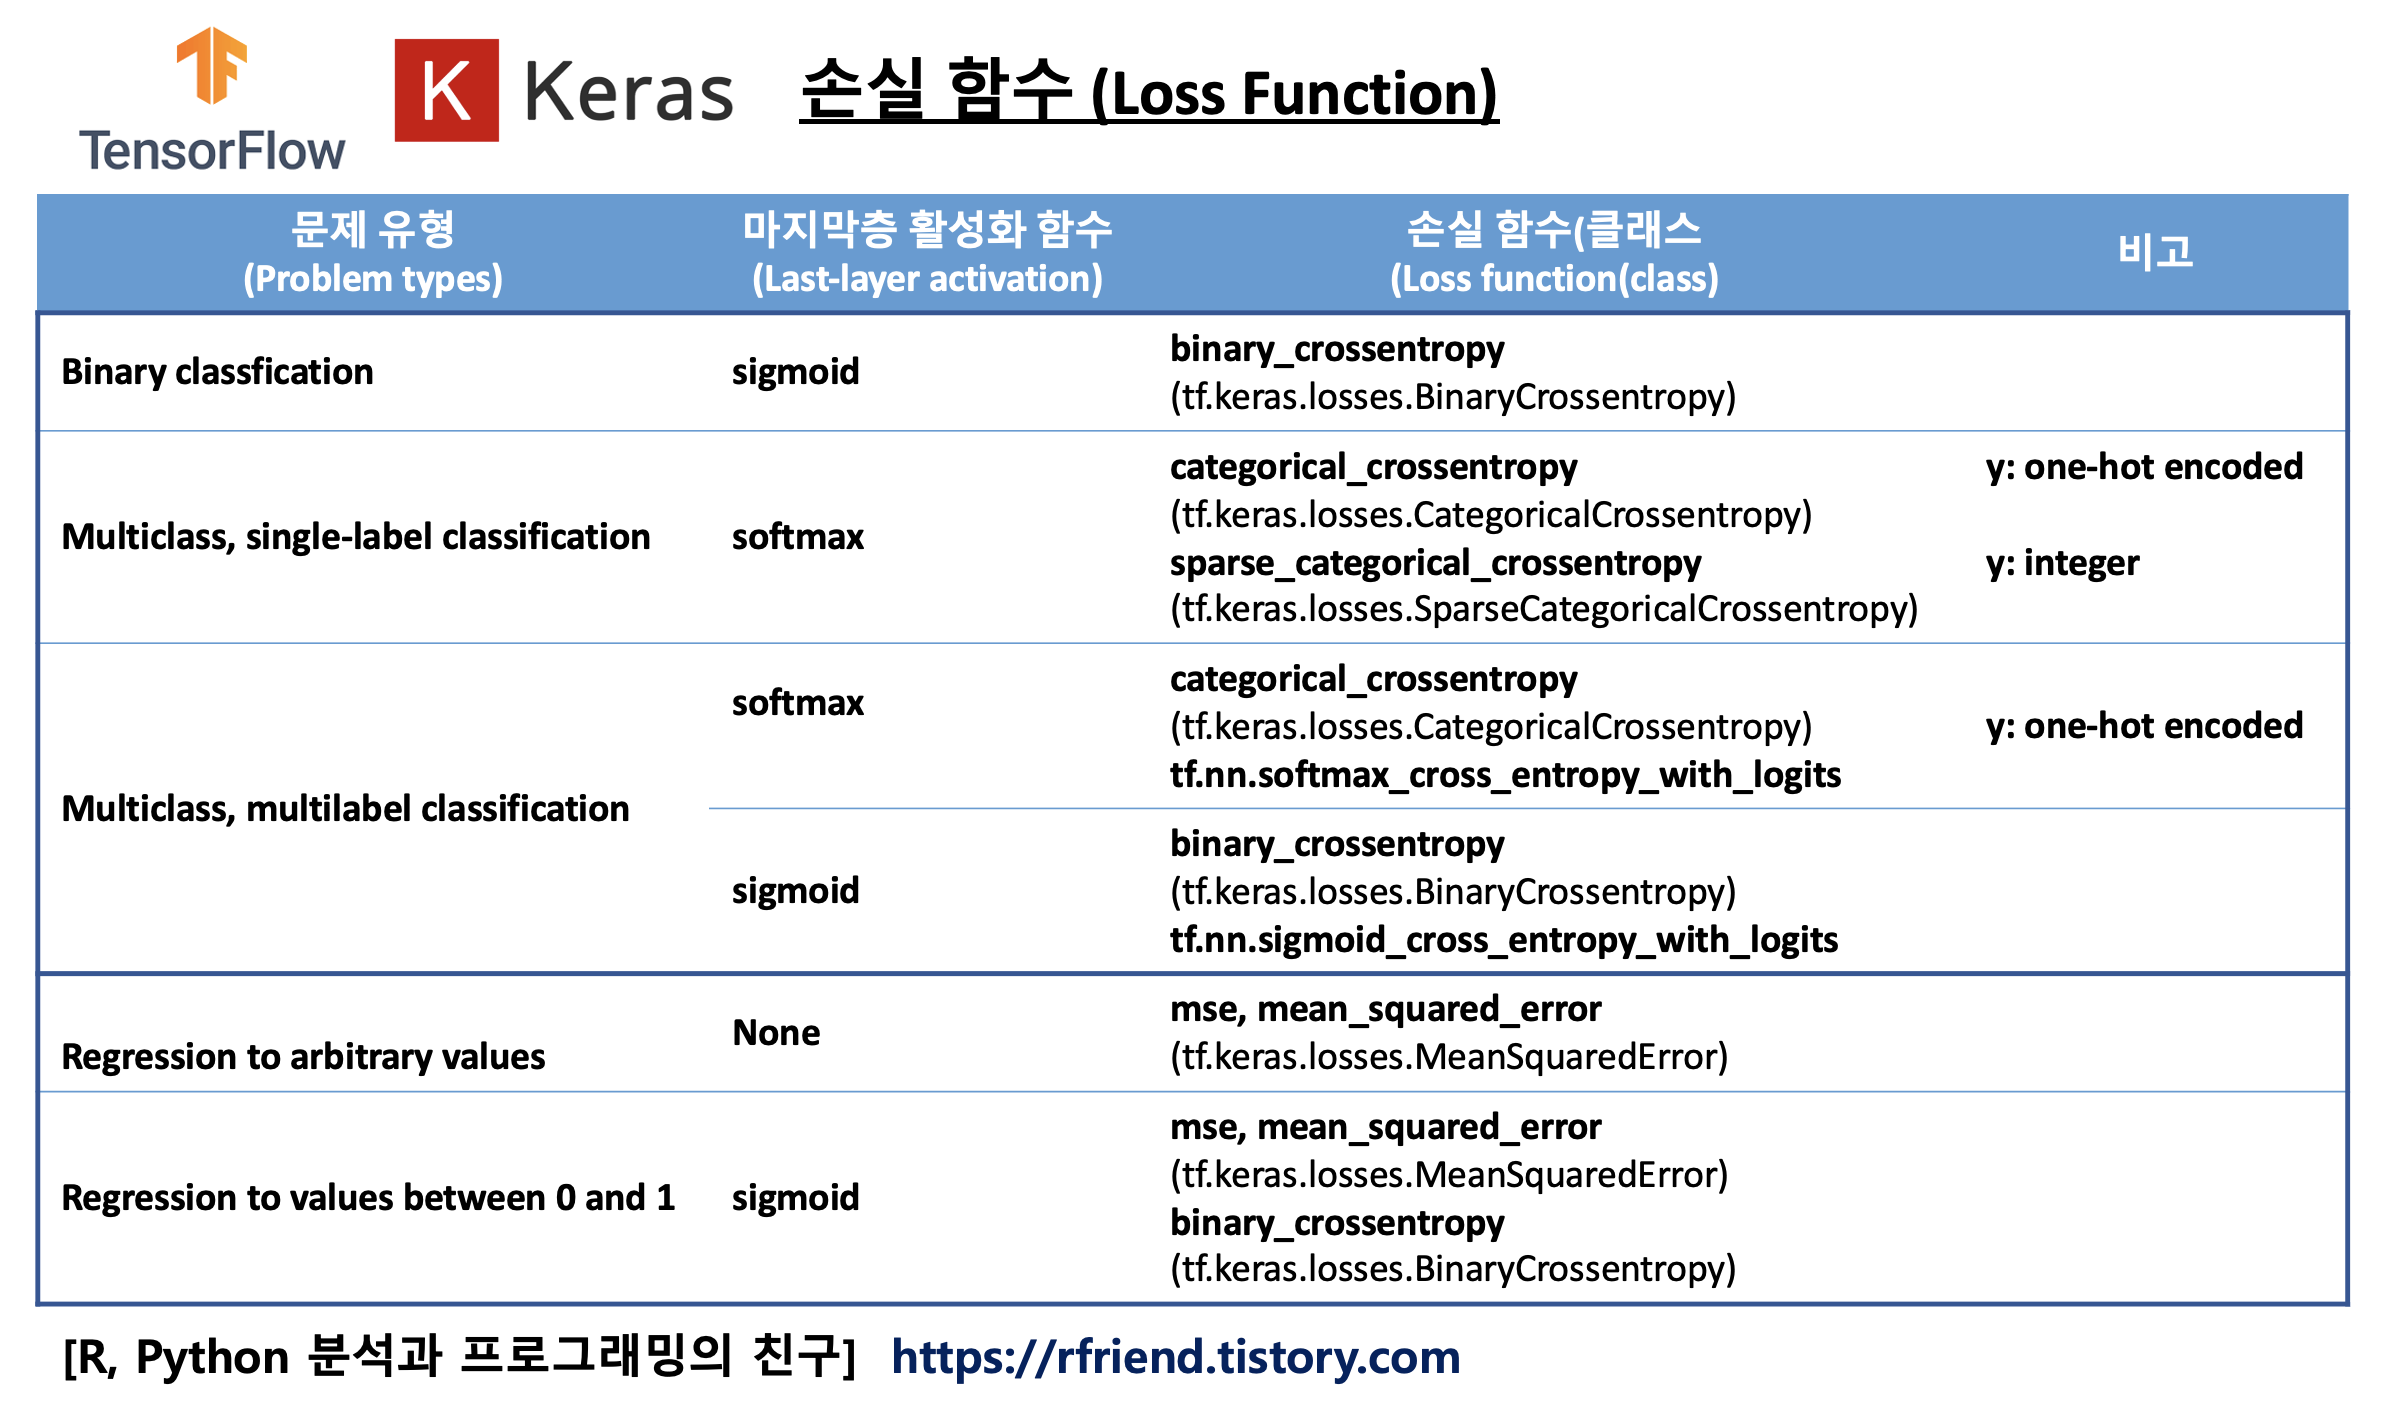
아래의 표는 TensorFlow Keras의 문제 유형(problem types) 별로 마지막층의 활성화 함수(last layer's activation function)와 손실함수/클래스를 표로 정리한 것입니다.
이번 포스팅에서 다루고자 하는 TensorFlow Keras의 sparse_categorical_crossentropy()와 categorical_crossentropy() 손실함수는 다중분류 문제(multiclass classification problem)에 사용하는 손실함수입니다.
[ TensorFlow Keras의 손실 함수, 손실 클래스 (Loss Functions, Loss Classes) ]
(3) 교차 엔트로피(Cross Entropy) 란 무엇인가?
교차 엔트로피 개념은 정보이론(information theroy)에서 나왔습니다. 교차 엔트로피(Cross Entropy)는 동일한 근간의 사건의 집합(over the same underlying events set)에서 뽑은 두 개의 확률 분포 p와 q에서 만약 집합에 사용된 코딩 체계가 실제 확률분포 p보다 추정 확률 분포 q에 최적화되어 있는 경우 집합으로 부터 뽑힌 사건을 식별하는데 필요한 평균 비트 수를 측정합니다.
위의 정의는 위키피디아(https://en.wikipedia.org/wiki/Cross_entropy) 에서 인용한 것인데요, 무슨 말인지 잘 이해하기 힘들지요? 아래의 유튜브 링크는 "Hands-on Machine Learning with Scikitlearn, Keras & TensorFlow" 책의 저자인 Aurelien Geron 님께서 "Entropy, Cross Entropy, KL Divergence"에 대해서 소개해주고 있는 영상인데요, 이걸 참고하시면 이해하는데 훨씬 쉬울거예요.
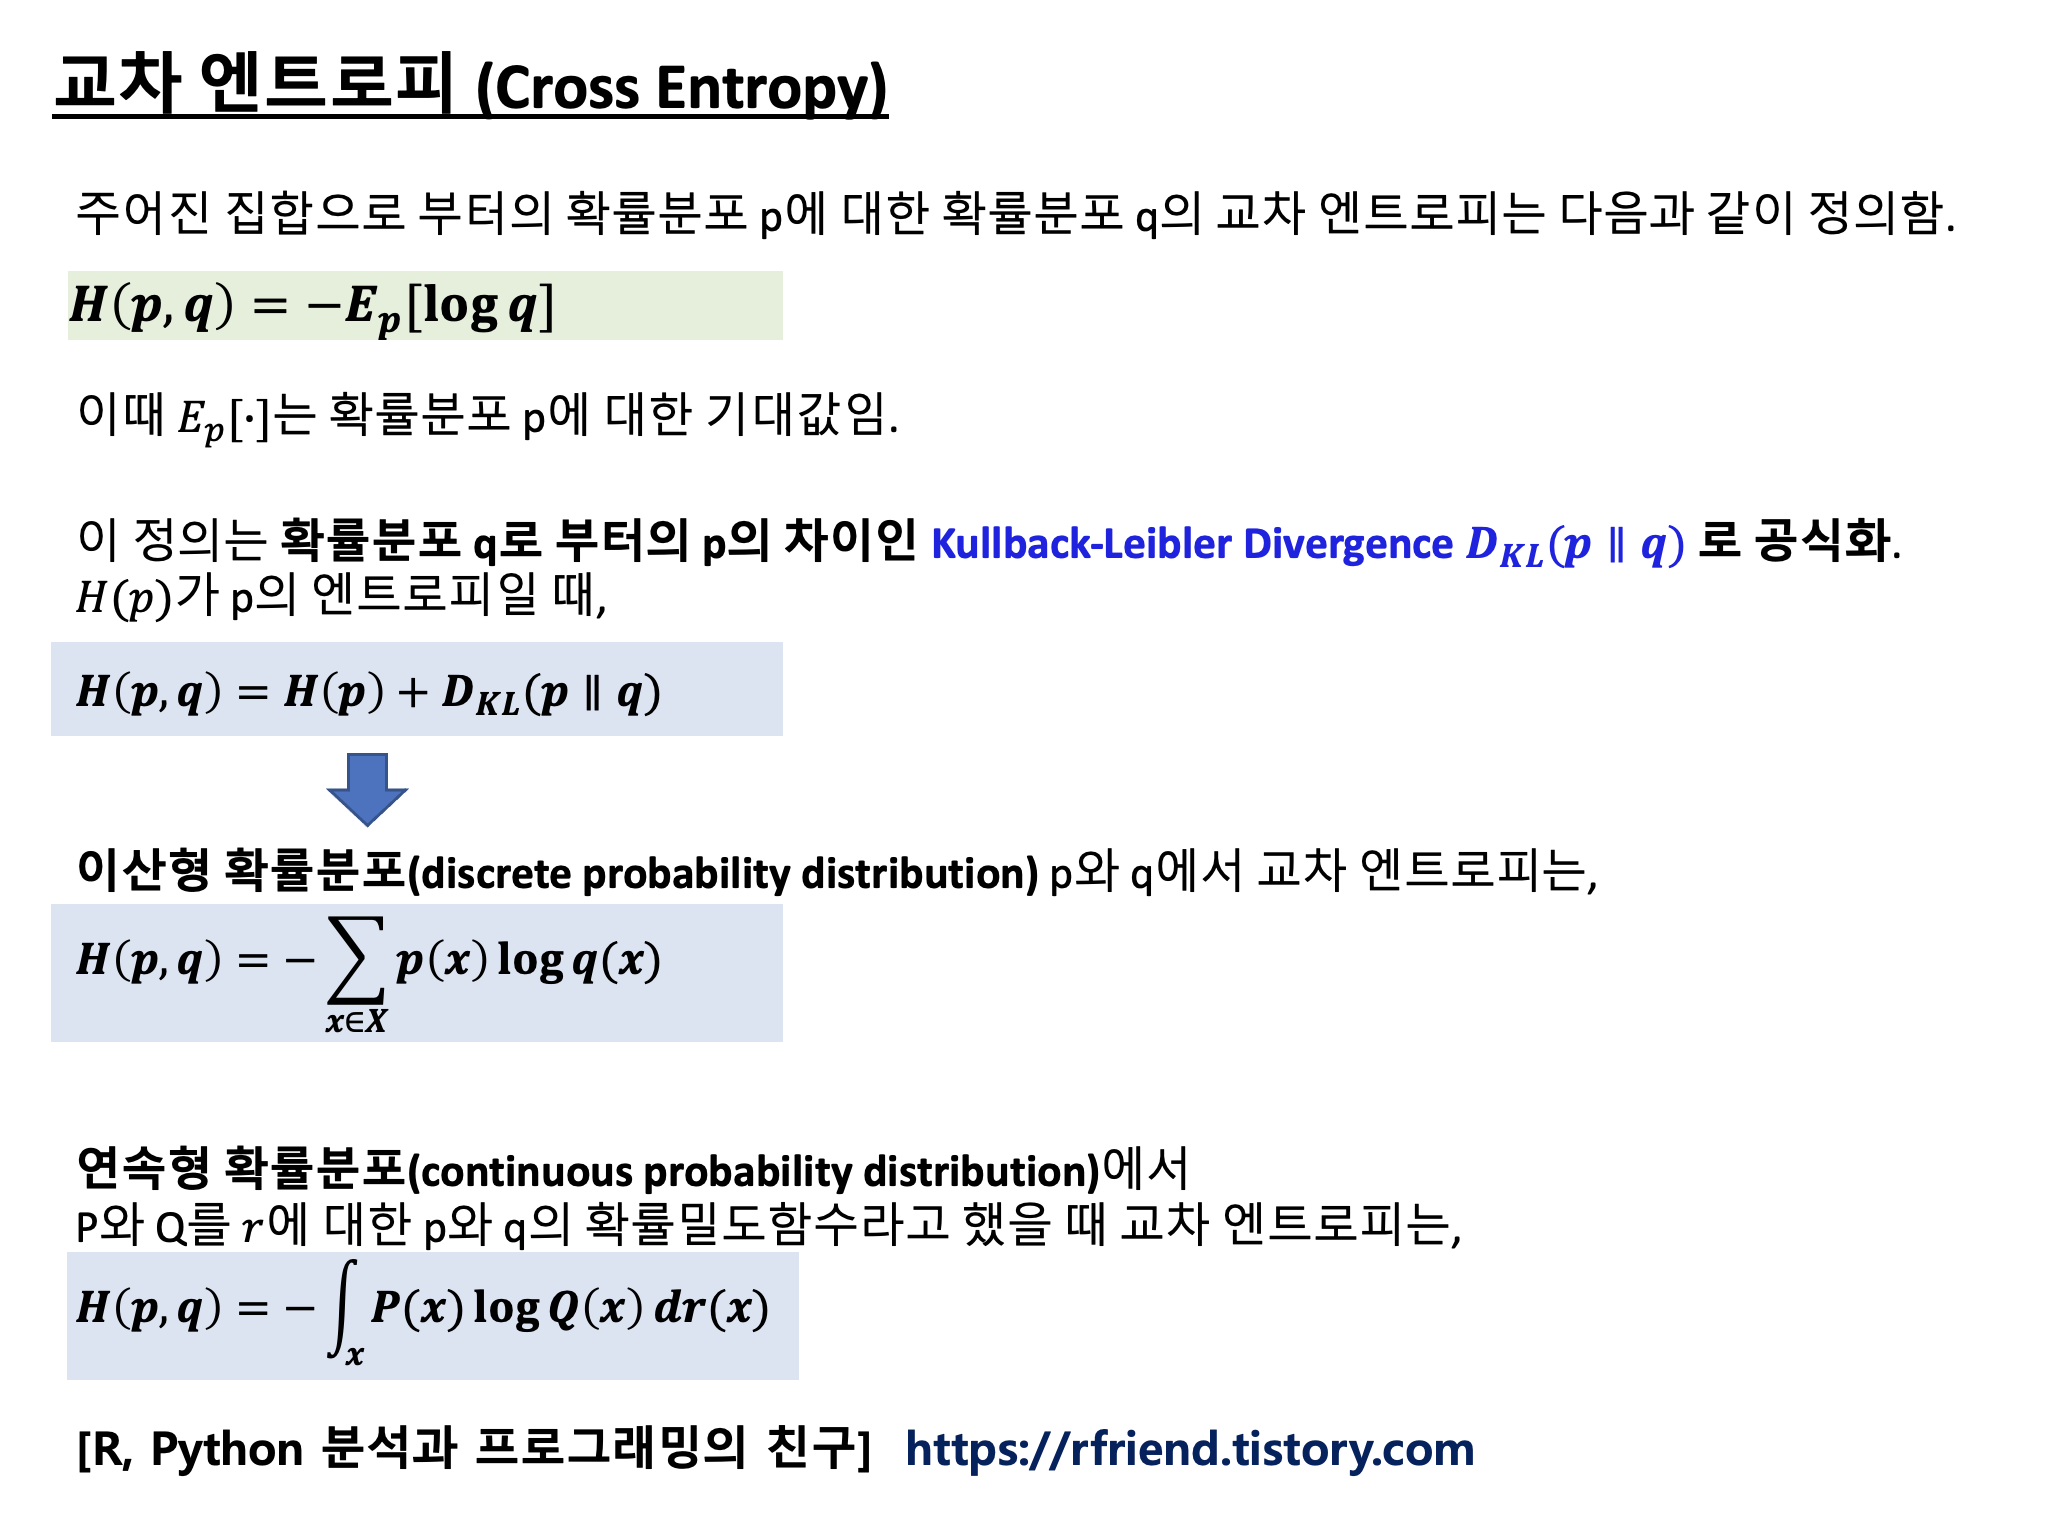
이 정의는 다시 확률분포 q로 부터의 p의 차이인 Kullback-Leibler Divergence Dkl(p||q) 로 공식화(be formulated)될 수 있습니다. 이산형 확률분포와 연속형 확률분포일 경우별로 교차엔트로피를 구하는 수식은 아래의 내용을 참고하세요.
교차 엔트로피는 기계학습과 최적화에서 손실 함수를 정의하는 데 사용될 수 있습니다. 참 확률 p(i)는 정답 레이블이고, 주어진 분포 q(i)는 현재 모델의 예측 값입니다. 언어 모델을 예로 들면, 훈련 데이터셋을 기반으로 언어모델을 생성한 다음, 교차 엔트로피를 테스트 세트에서 측정하여 모델이 테스트 데이터를 예측하는 데 얼마나 정확한지 평가합니다. 이 언어모델 예에서 p는 모든 말뭉치에서 단어의 실제 분포이고, q는 모델에 의해 예측된 단어의 분포입니다.
y(i) 를 실제의 참 값(actual true value), y_hat(i)를 모델이 예측한 값(predicted value)라고 했을 때, 분류 문제의 교차 엔트로피는 아래와 같은 수식으로 표현할 수 있습니다. (이진분류의 경우 y(i)가 0 또는 1 의 값을 가짐). 아래 수식을 보면 알 수 있듯이, 이진분류문제의 교차 엔트로피 손실함수는 실제 값이 0이면 아래 수식의 왼쪽 부분이 없어지고, 실제 값이 1이면 아래 수식의 오른쪽이 없어집니다. 따라서 만약 이진분류 모델이 실제 값을 틀리게 예측하고 또 예측확률값이 높을 수록 교차 엔트로피 손실함수 값이 더 커지게끔 설계되어 있습니다. (틀렸으면 벌을 주는데, 더 확신을 가지고 틀렸으면 더 큰 벌을 주는 개념).

(4) sparse_categorical_crossentropy() vs. categorical_crossentropy() 비교
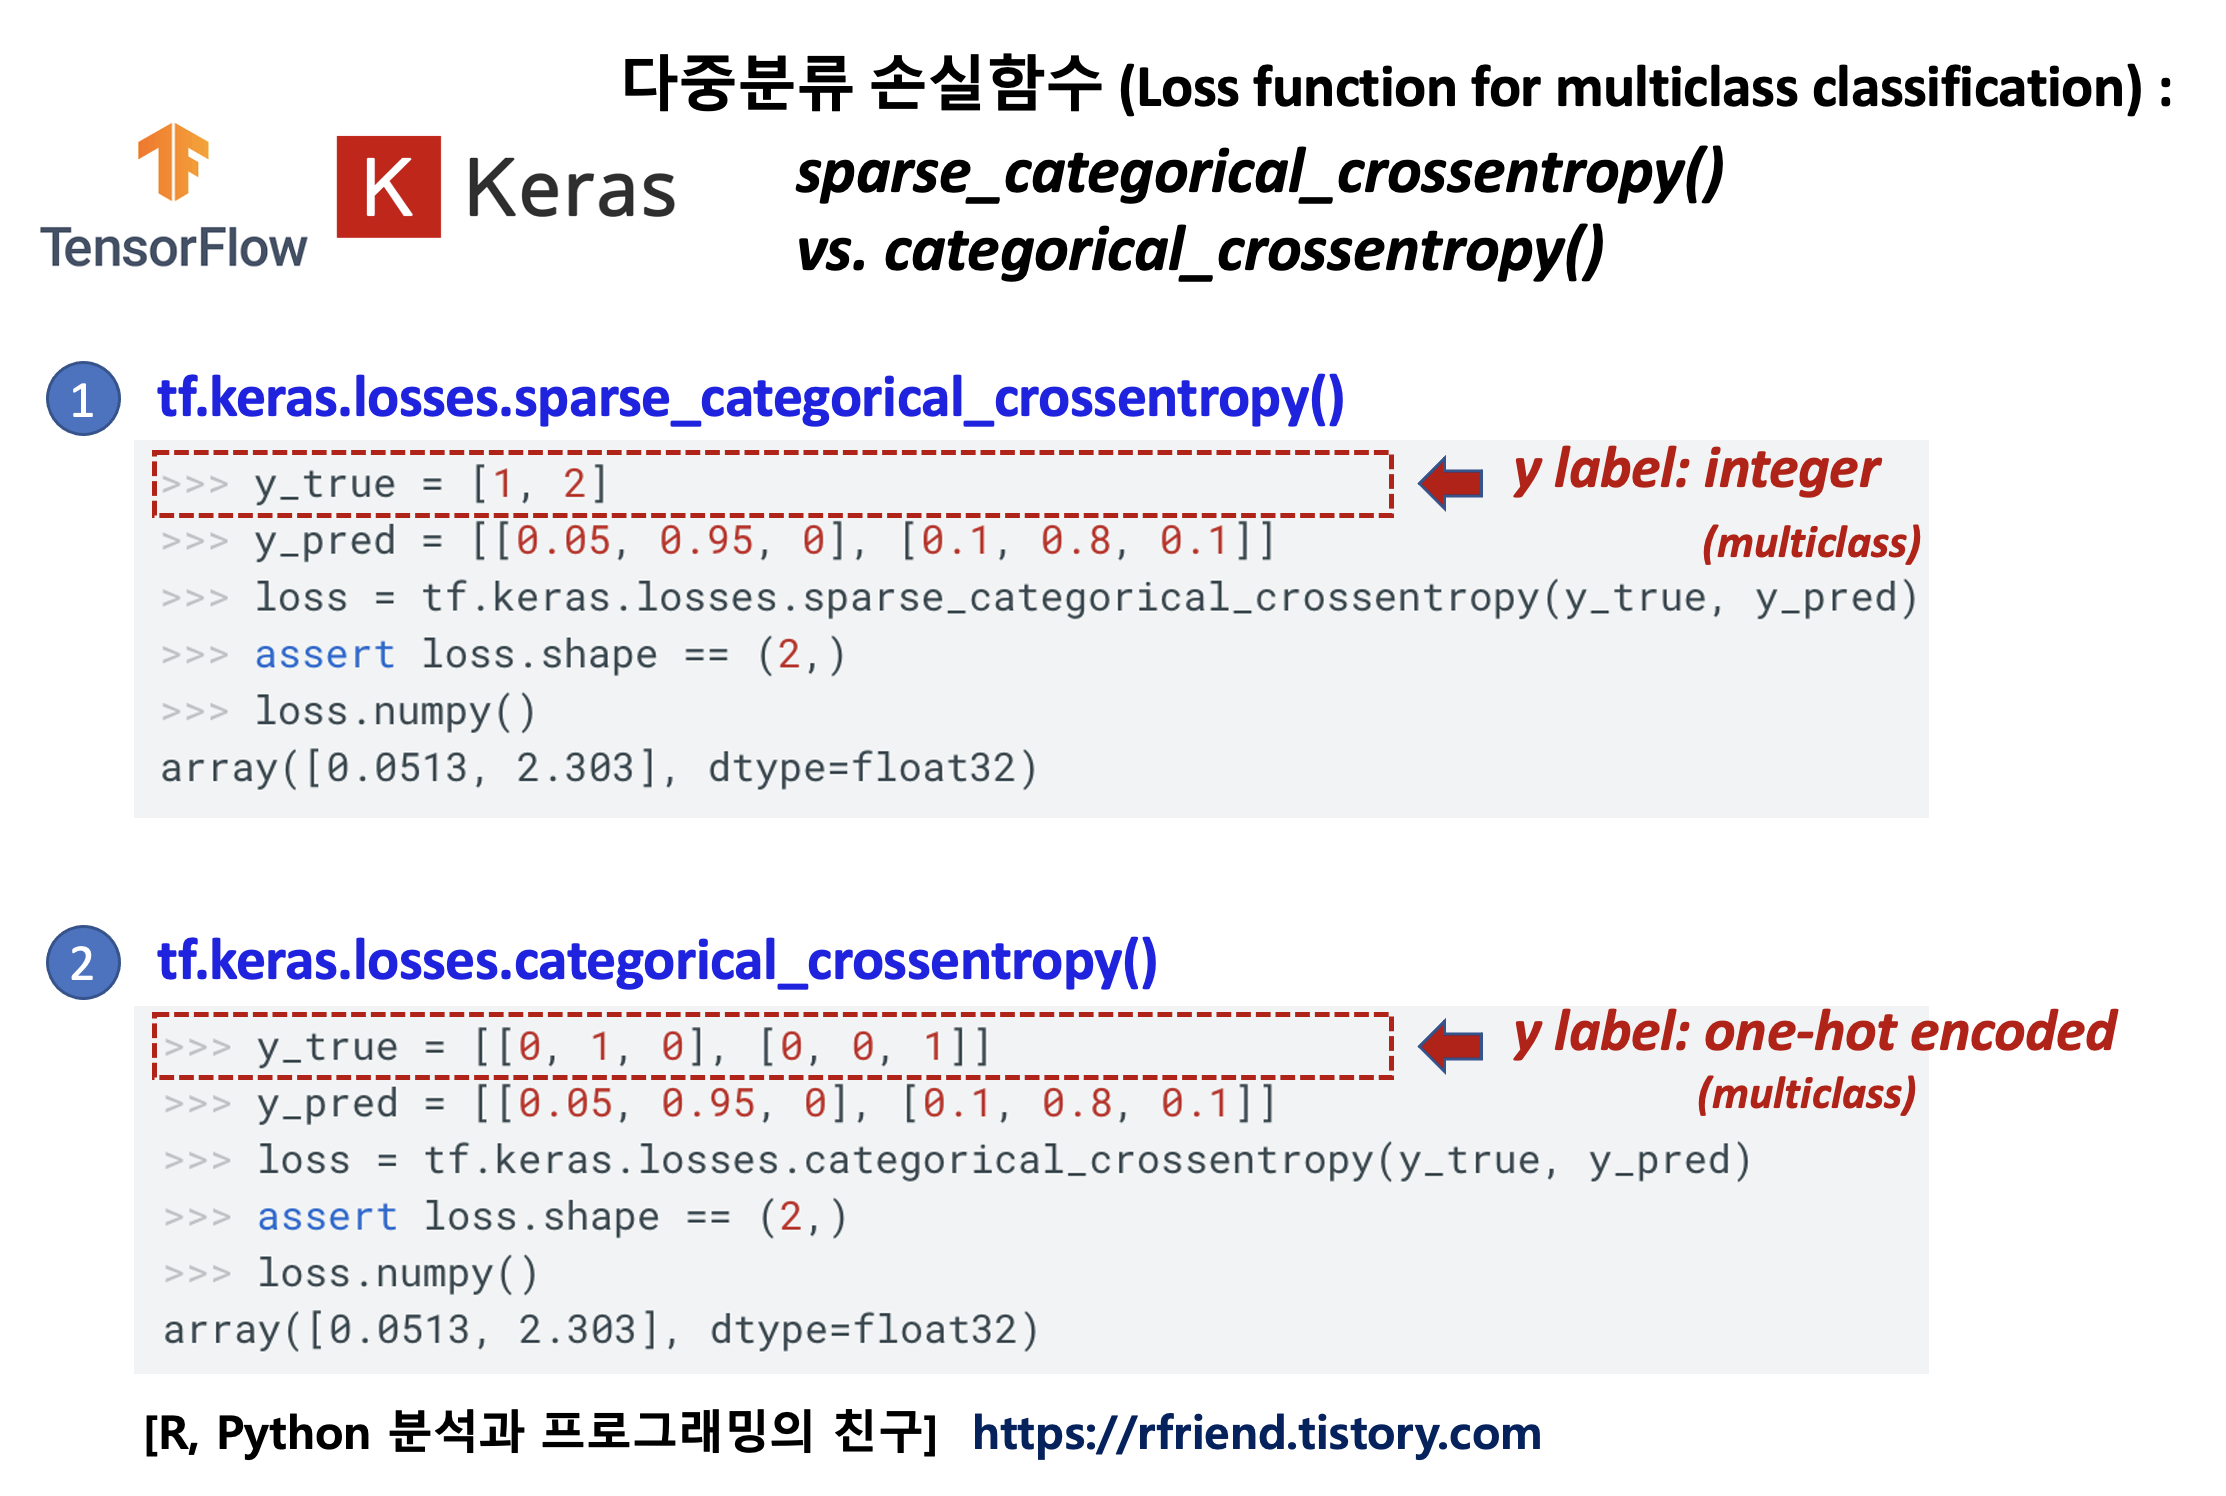
(4-1) 다중분류 문제(multiclass classification problem) 에 사용하는 함수 중에서 y label 의 형태에 따라서,
- tf.keras.losses.sparse_categorical_crossentropy(): y label 이 정수 (integer)
- tf.keras.losses.categorical_crossentropy(): y label 이 one-hot encoded
를 선택해서 사용하면 됩니다.
아래의 화면캡쳐한 코드 예시를 보면 y label의 형태가 어떻게 다른지 금방 알 수 있을 거예요.
(4-2) 또 하나 차이점이 있다면, 문제의 유형(problem types)에 따라서,
- tf.keras.losses.sparse_categorical_crossentropy(): multiclass single-label classification 만 가능
- tf.keras.losses.categorical_crossentropy(): multiclass single-label classification, multiclass multilabel classification 둘다 사용 가능
하다는 차이점이 있습니다.
multiclass single-label classification 문제는 다중 클래스 중에서 관측치는 단 한개의 클래스에만 속하는 문제(예: MNIST의 이미지 숫자 분류)를 말하며, multiclass multilabel classification 문제는 관측치가 여러개의 클래스에 속할 수 있는 문제(예: 음악 장류 분류, 영화 장르 분류 등)를 말합니다.
[ Reference ]
* TensorFlow 손실함수 (Loss Functions/ Classes)
: https://www.tensorflow.org/api_docs/python/tf/keras/losses
* Keras 손실함수 (Loss Functions/ Classes): https://keras.io/api/losses/
* Cross Entropy: https://en.wikipedia.org/wiki/Cross_entropy
* Keras sparse_categorical_crossentropy()
: https://www.tensorflow.org/api_docs/python/tf/keras/metrics/sparse_categorical_crossentropy
* Keras categorical_crossentropy()
: https://www.tensorflow.org/api_docs/python/tf/keras/metrics/categorical_crossentropy
이번 포스팅이 많은 도움이 되었기를 바랍니다.
행복한 데이터 과학자 되세요! :-)

'Deep Learning (TF, Keras, PyTorch) > TensorFlow basics' 카테고리의 다른 글
| [TensorFlow] nvidia-smi 로 GPU 장치 관리 및 GPU 활용 상태 모니터링 하기 (0) | 2022.01.09 |
|---|---|
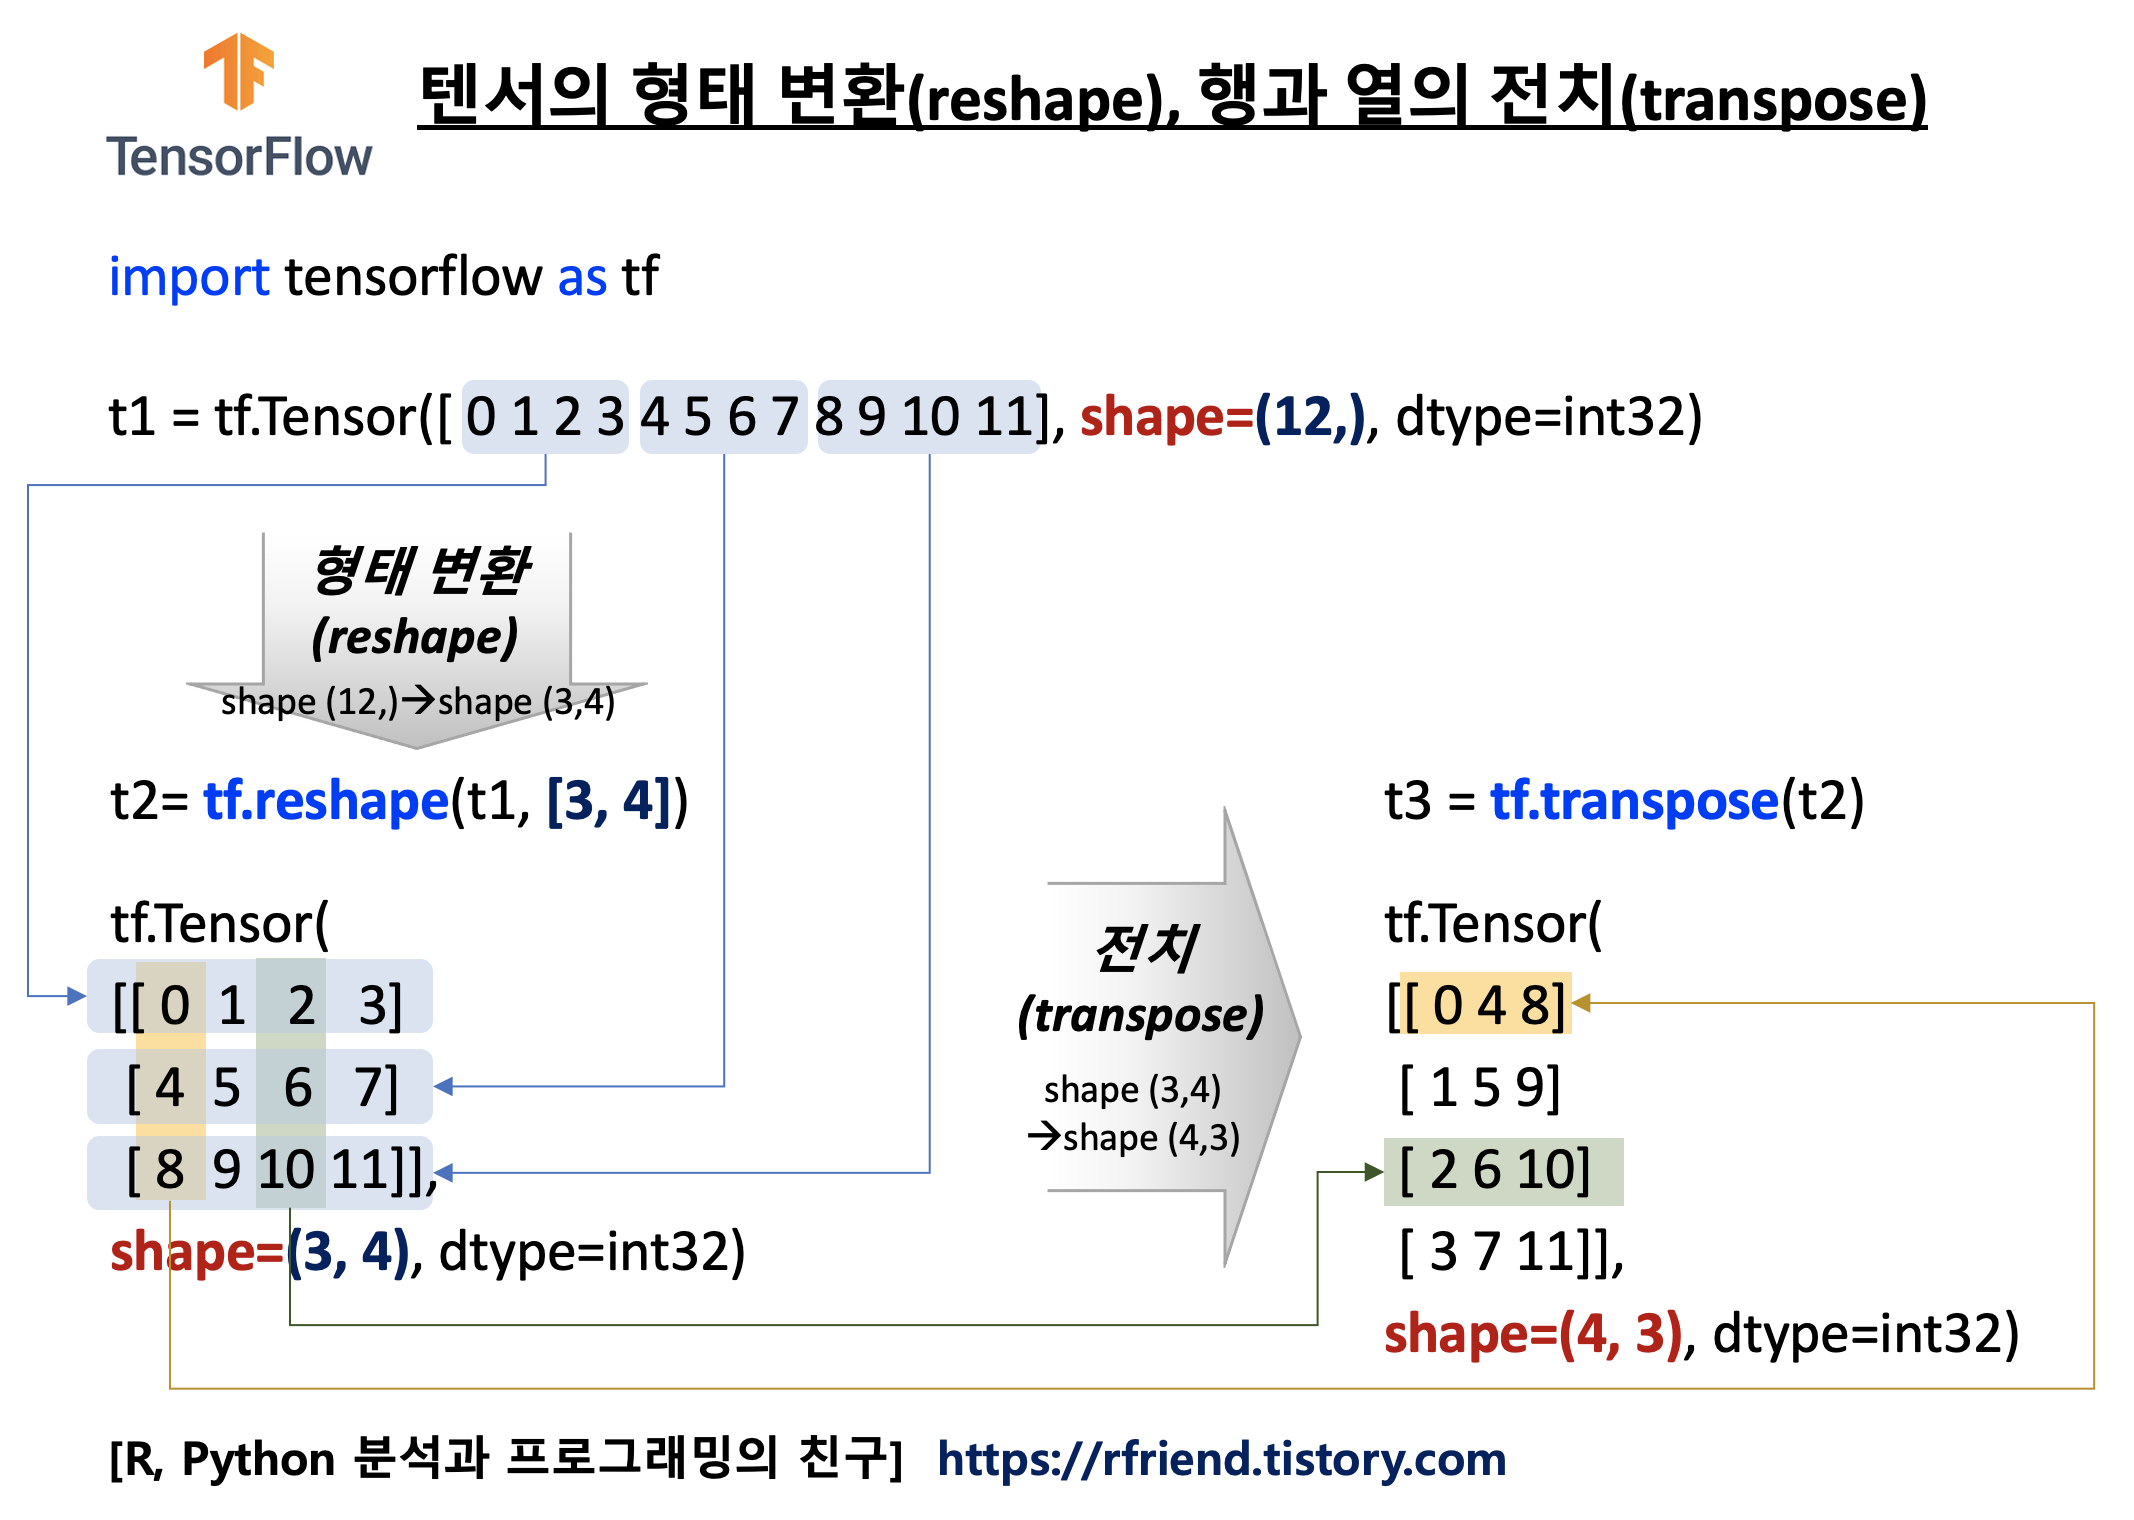
| [TensorFlow] 텐서 형태 변환 (tf.reshape()), 텐서 행과 열 전치 (tf.transpose()) (0) | 2021.12.19 |
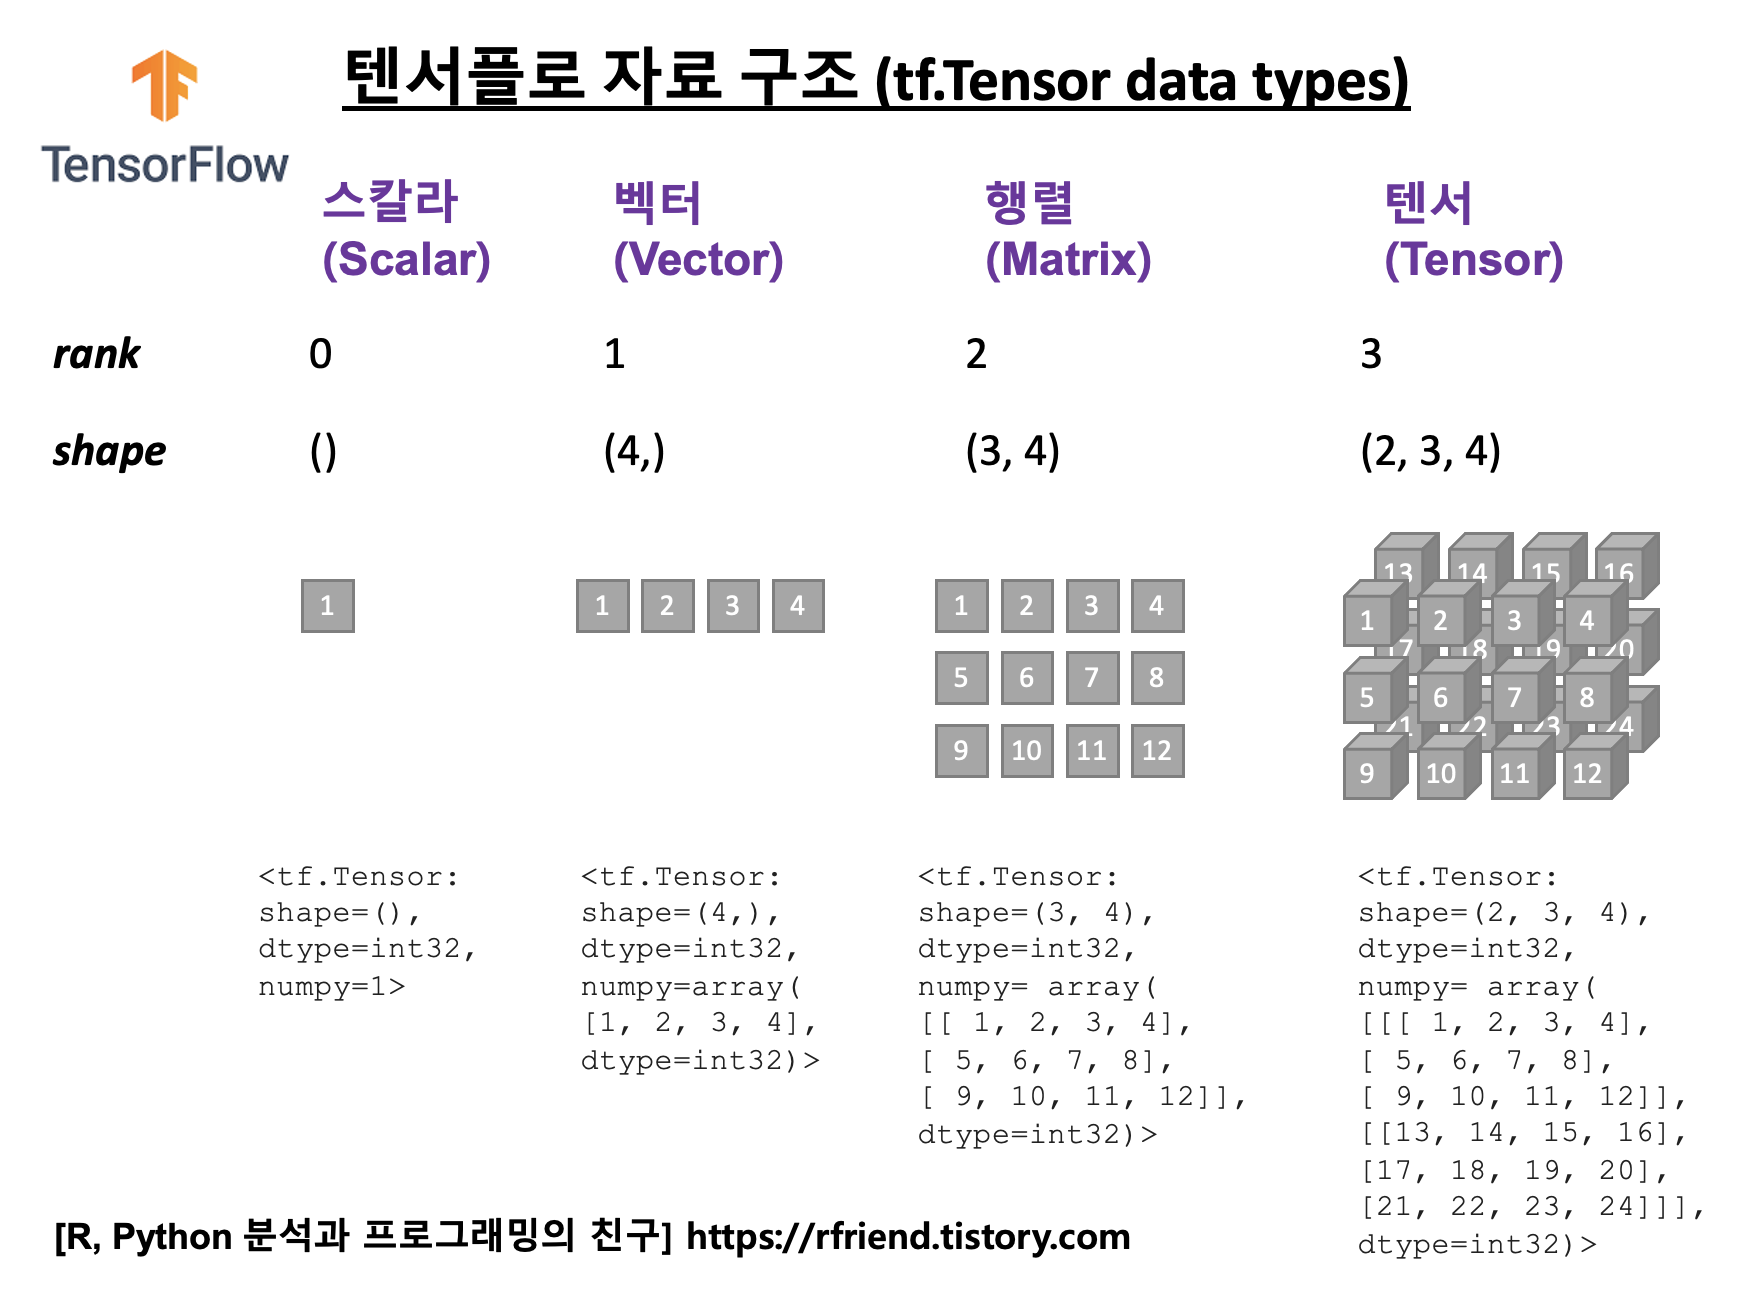
| [Tensorflow] 텐서는 무엇이고 어떻게 만들 수 있나? (What is a tf.Tensor and how to make a tf.Tensor?) (0) | 2021.12.19 |
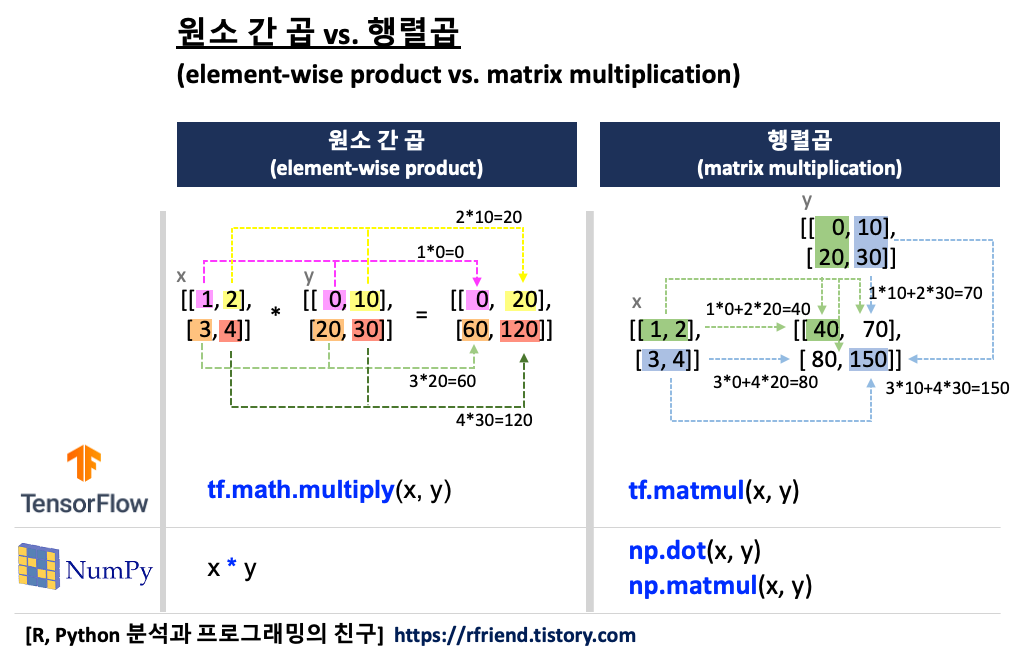
| [Tensorflow] 행렬 원소간 곱 vs. 행렬 곱 (tf.math.multiply() vs. tf.matmul()) (0) | 2021.12.18 |
| [TensorFlow] Gradient Tape을 이용한 자동 미분과 오차역전파 (0) | 2020.08.23 |