## odd or even number
num = int(input("Enter a number: "))

if (num % 2) == 0:
    print("{num} is Even")
else:
    print("{num} is Odd")

# Enter a number: 6
# 6 is Even
(2) 소수 여부 판별하기 (prime number)
소수(the prime number)는 '1과 자기 자신 외의 약수를 가지지 않는 1보다 큰 자연수'를 말합니다.
## Prime number or not
num = int(input("Enter a number: "))

prime_num = True
if num > 1:
    for i in range(2, num):
        if (num % i) == 0 :
            prime_num = False
            break

if prime_num == False:
    print(f"{num} is not a prime number.")
else:
    print(f"{num} is a prime number.")

# Enter a number: 47
# 47 is a prime number.
(3) 팩토리얼 계산하기 (factorial)
팩토리얼이란 어떤 양의 정수 n에 대해서, n부터 1까지의 모든 양의 정수를 곱한 값을 말합니다. 보통 "n!"로 표기하며, 팩토리얼은 수학적 계산과 조합론에서 중요한 개념입니다. 예를 들어, 5!는 5 x 4 x 3 x 2 x 1 = 120입니다. 팩토리얼은 주로 순열과 조합을 계산하거나 확률과 통계에서 사용됩니다.
## Factorial
num = int(input("Enter a number: "))

factorial = 1
if num < 0:
    print("Factorial does not exist for negative numbers.")
elif num == 0:
    print("The factorial of 0 is 1.")
else:
    for i in range(1, num + 1):
        factorial = factorial * i
    print(f"The factorial of {num} is {factorial}")

# Enter a number: 4
# The factorial of 4 is 24
(4) 3&5, 3, 5 로 나누어지는 수 판별하기 (FizzBuzz)
Python coding test 에 나올 법한 문제로 FizzBuzz 문제가 있습니다. 1보다 큰 양의 정수를 3과 5로 모두 나누어지면 "FizzBuzz", 3으로만 나누어지면 "Fizz", 5로만 나누어지면 "Buzz"라고 결과를 출력하는 문제입니다.
# FizzBuzz Problem
# Fizz and Buzz refer to any number that is a multiple of 3 and 5
for i in range(1, 20):
    if i % 3 == 0 and i % 5 == 0:
        print("FizzBuzz")
    elif i % 3 == 0:
        print("Fizz")
    elif i % 5 == 0:
        print("Buzz")
    else:
        print(i)

# 1
# 2
# Fizz
# 4
# Buzz
# Fizz
# 7
# 8
# Fizz
# Buzz
# 11
# Fizz
# 13
# 14
# FizzBuzz
# 16
# 17
# Fizz
# 19
(5) 1 ~5를 라인별로 1부터 시작해서 라인 개수 만큼 출력하기
def num(n):
    for i in range(0, n):
        num = 1
        for j in range(0, i+1):
            print(num, end=" ")
            num += 1
        print("\r")


num(5)
# 1
# 1 2
# 1 2 3
# 1 2 3 4
# 1 2 3 4 5
(6) 1~15를 라인별로 라인 번호부터 시작해서 라인개수 만큼 출력하기
def num(n):
    num = 1
    for i in range(0, n):
        for j in range(0, i+1):
            print(num, end=" ")
            num += 1
        print("\r") # the first position of a line


num(5)
# 1
# 2 3
# 4 5 6
# 7 8 9 10
# 11 12 13 14 15
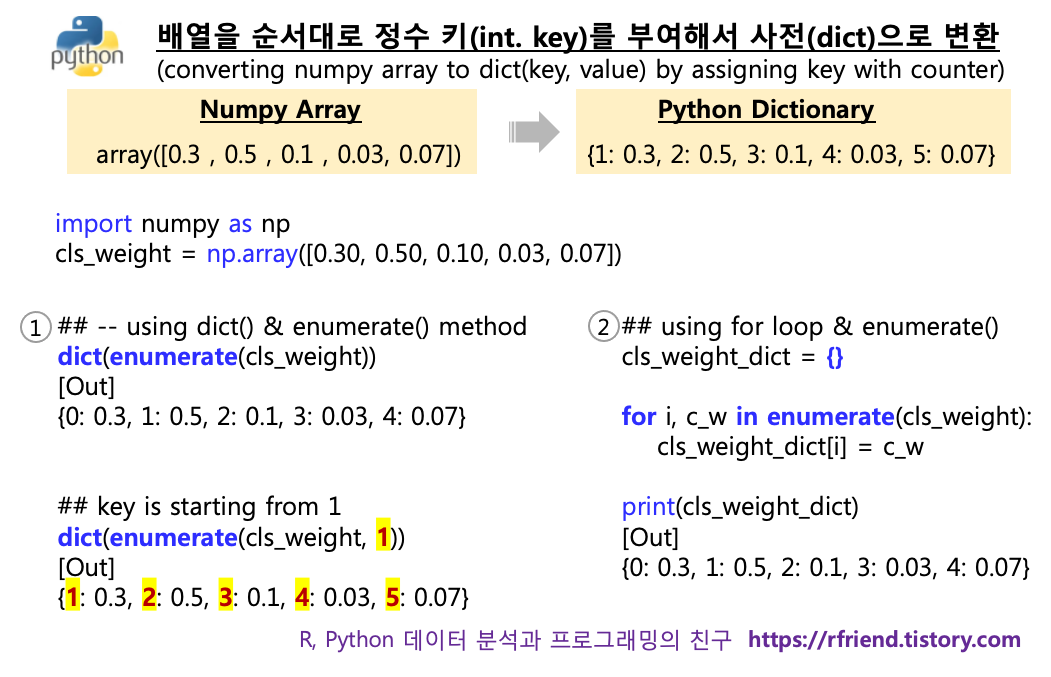
위의 'cls_weight' 배열을 사전(dictionary)으로 변환해보겠습니다. 사전(dict) 키(Key)가 '0' 부터 시작하고, 배열의 순서대로 사전의 키가 하나씩 증가하며, 배열의 순서대로 사전에 값을 할당하여 보겠습니다. dict() 함수는 객체를 '키(Key) : 값(Value)' 의 쌍을 가지는 사전형 자료구조를 만들어줍니다.
## converting numpy array to dictionary,
## dict key is starting from 0
cls_weight_dict_from_0 = dict(enumerate(cls_weight))

cls_weight_dict_from_0
[Out]
{0: 0.3, 1: 0.5, 2: 0.1, 3: 0.03, 4: 0.07}
이때 dict() 안의 enumerate() 메소드는 객체를 순환할 때 회수를 세어주는 counter 를 같이 생성해서 enumerate 객체를 반환합니다. for loop 으로 enumerate 객체를 순환하면서 counter 와 배열 내 값을 차례대로 출력을 해보면 아래와 같습니다.
## enumerate() method adds a counter to an iterable
## and returns it in a form of enumerate object
for i, j in enumerate(cls_weight):
    print(i, ':', j)

[Out]
0 : 0.3
1 : 0.5
2 : 0.1
3 : 0.03
4 : 0.07
경우에 따라서는 배열의 값으로 사전을 만들었을 때, 사전의 키 값이 '0'이 아니라 '1'이나 혹은 다른 숫자로 부터 시작하는 것을 원할 수도 있습니다. 이럴 경우 enumerate(iterable_object, 1) 처럼 원하는 숫자(아래 예에서는 '1')를 추가해주면 그 값이 더해져서 counter 가 생성이 됩니다.
## converting numpy array to dictionary,
## dict key is starting from 1

cls_weight_dict_from_1 = dict(enumerate(cls_weight, 1))

cls_weight_dict_from_1
[Out]
{1: 0.3, 2: 0.5, 3: 0.1, 4: 0.03, 5: 0.07}
만약 사전(dictionary)으로 변환하려고 하는 numpy array의 axis 1의 축이 있다면 flatten() 메소드를 사용해서 axis 0 만 있는 배열로 먼저 평평하게 펴준 (axis 1 축을 없앰) 후에 위의 dict(enumerate()) 를 똑같이 사용해주면 됩니다. 아래 예는 shape (5, 1) 의 배열을 flatten() 메소드를 써서 shape (5, 0) 으로 바꿔준 후에 dict(enumerate()) 로 배열을 사전으로 변환해주었습니다.
이번에는 for loop 과 enumerate() 메소드를 같이 이용하는 방법입니다. 위의 (1) 번 대비 좀 복잡한 느낌이 있기는 하지만, (1) 번 대비 (2) 방법은 for loop 안의 코드 블럭에 좀더 자유롭게 원하는 복잡한 로직을 녹여서 사전(dictionary)을 구성할 수 있다는 장점이 있습니다.
아래 예에서는 (a) 먼저 cls_weight_dict_3 = {} 로 비어있는 사전을 만들어 놓고, (b) for loop 으로 순환 반복을 하면서 enumerate(cls_weight) 가 반환해주는 (counter, 배열값) 로 부터 counter 정수 숫자를 받아서 cls_weight_dict_3 의 키(Key) 로 할당해주고, 배열의 값을 사전의 해당 키에 할당해주는 방식입니다. 사전의 키에 값 할당(assinging Value to dict by mapping Key)은 Dict[Key] = Value 구문으로 해줍니다.
cls_weight = np.array([0.30, 0.50, 0.10, 0.03, 0.07])
cls_weight
[Out]
array([0.3 , 0.5 , 0.1 , 0.03, 0.07])

## Converting a numpy array to a dictionary
## Dict key is starting from 0
cls_weight_dict_3 = {}

for i, c_w in enumerate(cls_weight):
    cls_weight_dict_3[i] = c_w


print(cls_weight_dict_3)
[Out]
{0: 0.3, 1: 0.5, 2: 0.1, 3: 0.03, 4: 0.07}
사전의 키를 '0' 이 아니라 '1'부터 시작하게 하려면 enumerate()의 counter가 0부터 시작하므로, counter를 사전의 키에 할당할 때 'counter+1' 을 해주면 됩니다.
## converting a numpy array to a dictionary using for loop
## dict key is strating from 1

## null dict
cls_weight_dict_3_from_1 = {}

## assigning values by keys + 1
for i, c_w in enumerate(cls_weight):
    cls_weight_dict_3_from_1[i+1] = c_w


print(cls_weight_dict_3_from_1)
[Out]
{1: 0.3, 2: 0.5, 3: 0.1, 4: 0.03, 5: 0.07}
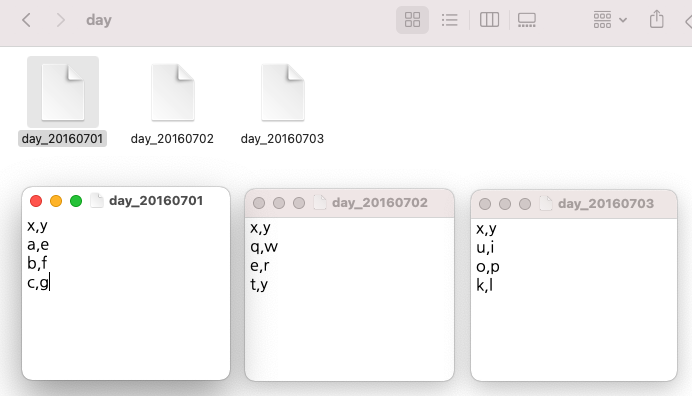
아래의 화면캡쳐 예시처럼 MyDocuments > R > FILES 폴더 아래에 daily로 쪼개진 10개의 text 파일들이 들어있다고 해봅시다. (10개 정도야 일일이 불어올 수도 있겠지만, 100개, 1,000개 파일이 들어있다면?)
(1) 폴더 경로 객체로 만들기
## cleaning up environment
rm(list=ls())

## making directory as an object
src_dir <- c("C:/Users/Owner/Documents/R/FILES") # 경로 구분 : '\'를 '/'로 바꿔야 함

src_dir
#[1] "C:/Users/Owner/Documents/R/FILES"
(2) 폴더 내 파일들 이름을 list-up 하여 객체로 만들기 : list.files()
# listing up name of files in the directory => object
src_file <- list.files(src_dir) # list

src_file
#[1] "day_20160701.txt" "day_20160702.txt" "day_20160703.txt" "day_20160704.txt"
#[5] "day_20160705.txt" "day_20160706.txt" "day_20160707.txt" "day_20160708.txt"
#[9] "day_20160709.txt" "day_20160710.txt"
"C:/Users/Owner/Documents/R/FILES" 디렉토리에 들어있는 파일들을 열어보면 아래와 같은 데이터들이 들어있습니다. (가상으로 만들어 본 것임) daily로 집계한 데이터들이 들어있네요.
(3) 파일 개수 객체로 만들기 : length(list)
# counting number of files in the directory => object
src_file_cnt <- length(src_file)

src_file_cnt
#[1] 10
여기까지 R을 실행하면 아래와 같이 environment 창에 객체들이 생겼음을 확인할 수 있습니다.
(4) 폴더 내 파일들을 LOOP 돌려서 불러오기 => (5) 파일을 내보내면서 합치기 : write.table(dataset, APPEND = TRUE)
: for(i in 1:src_file_cnt) {read.table() write.table(dataset, append = TRUE)}
## write.table one by one automatiically, using loop program
for(i in 1:src_file_cnt) {
	# write.table one by one automatiically, using loop program
    dataset <- read.table(
    	paste(src_dir, "/", src_file[i], sep=""),
        sep=",",
        header=F,
        stringsAsFactors = F)

    # dataset exporting with 'APPEND = TREU' option, filename = dataset_all.txt
    write.table(dataset,
    	paste(src_dir, "/", "dataset_all.txt", sep=""),
        sep = ",",
        row.names = FALSE,
        col.names = FALSE,
        quote = FALSE,
        append = TRUE) # appending dataset (stacking)

    # delete seperate datasets
    rm(dataset)

    # printing loop sequence at console to check loop status
    print(i)
}

#[1] 1
#[1] 2
#[1] 3
#[1] 4
#[1] 5
#[1] 6
#[1] 7
#[1] 8
#[1] 9
#[1] 10
여기까지 실행을 하면 아래처럼 MyDocuments>R>FILES 폴더 아래에 'dataset_all.txt' 라는 새로운 텍스트 파일이 하나 생겼음을 확인할 수 있습니다.
새로 생긴 'dataset_all.txt' 파일을 클릭해서 열어보면 아래와 같이 'day_20160701.txt' ~ 'day_20160710.txt'까지 10개 파일에 흩어져있던 데이터들이 차곡차곡 쌓여서 합쳐져 있음을 확인할 수 있습니다.
(6) 데이터 프레임으로 불러오기 : read.table() 칼럼 이름 붙이기 : col.names = c("var1", "var2", ...)
# reading dataset_all with column names
dataset_all_df <- read.table(
	paste(src_dir, "/", "dataset_all.txt", sep=""),
    sep = ",",
    header = FALSE, # no column name in the dataset
    col.names = c("ymd", "var1", "var2", "var3", "var4", "var5", + "var6", "var7", "var8", "var9", "var10"), # input column names
    stringsAsFactor = FALSE,
    na.strings = "NA") # missing value : "NA"
우측 상단의 environment 창에서 'dataset_all_df' 데이터 프레임이 새로 생겼습니다.
클릭해서 열어보면 아래와 같이 'day_20160701.txt' ~ 'day_20160710.txt'까지 데이터셋이 합쳐져있고, "ymd", "var1" ~ "var10" 까지 칼럼 이름도 생겼습니다.
댓글 질문에 '폴더에 있는 개별 파일을 하나씩 읽어와서 하나씩 DataFrame 객체로 메모리상에 생성하는 방법에 대한 질문이 있어서 코드 추가해서 올립니다. 위에서 소개한 방법과 전반부는 동일하구요, 마지막에 루프 돌릴 때 assign() 함수로 파일 이름을 할당하는 부분만 조금 다릅니다.
#========================================================= # read all files in a folder and make a separate dataframe #========================================================= rm(list=ls()) # clear all
# (2) make a file list of all files in the folder src_file <- list.files(src_dir) src_file
# (3) count the number of files in the directory => object src_file_cnt <- length(src_file) src_file_cnt # 5
# (4) read files one by one using looping # => make a dataframe one by one using assign function for (i in 1:src_file_cnt){ assign(paste0("day_", i), read.table(paste0(src_dir, "/", src_file[i]), sep = ",", header = FALSE)) print(i) # check progress }
댓글에 "여러개의 파일을 하나로 합칠 때 "파일 이름을 데이터 프레임의 새로운 칼럼에 값으로 추가한 후"에 합치는 방법"에 대한 문의가 있었습니다. 댓글란에 코드 블락을 복사해 넣으면 들여쓰기가 무시되어서 보기가 힘들므로 본문에 예제 코드 추가해 놓습니다.
간단한 샘플 텍스트 파일 3개 만들어서 for loop 순환문으로 각 파일 읽어온 후, 파일 이름을 새로운 칼람 'z'의 값으로 할당 해주고, blank data.frame 인 'day_all' 에 순차적으로 rbind 해주었습니다.
multiple files
##--------------------------------------------------------
## add new column with file name and append all dataframes
##--------------------------------------------------------

## blank data.frame to save all files later
day_all <- data.frame()

## file list
src_dir <- c("/Users/lhongdon/Documents/day")
src_file <- list.files(src_dir)
src_file
# [1] "day_20160701" "day_20160702" "day_20160703"


for (i in 1:length(src_file)){
  # read dataset 1 by 1 sequentially
  day_temp <- read.table(
    paste0(src_dir, "/", src_file[i]),
    sep=",",
    header=T,
    stringsAsFactors=F)

  # add filename as a new column
  day_temp$z <- src_file[i]

  # rbind day_temp to day_all data.frame
  day_all <- rbind(day_all, day_temp)

  #print(i) # for progress check
}

print(day_all)
# x y            z
# 1 a e day_20160701
# 2 b f day_20160701
# 3 c g day_20160701
# 4 q w day_20160702
# 5 e r day_20160702
# 6 t y day_20160702
# 7 u i day_20160703
# 8 o p day_20160703
# 9 k l day_20160703
=============================
(2021.08.25 일 추가)
댓글에 추가 질문이 달려서 요건에 맞게 코드를 더 추가하였습니다.
중첩 for loop 문에 조건절이 여러개 들어가다 보니 코드가 많이 복잡해졌네요.
[데이터 전처리 요건 ]
1. 로컬 머신 폴더 내 여러개의 csv 파일을 읽어와서 한개의 R data.frame 으로 통합
2. 이때 개별 csv 파일로 부터 읽어들인 데이터를 특정 개수의 [행 * 열] data.frame 으로 표준화
- 가령, 3 행 (rows) * 3 열 (columns) 의 data.frame 으로 표준화하기 원한다면
- 개별 csv 파일로 부터 읽어들인 데이터의 행(row)의 개수가 3보다 크면 1~3행까지만 가져와서 합치고 나머지는 버림. 반대로 3개 행보다 부족하면 'NA' 결측값으로 처리함.
- 개별 csv 파일로 부터 읽어들인 데이터의 열(column)이 타켓 칼럼 이름(가령, "x", "y", "z") 중에서 특정 칼럼이 없다면 그 칼럼의 값은 모두 'NA' 결측값으로 처리함.(가령, csv 파일 내에 "x", "y" 만 있고 "z" 칼럼은 없다면 "z" 칼럼을 만들어주고 대신 값은 모두 'NA' 처리해줌)
3. 'day' 라는 칼럼을 새로 만들어서 파일 이름(day 날짜가 들어가 있음)을 값으로 넣어줌
##--------------------------------------------------------
## (1) 3 rows & 3 cols DataFrame
## (2) add new column with file name and append all dataframes
##--------------------------------------------------------

## blank data.frame to save all files later
day_all <- data.frame()

## file list
src_dir <- c("/Users/lhongdon/Documents/day")
src_file <- list.files(src_dir)
src_file
# [1] "day_20160701" "day_20160702" "day_20160703" "day_20160704"


## setting target rows & cols
row_num <- 3 # set your target number of rows
col_name <- c("x", "y", "z") # set your target name of columns

for (i in 1:length(src_file)){

  # read dataset 1 by 1 sequentially
  day_temp <- read.table(
    paste0(src_dir, "/", src_file[i]),
    sep=",",
    header=T,
    stringsAsFactors=F)

  ##-- if the number of rows is less than 3 then 'NA',
  ##-- if the number of rows is greater than 3 than ignore them
  ##-- if the name of columns is not in col_nm then 'NA'

  # blank temp dataframe with 3 rows and 3 columns
  tmp_r3_c3 <- data.frame(matrix(rep(NA, row_num*col_num),
  								nrow=row_num,
                                byrow=T))
  names(tmp_r3_c3) <- col_name

  tmp_row_num <-  nrow(day_temp)
  tmp_col_name <- colnames(day_temp)

  r <- ifelse(row_num > tmp_row_num, tmp_row_num, row_num)

  for (j in 1:r) {
    for (k in 1:length(tmp_col_name)) {
      tmp_r3_c3[j, tmp_col_name[k]] <- day_temp[j, tmp_col_name[k]]
    }
  }

  # add filename as a new column 'day'
  tmp_r3_c3$day <- src_file[i]

  # rbind day_temp to day_all data.frame
  day_all <- rbind(day_all, tmp_r3_c3)

  rm(tmp_r3_c3)
  print(i) # for progress check
}

print(day_all)
# x    y  z          day
# 1     a    e  1 day_20160701
# 2     b    f  3 day_20160701
# 3     c    g  5 day_20160701
# 4     q    w NA day_20160702
# 5     e    r NA day_20160702
# 6     t    y NA day_20160702
# 7     u    i  3 day_20160703
# 8     o    p  6 day_20160703
# 9  <NA> <NA> NA day_20160703
# 10    e    a  6 day_20160704
# 11    d    z  5 day_20160704
# 12    c    x  3 day_20160704