[LangChain] Pipeline으로 여러개의 프롬프트를 조합해서 쓰기 (Composing multiple prompts together using Pipeline)
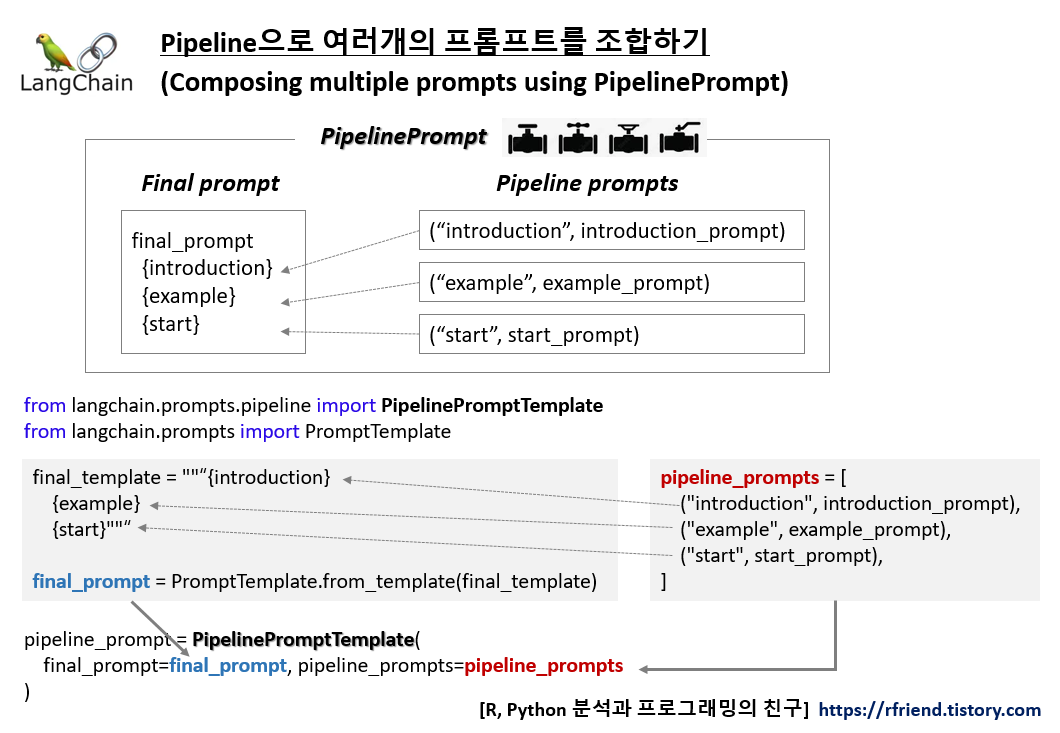
Deep Learning (TF, Keras, PyTorch)/Natural Language Processing 2024. 1. 4. 23:53LangChain으로 LLM 모델을 사용한 애플리케이션을 만들 때 기존의 여러개 프롬프트를 재사용하고 조합해서 최종 프롬프트를 만들어서 사용해야 할 경우가 있습니다. 이때 LangChain의 PipelinePrompt 를 사용하면 되는데요, PipeliePrompt는 다음과 같이 Final promt, Pipeline prompts 의 두 개 부분으로 구성되어 있습니다.
- (1) Final prompt: 최종적으로 반환되는 프롬프트.
- (2) Pipeline prompts: string 이름과 prompt template 으로 구성되는 튜플의 리스트(a list of tuples). 각 프롬프트는 포맷이 정의되고, 동일한 이름의 변수로 파이프라인의 다음 template으로 전달됨.
간단한 예를 들어보겠습니다.
- (1) Final prompt: final_prompt
- (2) Pipeline prompts: introduction_prompt, example_prompt, start_prompt
- (3) Composing all together
: PipelinePromptTemplate(
final_prompt=final_prompt,
pipeline_prompts=[
("introduction", introduction_prompt),
("example", example_prompt),
("start", start_prompt)
])
먼저, 터미널에서 pip install로 langchain, openai 모듈을 설치합니다.
! pip install langchain openai
다음으로 실습에 필요한 모듈을 importing 합니다.
from langchain.prompts.pipeline import PipelinePromptTemplate
from langchain.prompts import ChatPromptTemplate
from langchain.chat_models import ChatOpenAI
from langchain_core.output_parsers import StrOutputParser
OpenAI의 Chat Model을 사용해서 답변을 생성할 것이므로 OPENAI API KEY를 환경변수에 등록합니다.
import os

os.environ["OPENAI_API_KEY"]="sk-xxxx..."
(1) Final prompt 생성
여러개의 하위 프롬프트를 구성요소로 가지는 최종 프롬프트를 작성합니다. (나중에 변수이름과 하위 구성요소 프롬프트를 튜플로 매핑시키고, 하나의 리스트로 묶어줍니다.)
# Final template and prompt
final_template = """{introduction}

{example}

{start}"""

final_prompt = ChatPromptTemplate.from_template(final_template)
(2) Pipeline prompts 생성
(2-1) instruction_prompt 생성
# Introduction template and prompt
introduction_template = """You are an expert on {topic}."""

introduction_prompt = ChatPromptTemplate.from_template(introduction_template)
(2-2) exmaple_prompt 생성
# Example template and prompt
example_template = """Here is an example of an interaction:

Input: {example_input}
Output: {example_output}"""

example_prompt = ChatPromptTemplate.from_template(example_template)
(2-3) start_prompt 생성
# Start template and prompt
start_template = """Now, do this for real.

Input: {input}
Output:"""

start_prompt = ChatPromptTemplate.from_template(start_template)
(3) 여러개의 Pipeline prompts를 PipelinePrompt를 이용해서 하나의 Pipeline으로 조합하기 (Composing all together)
# Composing multiple prompts together using PipelinePromptTemplate()
input_prompts = [
    ("introduction", introduction_prompt),
    ("example", example_prompt),
    ("start", start_prompt),
]

pipeline_prompt = PipelinePromptTemplate(
    final_prompt=final_prompt, pipeline_prompts=input_prompts
)


pipeline_prompt.input_variables
# ['example_input', 'example_output', 'input', 'topic']
최종 pipeline_prompt를 구성하는 각 하위 프롬프트의 변수이름에 값을 입력해서 프린트해보았습니다. 이제 프롬프트는 준비가 다 되었습니다.
print(
    pipeline_prompt.format(
        topic="Math",
        example_input="It costs 2 dollar per apple. How much do you need in total to buy 10 apples?",
        example_output="Since 2 x 10 = 20, you need a total of $20.",
        input="How much does it cost to buy 6 cans of beer that cost $3 each?",
    )
)


# Human: [HumanMessage(content='You are an expert on Math.')]

# [HumanMessage(content='Here is an example of an interaction:\n\nInput: It costs 2 dollar per apple. How much do you need in total to buy 10 apples?\nOutput: Since 2 x 10 = 20, you need a total of $20.')]

# [HumanMessage(content='Now, do this for real. \n\nInput: How much does it cost to buy 6 cans of beer that cost $3 each?\nOutput:')]
(4) pipeline_prompt + Chat Model + Output Parser를 Chaining 하기
# Chat Model
model = ChatOpenAI(temperature=0, model='gpt-4')

# Output Parser
parser = StrOutputParser()

# Chaining
chain = pipeline_prompt | model | parser
(5) chain.invoke() 로 Chat Model 실행하고 결과 반환받기
두개를 실행시켜 봤는데 예제를 통해 가르켜준대로 잘 대답을 해주네요.
chain.invoke({
    "topic": "Math",
    "example_input": "It costs 2 dollar per apple. How much do you need in total to buy 10 apples?",
    "example_output": "Since 2 x 10 = 20, you need a total of $20.",
    "input": "How much does it cost to buy 6 cans of beer that cost $3 each?"
})

# 'Since 6 x 3 = 18, you need a total of $18.'


chain.invoke({
    "topic": "Math",
    "example_input": "It costs 2 dollar per apple. How much do you need in total to buy 10 apples?",
    "example_output": "Since 2 x 10 = 20, you need a total of $20.",
    "input": "How much does it cost in total to buy 6 cans of beer that cost $3 each \
    and two snacks that cost $5 each?"
})

# 'Since (6 x $3) + (2 x $5) = $18 + $10 = $28, you need a total of $28.'
[ Reference ]
* LangChain - Pipeline: https://python.langchain.com/docs/modules/model_io/prompts/pipeline
이번 포스팅이 많은 도움이 되었기를 바랍니다.
행복한 데이터 과학자 되세요. :-)

'Deep Learning (TF, Keras, PyTorch) > Natural Language Processing' 카테고리의 다른 글
| [LangChain] 표준 인터페이스, 비동기 인터페이스 (Standard Interfaces, Async Interfaces in LangChain) (0) | 2024.01.06 |
|---|---|
| Chain-of-Thought Prompting 이란 무엇인가? (0) | 2024.01.05 |
| [LangChain] 문자열 값을 반환하는 함수를 사용한 부분적 프롬프트 템플릿 (Partial prompt templates with functions) (0) | 2024.01.03 |
| [LangChain] Chat Model로 Few-shot Prompting 하기 (0) | 2024.01.03 |
| [LangChain] LLM Model로 Few-shot Prompting 하기 (2) | 2024.01.02 |