[Kubeflow] MiniKF 를 맥북에 설치하기 (Installing MiniKF, Mini-Kubuflow on laptop/desktop)
Kubeflow 2021. 8. 17. 19:02지난번 포스팅(https://rfriend.tistory.com/674)에서는 오픈소스 Kubeflow 이 무엇이고 특장점에는 무엇이 있는지 알아보았습니다.
Kubeflow 는 아래의 표에서 확인할 수 있는 바와 같이 다양한 클라우드 플랫폼 위에서 유연하게 사용할 수 있습니다. (As of Aug. 2021)
[ Kubeflow 의 플랫폼 별 다양한 버전 ]

* 출처: https://www.kubeflow.org/docs/started/installing-kubeflow/
이번 포스팅에서는 이들 여러개의 플랫폼 중에서도 Laptop/ Desktop에 간편하게 설치해서 쉽게 Kubeflow 기능을 체험해보고 싶은 사용자에게 적합한 "Vagrant 플랫폼 기반의 Arrikto MiniKF (Mini-Kubeflow)" 를 MacOS의 맥북에 설치하는 방법을 소개하겠습니다.
MiniKF 는 이름에서 유추할 수 있듯이, 단지 몇 번의 클릭만으로 Kubeflow의 전체 파이프라인을 사용해볼 수 있게 해줌으로써 Kubernetes를 전문적으로 알지는 못하는 데이터 과학자 또는 개발자라도 Kubeflow 를 빠르고 쉽게 시작할 있도록 해줍니다. 더불어서, 만약 나중에 MiniKF에서 만든 기계학습/딥러닝 모델을 규모있게 운영을 하고 싶으면, 기존 코드를 다시 쓰는 것 없이 단지 원클릭 만으로 Kubeflow 클라우드 배포로 이동시킬 수 있습니다. 완전 신기하고 멋지죠?!!
MiniKF로 로컬머신에서 원활한 실험을 하기 위한 시스템 사양으로 Kubeflow 커뮤니티 사이트에서는 아래의 사양을 추천하고 있습니다.
[ System Requirements for MiniKF ]
- 12 GB RAM
- 2 CPUs
- 50 GB disk space
제가 사용하는 맥북 사양은 메모리 32GB, CPU 2.4 Ghz 8코어 Intel Core i9, 1TB disk space 인데요, MiniKF 구동시킬때마다 비행기 이륙하는 소리가 나는 것으로 봐서는 MiniKF가 리소스를 상당히 많이 사용하는 것 같습니다.
MiniKF 는 Linux, macOS, Windows 의 주요 OS 에서 사용 가능합니다.
이번 포스팅에서는 macOS (Big Sur 버전 11.3) 에 Homebrew, Vagrant 를 사용해서 MiniKF를 설치해보겠습니다.
사전 준비사항으로 랩탑/데스크탑에 Vagrant, Virtual Box 를 설치해야 합니다.
- (1) Vagrant 사전 설치
- (2) Virtual Box 가상머신 사전 설치
(1) Vagrant 사전 설치
Vagrant 는 단일 워크플로우에서 가상 머신 환경을 구성하고 관리하는 툴입니다. Vagrant 는 사용하기 쉬운 워크플로우오ㅓ 자동화에 중점을 두어 개발환경 구성에 소요되는 시간을 줄이고 생산성을 올려줍니다.
% brew tap hashicorp/tap
% brew install vagrant
(base) lhongdon@Hongui-MacBookPro ~ % brew tap hashicorp/tap
Updating Homebrew...
==> Homebrew is run entirely by unpaid volunteers. Please consider donating:
  https://github.com/Homebrew/brew#donations
==> Auto-updated Homebrew!
Updated 1 tap (homebrew/core).
==> New Formulae
firefoxpwa
==> Updated Formulae
Updated 127 formulae.

==> Tapping hashicorp/tap
Cloning into '/usr/local/Homebrew/Library/Taps/hashicorp/homebrew-tap'...
remote: Enumerating objects: 1444, done.
remote: Counting objects: 100% (198/198), done.
remote: Compressing objects: 100% (127/127), done.
remote: Total 1444 (delta 122), reused 117 (delta 71), pack-reused 1246
Receiving objects: 100% (1444/1444), 263.75 KiB | 5.27 MiB/s, done.
Resolving deltas: 100% (818/818), done.
Tapped 1 cask and 11 formulae (42 files, 380.5KB).
(base) lhongdon@Hongui-MacBookPro ~ %
(base) lhongdon@Hongui-MacBookPro ~ %
(base) lhongdon@Hongui-MacBookPro ~ %
(base) lhongdon@Hongui-MacBookPro ~ % brew install vagrant
==> Tapping homebrew/cask
Cloning into '/usr/local/Homebrew/Library/Taps/homebrew/homebrew-cask'...
remote: Enumerating objects: 586340, done.
remote: Counting objects: 100% (510/510), done.
remote: Compressing objects: 100% (264/264), done.
remote: Total 586340 (delta 262), reused 384 (delta 246), pack-reused 585830
Receiving objects: 100% (586340/586340), 258.95 MiB | 6.46 MiB/s, done.
Resolving deltas: 100% (414124/414124), done.
Tapped 3975 casks (4,055 files, 277.8MB).
==> Downloading https://releases.hashicorp.com/vagrant/2.2.18/vagrant_2.2.18_x86_64.dmg
######################################################################## 100.0%
==> Installing Cask vagrant
==> Running installer for vagrant; your password may be necessary.
Package installers may write to any location; options such as `--appdir` are ignored.
Password:
Sorry, try again.
Password:
installer: Package name is Vagrant
installer: Installing at base path /
installer: The install was successful.
🍺  vagrant was successfully installed!
(base) lhongdon@Hongui-MacBookPro ~ %
(base) lhongdon@Hongui-MacBookPro ~ %
(2) Virtual Box 사전 설치
가상 머신 Virtual Box 를 https://www.virtualbox.org/wiki/Downloads 에서 자신의 OS 에 맞는 패키지를 다운로드해서 랩탑/데스크탑에 설치해 줍니다. 저는 MacBook Pro 에 설치할 것이므로 OS X hosts 메뉴에서 VirtualBox-6.1.26-145957-OSX.dmg 파일을 다운로드하여 앱을 실행시켰습니다.

사전 준비사항이 완료되었으면 이제 MiniKF를 설치하고 업그레이드 해보겠습니다.
- (3) MiniKF 설치
- (4) MiniKF 업그레이드
(3) MiniKF 설치
% vagrant init arrikto/minikf
$ vagrant up
먼저 터미널에서 'minikf' 라는 디렉토리를 만들고, 'minikf' 로 디렉토리를 변경하여, 위의 vagrant 명령문을 실행하여 MiniKF 를 설치하였습니다.
(base) lhongdon@Hongui-MacBookPro ~ %
(base) lhongdon@Hongui-MacBookPro ~ % mkdir minikf
(base) lhongdon@Hongui-MacBookPro ~ % cd minikf
(base) lhongdon@Hongui-MacBookPro minikf %
(base) lhongdon@Hongui-MacBookPro minikf %
(base) lhongdon@Hongui-MacBookPro minikf % vagrant init arrikto/minikf
A `Vagrantfile` has been placed in this directory. You are now
ready to `vagrant up` your first virtual environment! Please read
the comments in the Vagrantfile as well as documentation on
`vagrantup.com` for more information on using Vagrant.
(base) lhongdon@Hongui-MacBookPro minikf %
(base) lhongdon@Hongui-MacBookPro minikf %
(base) lhongdon@Hongui-MacBookPro minikf % vagrant up
Bringing machine 'default' up with 'virtualbox' provider...
==> default: Box 'arrikto/minikf' could not be found. Attempting to find and install...
    default: Box Provider: virtualbox
    default: Box Version: >= 0
==> default: Loading metadata for box 'arrikto/minikf'
    default: URL: https://vagrantcloud.com/arrikto/minikf
==> default: Adding box 'arrikto/minikf' (v20210428.0.1) for provider: virtualbox
    default: Downloading: https://vagrantcloud.com/arrikto/boxes/minikf/versions/20210428.0.1/providers/virtualbox.box
Download redirected to host: storage.googleapis.com
Progress: 0% (Rate: 5291k/s, Estimated time remaining: 5:06:30)


Progress: 0% (Rate: 5865k/s, Estimated time remaining: 1:52:28)

Progress: 3% (Rate: 5216k/s, Estimated time remaining: 0:52:52)vagrant box update
Progress: 3% (Rate: 5324k/s, Estimated time remaining: 0:51:46)
Progress: 4% (Rate: 5418k/s, Estimated time remaining: 0:51:17)

==> default: Successfully added box 'arrikto/minikf' (v20210428.0.1) for 'virtualbox'!
Plugin 'vagrant-persistent-storage' is missing, running `vagrant plugin install vagrant-persistent-storage`...
Installing the 'vagrant-persistent-storage --version '>= 0.0.47'' plugin. This can take a few minutes...
Fetching vagrant-persistent-storage-0.0.49.gem
Installed the plugin 'vagrant-persistent-storage (0.0.49)'!
Plugin installed successfully, please re-run `vagrant up`.
(base) lhongdon@Hongui-MacBookPro minikf %
(base) lhongdon@Hongui-MacBookPro minikf %
(4) MiniKF 업그레이드
(4-1) MiniKF box를 최신버전으로 업그레이드 하기
% vagrant box update(base) lhongdon@Hongui-MacBookPro minikf % vagrant box update
==> default: Checking for updates to 'arrikto/minikf'
default: Latest installed version: 20210428.0.1
default: Version constraints:
default: Provider: virtualbox
==> default: Box 'arrikto/minikf' (v20210428.0.1) is running the latest version.
(4-2) 최신 버전으로 업데이트 했는지 확인해보기
% vagrant box list(base) lhongdon@Hongui-MacBookPro minikf % vagrant box list
arrikto/minikf (virtualbox, 20210428.0.1)
(4-3) 'vagrant-persistent-storage' 플러그인을 v0,0.47 또는 이후 버전으로 업그레이드 하기
% vagrant plugin update vagrant-persistent-storage(base) lhongdon@Hongui-MacBookPro minikf % vagrant plugin update vagrant-persistent-storage
Updating plugins: vagrant-persistent-storage. This may take a few minutes...
All plugins are up to date.
(4-4) VM 없애기
% vagrant destroy(base) lhongdon@Hongui-MacBookPro minikf % vagrant destroy
==> default: VM not created. Moving on...
(4-5) 모든 local state 제거하기.
(notebooks, pipelines, Rok snapshots 등의 MiniKF의 모든 custimization 을 제거함)
[Linux/macOS] % rm minikf-user-data.vdi
[Windows] % del minikf-user-data.vdi
(4-6) VM 을 다시 생성하기
% vagrant up(base) lhongdon@Hongui-MacBookPro minikf %
(base) lhongdon@Hongui-MacBookPro minikf % vagrant up
Bringing machine 'default' up with 'virtualbox' provider...
==> default: Using /Users/lhongdon/minikf/minikf-user-data.vdi for persistent storage.
==> default: Importing base box 'arrikto/minikf'...
==> default: Generating MAC address for NAT networking...
==> default: Using /Users/lhongdon/minikf/minikf-user-data.vdi for persistent storage.
==> default: Checking if box 'arrikto/minikf' version '20210428.0.1' is up to date...
==> default: Setting the name of the VM: minikf_default_1628746272800_96697
Vagrant is currently configured to create VirtualBox synced folders with
the `SharedFoldersEnableSymlinksCreate` option enabled. If the Vagrant
guest is not trusted, you may want to disable this option. For more
information on this option, please refer to the VirtualBox manual:
https://www.virtualbox.org/manual/ch04.html#sharedfolders
This option can be disabled globally with an environment variable:
VAGRANT_DISABLE_VBOXSYMLINKCREATE=1
or on a per folder basis within the Vagrantfile:
config.vm.synced_folder '/host/path', '/guest/path', SharedFoldersEnableSymlinksCreate: false
==> default: Clearing any previously set network interfaces...
==> default: Preparing network interfaces based on configuration...
default: Adapter 1: nat
default: Adapter 2: hostonly
==> default: Forwarding ports...
default: 32123 (guest) => 32123 (host) (adapter 1)
default: 22 (guest) => 2222 (host) (adapter 1)
==> default: Using /Users/lhongdon/minikf/minikf-user-data.vdi for persistent storage.
==> default: Running 'pre-boot' VM customizations...
==> default: Using /Users/lhongdon/minikf/minikf-user-data.vdi for persistent storage.
==> default: ** Creating persistent storage **
==> default: Using /Users/lhongdon/minikf/minikf-user-data.vdi for persistent storage.
==> default: ** Attaching persistent storage **
==> default: Booting VM...
==> default: Waiting for machine to boot. This may take a few minutes...
default: SSH address: 127.0.0.1:2222
default: SSH username: vagrant
default: SSH auth method: private key
default:
default: Vagrant insecure key detected. Vagrant will automatically replace
default: this with a newly generated keypair for better security.
default:
default: Inserting generated public key within guest...
default: Removing insecure key from the guest if it's present...
default: Key inserted! Disconnecting and reconnecting using new SSH key...
==> default: Machine booted and ready!
==> default: Checking for guest additions in VM...
default: The guest additions on this VM do not match the installed version of
default: VirtualBox! In most cases this is fine, but in rare cases it can
default: prevent things such as shared folders from working properly. If you see
default: shared folder errors, please make sure the guest additions within the
default: virtual machine match the version of VirtualBox you have installed on
default: your host and reload your VM.
default:
default: Guest Additions Version: 5.2.42_Ubuntu r137960
default: VirtualBox Version: 6.1
==> default: Using /Users/lhongdon/minikf/minikf-user-data.vdi for persistent storage.
==> default: ** Managing persistent storage **
==> default: Setting hostname...
==> default: Configuring and enabling network interfaces...
==> default: Mounting shared folders...
default: /vagrant => /Users/lhongdon/minikf
==> default: Machine 'default' has a post `vagrant up` message. This is a message
==> default: from the creator of the Vagrantfile, and not from Vagrant itself:
==> default:
==> default: Welcome to MiniKF!
==> default: Visit http://10.10.10.10/ to get started.
==> default:
(base) lhongdon@Hongui-MacBookPro minikf %
(base) lhongdon@Hongui-MacBookPro minikf %
(5) MiniKF 설치 여부 확인해 보기
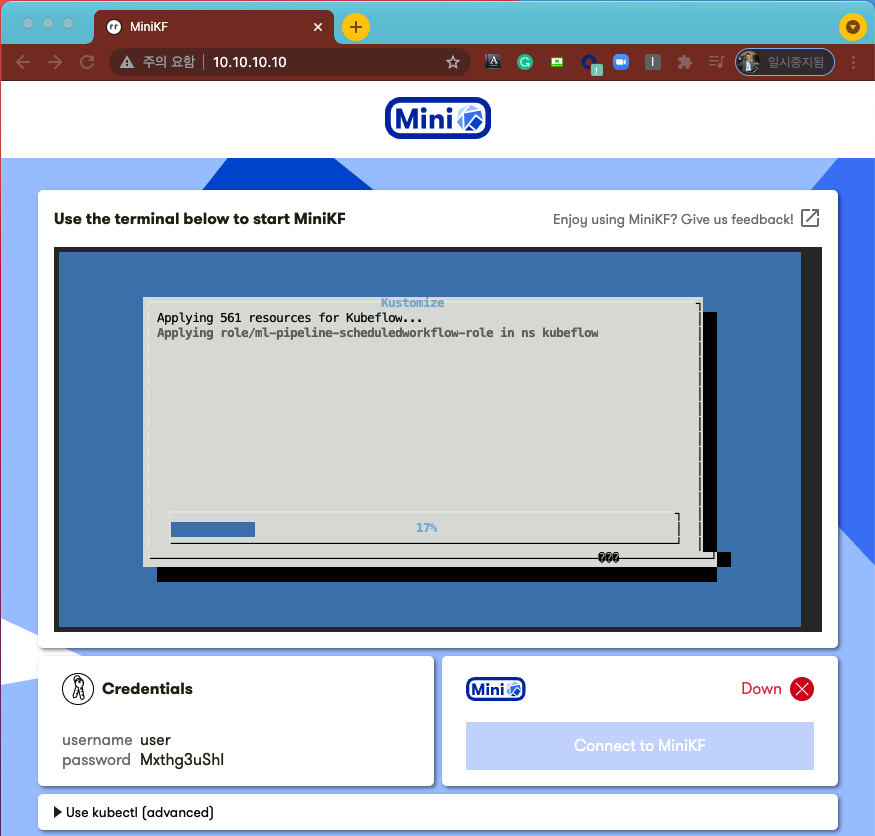
웹 브라우저를 열어서 "http://10.10.10.10" 주소로 접속했을 때 아래와 같은 화면이 나타난다면 랩탑/데스크탑에 MiniKF 설치가 성공한 것입니다.
첫 화면의 중앙에 'OK' 라는 부분에 커서를 가져다놓고 엔터를 치면 Kubeflow 가 실행이 되면서 한참동안 progress bar 가 진행이 되고, 맥북에서 비행기 이륙하는 소리가 날거예요. (MiniKF 가 실행되는데 5분 정도 걸리니깐 커피 한잔 하고 오세요.)
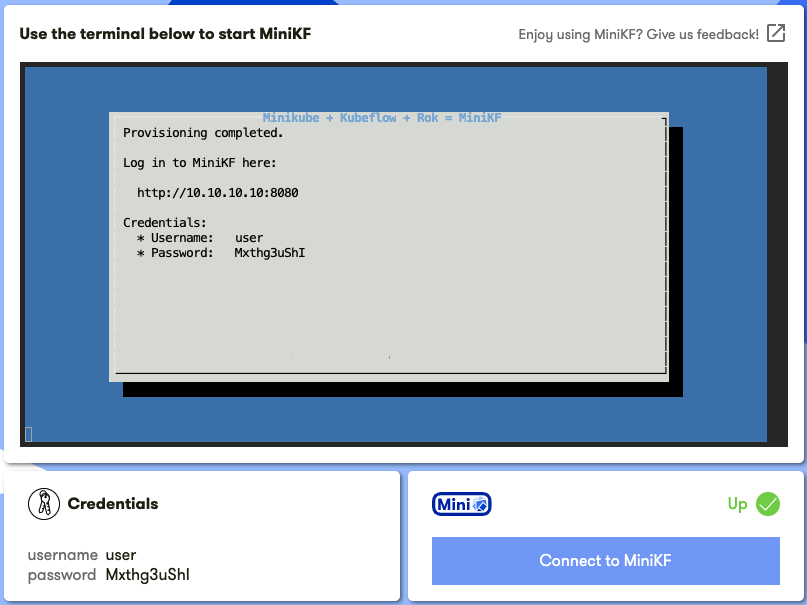
Provisioning 이 모두 끝나면 아래의 화면처럼 "Provisioning completed" 라는 메시지와 함께 "Credentials" 에 Username 과 Password 가 나타납니다. 오른쪽 하단의 "Connect to MiniKF"를 메뉴를 누르면 Log-In 화면이 새로 뜹니다.
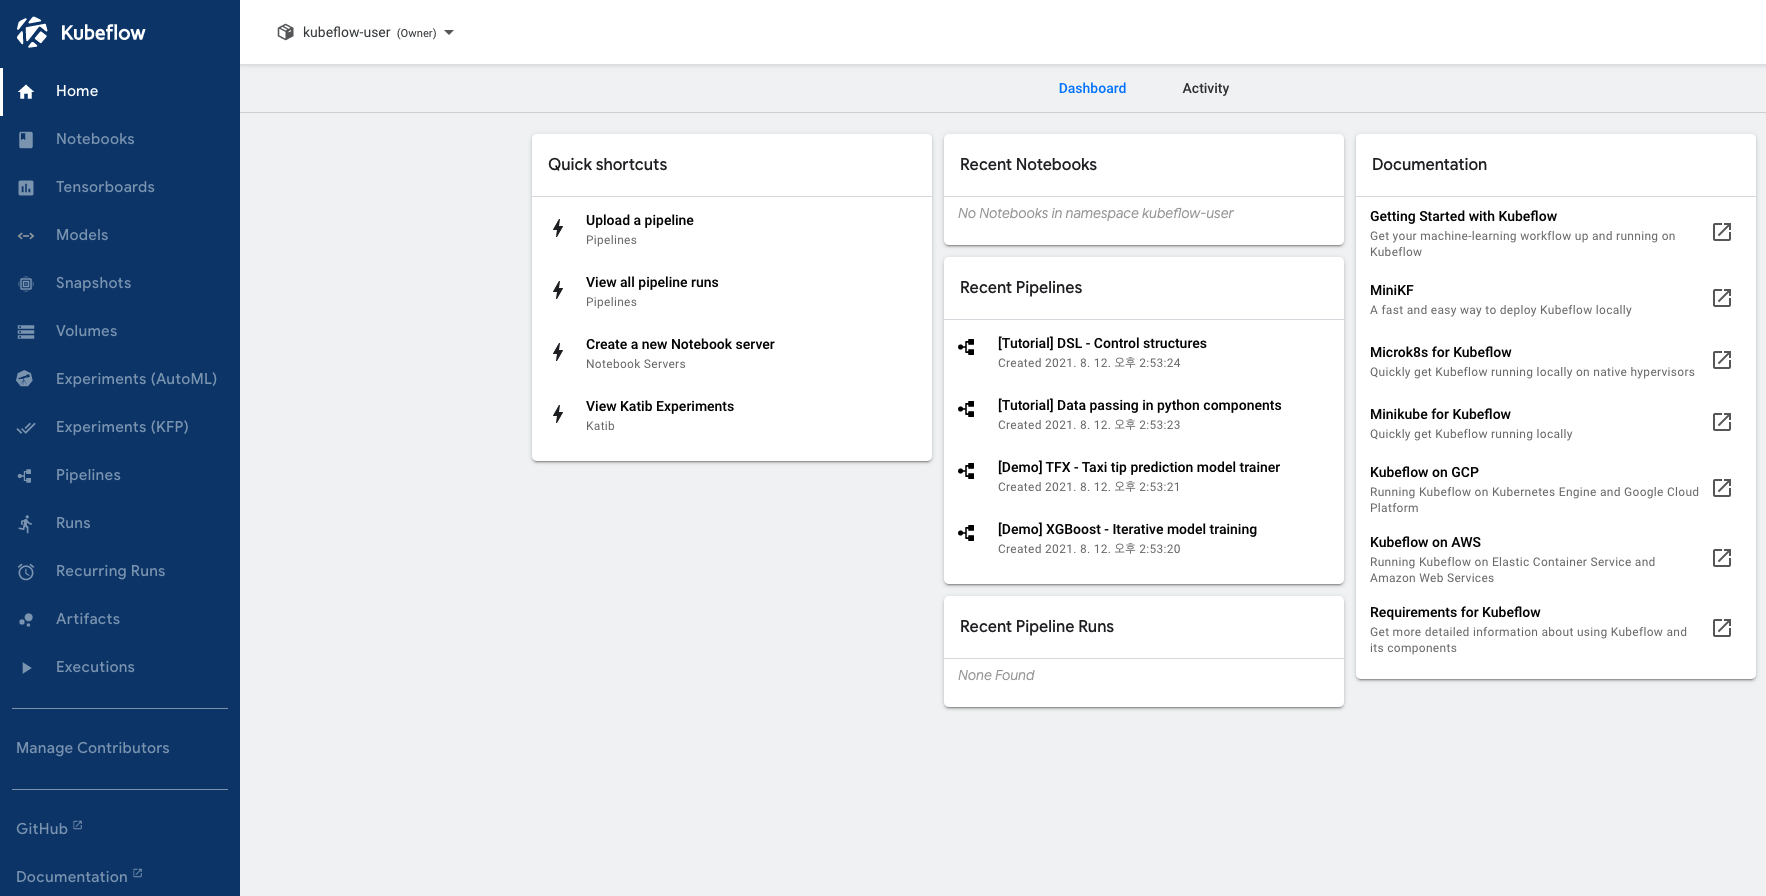
아래의 화면처럼 MiniKF Log In 화면이 나타나면 바로 앞의 화면에서 왼쪽 하단에 있는 Credentials 의 Username, Password 를 사용해서 로그인을 해주면 됩니다.

쨔잔~ 드디어 Kubeflow의 main home 페이지의 UI 화면이 떴습니다. 이제 Kubeflow 를 로컬 머신에서 UI 를 통해 편리하게 사용할 수 있는 환경이 마련되었습니다. ^^b
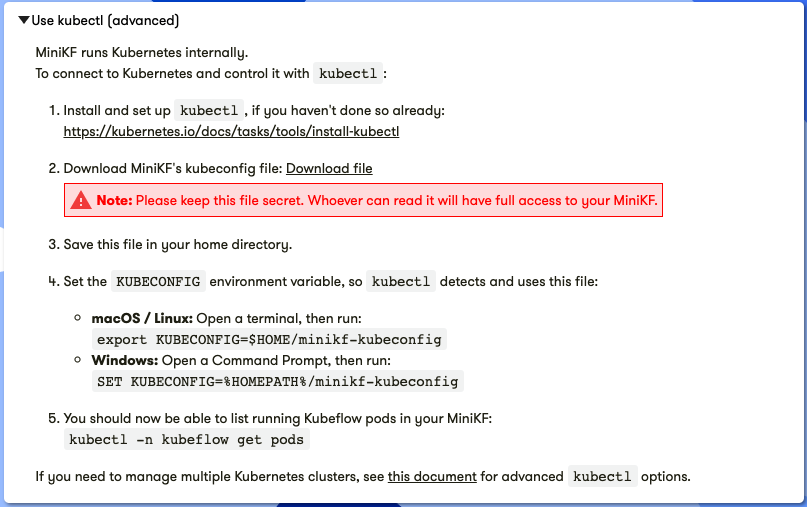
Kubernetes 고급사용자라면 Kubernetes Commandline Tool 인 kubectl 을 설치해서 사용하면 빠르고 편리하게 K8s 상태를 조회하고 조작할 수 있습니다. (* kubectl 설치 참조: https://kubernetes.io/docs/tasks/tools/)
아래 화면의 2번에 'MiniKF's kubeconfig file: Download file' 링크를 클릭하면 kubeconfig file을 다운로드할 수 있습니다. 이 파일이 있으면 누구나 당신의 MiniKF 에 접근할 수 있으므로 보안에 신경써서 보관해야 합니다. 이 파일을 Home directory에 보관해주세요. 아래의 4번을 참고해서 KUBECONFIG 환경변수를 설정해주면 kubectl 이 이 파일을 찾을 수 있습니다.
$ kubectl -n kubeflow get pods 을 커맨드라인에 입력해주면 MiniKF 에서 실행 중인 Kubeflow pods 목록을 볼 수 있을거예요.
MacOS 에 kubectl 설치하고 환경설정하기, 자주 사용하는 커맨드라인 명령어는 https://rfriend.tistory.com/684 를 참고하세요.
MiniKF 와 Kubernetes, Vurtual Box 를 모두 종료하려면 아래와 같이 % vagrant halt 를 해주면 됩니다.
(base) lhongdon@Hongui-MacBookPro minikf %
(base) lhongdon@Hongui-MacBookPro minikf % vagrant halt
==> default: Attempting graceful shutdown of VM...
==> default: Using /Users/lhongdon/minikf/minikf-user-data.vdi for persistent storage.
==> default: ** Detaching persistent storage **
(base) lhongdon@Hongui-MacBookPro minikf %
위에서 새로 만들었던 VM을 $ vagrant halt 로 종료하고 내렸는데요, 이전에 만들었던 VM target machine 을 새로 시작하려면, $ vagrant global-status 로 VM ID를 확인하고 ==> $ vagrant up [target machine ID] 를 입력해주면 됩니다.
-- get an ID of target machine --

(base) lhongdon@Hongui-MacBookPro ~ % vagrant global-status
id       name    provider   state    directory
-------------------------------------------------------------------------
a6427be  default virtualbox poweroff /Users/lhongdon/minikf

The above shows information about all known Vagrant environments
on this machine. This data is cached and may not be completely
up-to-date (use "vagrant global-status --prune" to prune invalid
entries). To interact with any of the machines, you can go to that
directory and run Vagrant, or you can use the ID directly with
Vagrant commands from any directory. For example:
"vagrant destroy 1a2b3c4d"
(base) lhongdon@Hongui-MacBookPro ~ %


-- run target machine ID again --
'
(base) lhongdon@Hongui-MacBookPro ~ % vagrant up a6427be
Bringing machine 'default' up with 'virtualbox' provider...
==> default: Using /Users/lhongdon/minikf/minikf-user-data.vdi for persistent storage.
==> default: Using /Users/lhongdon/minikf/minikf-user-data.vdi for persistent storage.
==> default: Checking if box 'arrikto/minikf' version '20210428.0.1' is up to date...
==> default: Clearing any previously set forwarded ports...
==> default: Clearing any previously set network interfaces...
....
....
참고로, Vagrant 의 명령어 리스트와 설명을 보려면 % vagrant -h 또는 % vagrant --help 로 해서 command line 명령어를 인쇄할 수 있습니다. 아래의 Vagrant 명령어 리스트 참고하세요.
(base) lhongdon@Hongui-MacBookPro minikf % vagrant -h
Usage: vagrant [options] <command> [<args>]

    -h, --help                       Print this help.

Common commands:
     autocomplete    manages autocomplete installation on host
     box             manages boxes: installation, removal, etc.
     cloud           manages everything related to Vagrant Cloud
     destroy         stops and deletes all traces of the vagrant machine
     global-status   outputs status Vagrant environments for this user
     halt            stops the vagrant machine
     help            shows the help for a subcommand
     init            initializes a new Vagrant environment by creating a Vagrantfile
     login
     package         packages a running vagrant environment into a box
     plugin          manages plugins: install, uninstall, update, etc.
     port            displays information about guest port mappings
     powershell      connects to machine via powershell remoting
     provision       provisions the vagrant machine
     push            deploys code in this environment to a configured destination
     rdp             connects to machine via RDP
     reload          restarts vagrant machine, loads new Vagrantfile configuration
     resume          resume a suspended vagrant machine
     snapshot        manages snapshots: saving, restoring, etc.
     ssh             connects to machine via SSH
     ssh-config      outputs OpenSSH valid configuration to connect to the machine
     status          outputs status of the vagrant machine
     suspend         suspends the machine
     up              starts and provisions the vagrant environment
     upload          upload to machine via communicator
     validate        validates the Vagrantfile
     version         prints current and latest Vagrant version
     winrm           executes commands on a machine via WinRM
     winrm-config    outputs WinRM configuration to connect to the machine

For help on any individual command run `vagrant COMMAND -h`

Additional subcommands are available, but are either more advanced
or not commonly used. To see all subcommands, run the command
`vagrant list-commands`.
        --[no-]color                 Enable or disable color output
        --machine-readable           Enable machine readable output
    -v, --version                    Display Vagrant version
        --debug                      Enable debug output
        --timestamp                  Enable timestamps on log output
        --debug-timestamp            Enable debug output with timestamps
        --no-tty                     Enable non-interactive output

(base) lhongdon@Hongui-MacBookPro minikf %
[ References ]
* MiniKF on laptop/desktop: https://www.kubeflow.org/docs/distributions/minikf/minikf-vagrant/
* Installing Kubeflow: https://www.kubeflow.org/docs/started/installing-kubeflow/
* Homebrew 설치: https://brew.sh/
* Vagrant 설치: https://www.vagrantup.com/downloads
* Virtual Box 설치: https://www.virtualbox.org/wiki/Downloads
이번 포스팅이 많은 도움이 되었기를 바랍니다.
행복한 데이터과학자 되세요! :-)

'Kubeflow' 카테고리의 다른 글
| [Docker] 컨테이너, 도커 컨테이너, 도커 이미지 (Dontainer, Docker Container, Docker Image) (0) | 2022.03.20 |
|---|---|
| [Visual Studio Code] Kubernetes YAML 확장 팩 설치 및 YAML 언어 설정 (1) | 2021.10.11 |
| [Kubeflow] 파이프라인 개념과 구성요소 개요 (Conceptual overview of Kubeflow Pipelines) (0) | 2021.09.26 |
| [Kubeflow] K8s 툴인 kubectl 설치하고 사용하기 (0) | 2021.09.13 |
| Kubeflow 는 무엇인가요? (What is Kubeflow?) (0) | 2021.08.12 |


