이번 포스팅에서는 여러개의 pdf 파일을 참조하여 ChatGPT로 질의응답하는 방법을 소개하겠습니다. 

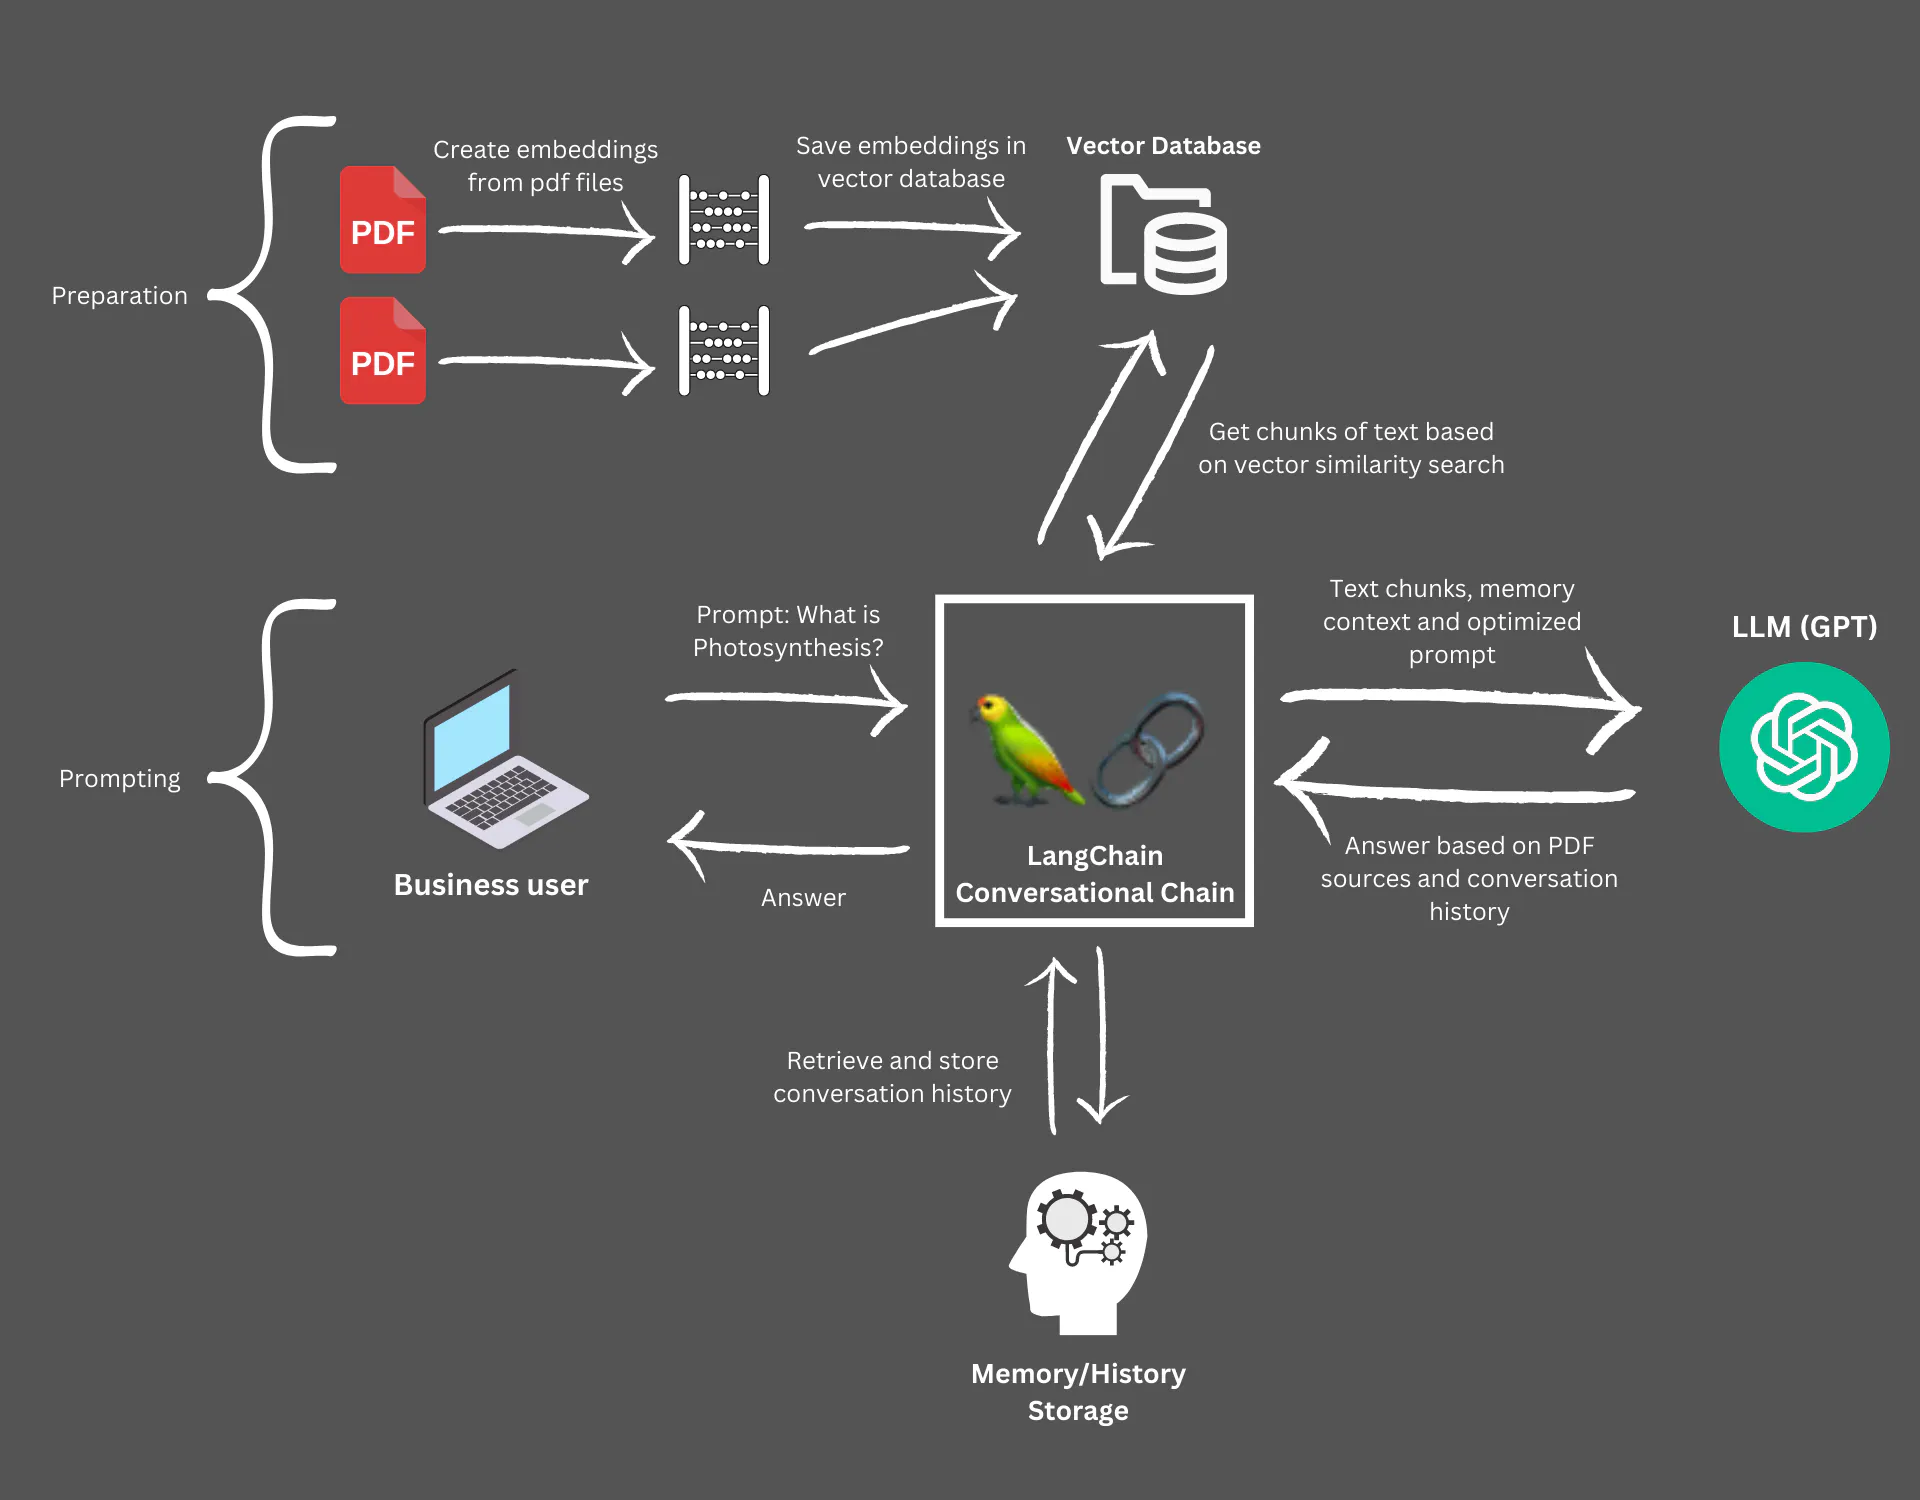
RAG (Retrieval0Augmented Generation) 방법을 사용한 답변 생성입니다. 


1. pdf 파일을 로딩하고 임베딩으로 변환하여 Chroma Vector DB에 저장하고 인덱싱하기

2. 사용자 질문과 문서의 임베딩에 대해 Semantic Search하여 가장 유사한 문서 찾기

3. Semantic Search로 찾은 문서를 사용자 질문과 함께 ChatGPT에 보내서 답변 생성하기

4. 다른 pdf 파일을 로딩하고 임베딩으로 변환하여 Vector DB에 추가하기

5. 대화 기록에 대한 기억 (Chat History Memory)을 사용하여 ChatGPT 답변 생성하기


LangChain, ChatGPT, pdf loader, Chroma Vector DB, Memory Storage


* source: https://www.datascienceengineer.com/blog/post-multiple-pdfs-with-gpt


먼저, 터미널에서 pip install 로 openai, langchain, pypdf, chroma 모듈을 설치합니다. 


! pip install -q openai langchain pypdf chroma


1. pdf 파일을 로딩하고 임베딩으로 변환하여 Chroma Vector DB에 저장하고 인덱싱하기


아래에 필요한 모듈을 importing 합니다. 


# Import the required modules
from langchain.document_loaders import PyPDFLoader
from langchain.vectorstores import Chroma
from langchain.chat_models import ChatOpenAI
from langchain.embeddings.openai import OpenAIEmbeddings
from langchain.text_splitter import RecursiveCharacterTextSplitter
from langchain.chains import RetrievalQA, ConversationalRetrievalChain


환경변수로 OpenAI의 ChatGPT를 사용하기 위한 API Key를 등록합니다. 


# Set OpenAI API Key as an environment variable
import os

os.environ["OPENAI_API_KEY"]="sk-xxxx" # set with yours


LangChain 에서는 PDF (Portable Document Format) 파일을 로드할 수 있는 여러가지 방법을 제공합니다. 그중에서도 PyPDF 모듈을 이용해서 PDF 파일을 로드해보겠습니다. 


# Load a PDF file, using the LangChain PyPDF loader
loader = PyPDFLoader("LangChain.pdf")


위에서 pdf 파일 문서를 로딩한 다음에는 RecursiveCharacterTextSplitter() 메소드를 사용해서 최대한 문장(sentence)를 유지한 상태의 작은 chunk 로 분할해줍니다. chuck_size, chunk_overlap 을 매개변수로 정의해줄 수 있습니다. 


# Split the text in chunks, using LangChain Recursive Character Text Splitter
text_splitter = RecursiveCharacterTextSplitter(
    chunk_size=1000,
    chunk_overlap=200
    )

pages = loader.load_and_split(text_splitter)


pdf 로드 후 분할을 하면 chunk 의 텍스트인 page_content, 그리고 소스 파일과 페이지 번호가 있는 metadata 에 각각 접근할 수 있습니다. 


pages[0].page_content
# LangChain Introduction
# LangChain  is a framework for developing applications powered by language models.
# .... 
#  LangServe : A library for deploying LangChain chains as a REST API.
#  LangSmith : A developer platform that lets you debug, test, evaluate, and


pages[0].metadata
# {'source': 'LangChain.pdf', 'page': 0}


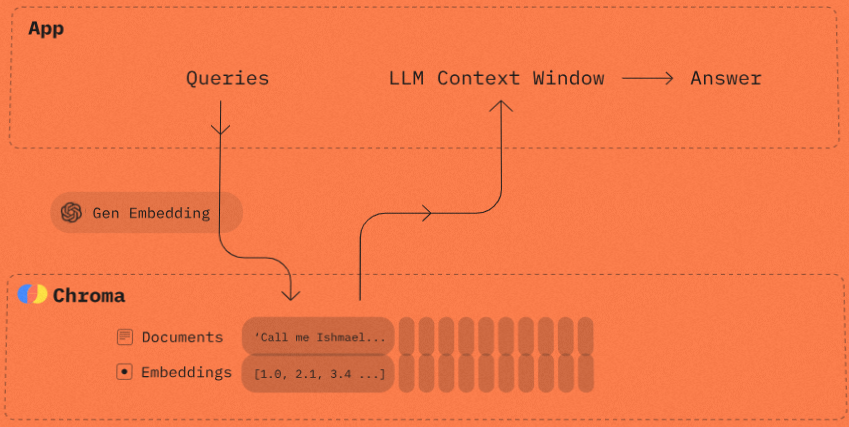
OpenAI의 Text Embedding 을 이용하여 chunk의 문서들을 임베딩 벡터로 변환하고, Chroma Vector DB에 저장하고 인덱싱합니다. 이때 메모리에만 남겨두는 것이 아니라 directory에 영구저장(persist)하여 추후 재사용할 수 있도록 합니다. 


# Create a persistent, file-based vector store, using Chroma vector store.
directory = 'index_store'
vector_index = Chroma.from_documents(
    pages, # Documents
    OpenAIEmbeddings(), # Text embedding model
    persist_directory=directory # persists the vectors to the file system
    )

vector_index.persist()


Chroma Vector DB에 대한 자세한 내용은 https://www.trychroma.com/ 를 참고하세요. 


Chroma Vector DB


2. 사용자 질문과 문서의 임베딩에 대해 Semantic Search하여 가장 유사한 문서 찾기


위의 1번에서 pdf를 로딩하고 분할 후 임베딩 벡터로 변환하여 저장한 문서와 사용자 질문을 임베딩으로 변환한 벡터 간의 cosine similarity를 계산하여, 가장 유사한 k개의 문서를 검색 (Semantic Search)합니다. 


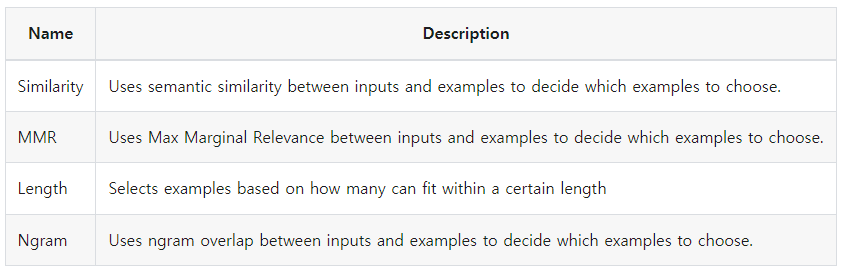
LangChain 에서 제공하는 Vector store-backed retriever 에는 MMR (Maximum marginal relevance) retriever와 Similarity retriever 가 있습니다. 


# Create the retriever and the query-interface. 
retriever = vector_index.as_retriever(
    search_type="similarity", # Cosine Similarity
    search_kwargs={
        "k": 3, # Select top k search results
    } 
)


위에서 정의한 Similarity retriever 를 사용하여 get_relevant_documents() 로 질문을 던져서 검색을 하여 질문과 가장 유사한 k개의 문서를 추출해보겠습니다. 


retriever.get_relevant_documents("What is VectorStore for Retreival in LangChain?")

[Out]
[Document(page_content='allowing you to choose the one best suited for your needs. LangChain provides a \nstandard interface, allowing you to easily swap between models.  \nVector stores  \nWith the rise of embeddings, there has emerged a need for databases to support \nefficient storage and searching of these embeddings. LangChain provides \nintegrations with over 50 different vecto rstores, from open -source local ones to \ncloud -hosted proprietary ones, allowing you to choose the one best suited for your \nneeds. LangChain exposes a standard interface, allowing you to easily swap between \nvector stores.  \nRetrievers  \nOnce the data is in the database, you still need to retrieve it. LangChain supports \nmany different retrieval algorithms and is one of the places where we add the most \nvalue. LangChain supports b asic methods that are easy to get started - namely \nsimple semantic search. However, we have also added a collection of algorithms on \ntop of this to increase performance. These include:', metadata={'page': 2, 'source': 'LangChain.pdf'})]


3. Semantic Search로 찾은 문서를 사용자 질문과 함께 ChatGPT에 보내서 답변 생성하기


LangChain에 제공하는 Retrieval 기반 QA 클래스에는 RetrievalQA와 ConversationalRetrievalChain 의 두가지 종류가 있습니다. 


- RetreivalQA: Retrieval 만을 사용하여 답변 생성

- ConversationalRetrievalChain: Chat History 기억과 Retrieval 을 같이 사용하여 답변 생성


먼저, RetrievalQA 클래스를 사용하여 ChatGPT에 Retrieval 만을 이용한 질의응답을 해보겠습니다. 아래 예에서는 temperature=0 으로 설정해서 보수적이고 일관적인 답변을 생성하도록 했으며, LLM 모델로는 ChatGPT-4 버전을 사용해보겠습니다. 그리고 return_source_documents=True 로 설정하여 답변 생성에 참고한 소스 문서를 같이 반환하도록 하여 나중에 사용자가 확인할 수 있도록 하였습니다. 


# Create the chain for allowing us to chat with the document.
qa_chain = RetrievalQA.from_chain_type(
    llm=ChatOpenAI(temperature=0, model="gpt-4"), 
    chain_type="stuff", 
    retriever=retriever,
    return_source_documents=True # source document which were used as source files
)


위에서 작성한 qa_chain 에 대해 invoke() 메소드를 사용해서 사용자 질문을 던지면, ChatGPT는 답변 결과(result)와 답변을 생성할 때 참고했던 소스 문서(source_documents)를 반환합니다. 


# Query the pdf file
qa_chain.invoke("What is VectorStore for Retrieval in LangChain")

# {'query': 'What is VectorStore for Retrieval in LangChain',
#  'result': 'VectorStore for Retrieval in LangChain refers to the feature that allows LangChain to integrate with over 50 different vector stores. These vector stores can be open-source local ones or cloud-hosted proprietary ones. The VectorStore feature in LangChain allows users to efficiently store and search embeddings, which are representations of textual data in a numerical format. This feature provides flexibility for users to choose the vector store that best suits their needs. LangChain also provides a standard interface that allows users to easily swap between different vector stores.',
#  'source_documents': [Document(page_content='allowing you to choose the one best suited for your needs. LangChain provides a \nstandard interface, allowing you to easily swap between models.  \nVector stores  \nWith the rise of embeddings, there has emerged a need for databases to support \nefficient storage and searching of these embeddings. LangChain provides \nintegrations with over 50 different vecto rstores, from open -source local ones to \ncloud -hosted proprietary ones, allowing you to choose the one best suited for your \nneeds. LangChain exposes a standard interface, allowing you to easily swap between \nvector stores.  \nRetrievers  \nOnce the data is in the database, you still need to retrieve it. LangChain supports \nmany different retrieval algorithms and is one of the places where we add the most \nvalue. LangChain supports b asic methods that are easy to get started - namely \nsimple semantic search. However, we have also added a collection of algorithms on \ntop of this to increase performance. These include:', metadata={'page': 2, 'source': 'LangChain.pdf'}),
#   Document(page_content='allowing you to choose the one best suited for your needs. LangChain provides a \nstandard interface, allowing you to easily swap between models.  \nVector stores  \nWith the rise of embeddings, there has emerged a need for databases to support \nefficient storage and searching of these embeddings. LangChain provides \nintegrations with over 50 different vecto rstores, from open -source local ones to \ncloud -hosted proprietary ones, allowing you to choose the one best suited for your \nneeds. LangChain exposes a standard interface, allowing you to easily swap between \nvector stores.  \nRetrievers  \nOnce the data is in the database, you still need to retrieve it. LangChain supports \nmany different retrieval algorithms and is one of the places where we add the most \nvalue. LangChain supports b asic methods that are easy to get started - namely \nsimple semantic search. However, we have also added a collection of algorithms on \ntop of this to increase performance. These include:', metadata={'page': 2, 'source': 'LangChain.pdf'}),
#   Document(page_content='\uf0b7 And more!  \nIndexing  \nThe LangChain  Indexing API  syncs your data from any source into a vector store, \nhelping you:  \n\uf0b7 Avoid writing duplicated content into the vector store  \n\uf0b7 Avoid re -writing unchanged content  \n\uf0b7 Avoid re -computing embeddings over unchanged content  \nAll of which should save you time and money, as well as improve  your vector search \nresults.', metadata={'page': 2, 'source': 'LangChain.pdf'})]}


4. 다른 pdf 파일을 로딩하고 임베딩으로 변환하여 Vector DB에 추가하기


위의 1~3에서 사용했던 pdf 문서와는 다른 pdf 문서를 추가로 로딩, 분할, 임베딩 변환, Vector DB에 저장, 인덱싱하여, 여러개의 pdf 문서들을 참고하여 질의응답을 할 수 있습니다. 


vector_index.add_documents() 로 기존의 Chroma Vector DB에 임베딩 변환, 저장해주고, persist() 로 파일 기반의 Vector Store에 영구저장할 수 있습니다. 


# Adding additional documents to vector store
# Load a PDF file, using the LangChain PyPDF loader
loader = PyPDFLoader("Chain-of-Thought-prompting.pdf")

# Split the text in chunks, using LangChain Recursive Character Text Splitter
pages_new = loader.load_and_split(text_splitter)

# Add additional documents to vector store
_ = vector_index.add_documents(pages_new)

# Create a persistent, file-based vector store, using Chroma vector store.
vector_index.persist()


그러면 qa_chain.invoke() 로 기존 chain에 대해 사용자 질의를 했을 때 위의 4번에서 새로 추가한 pdf 문서의 내용까지 검색, 참조하여 답변을 생성해줍니다. (아래 예제에서는 두번째로 추가한 Chain-of-Thought-prompting.pdf 파일을 참조해서 적절한 답변을 생성했음) 


# Query the pdf file
qa_chain.invoke("What is Chain-of-Thought Prompting?")

# {'query': 'What is Chain-of-Thought Prompting?',
#  'result': 'Chain-of-Thought Prompting is a method used to improve the reasoning abilities of large language models. It involves generating a series of intermediate reasoning steps, called a chain of thought, and using these demonstrations as prompts for the language model. The idea is that by providing examples of how to reason through a problem, the language model can better perform complex reasoning tasks. This approach has shown promising results in improving performance on arithmetic, commonsense, and symbolic reasoning tasks.',
#  'source_documents': [Document(page_content='C Extended Related Work\nChain-of-thought prompting is a general approach that is inspired by several prior directions: prompt-\ning, natural language explanations, program synthesis/execution, numeric and logical reasoning, and\nintermediate language steps.\nC.1 Prompting\nThe recent success of large-scale language models has led to growing interest in improving their\ncapability to perform tasks via prompting (Brown et al. (2020), and see Liu et al. (2021) for a\nsurvey). This paper falls in the category of general prompting approaches, whereby input prompts are\noptimized to allow a single large language model to better perform a variety of tasks (Li and Liang,\n2021; Lester et al., 2021; Reif et al., 2022, inter alia ).\nOne recent line of work aims to improve the ability of language models to perform a task by providing\ninstructions that describe the task (Raffel et al., 2020; Wei et al., 2022a; Ouyang et al., 2022; Sanh', metadata={'page': 23, 'source': 'Chain-of-Thought-prompting.pdf'}),
#   Document(page_content='Chain-of-Thought Prompting Elicits Reasoning\nin Large Language Models\nJason Wei Xuezhi Wang Dale Schuurmans Maarten Bosma\nBrian Ichter Fei Xia Ed H. Chi Quoc V . Le Denny Zhou\nGoogle Research, Brain Team\n{jasonwei,dennyzhou}@google.com\nAbstract\nWe explore how generating a chain of thought —a series of intermediate reasoning\nsteps—significantly improves the ability of large language models to perform\ncomplex reasoning. In particular, we show how such reasoning abilities emerge\nnaturally in sufficiently large language models via a simple method called chain-of-\nthought prompting , where a few chain of thought demonstrations are provided as\nexemplars in prompting.\nExperiments on three large language models show that chain-of-thought prompting\nimproves performance on a range of arithmetic, commonsense, and symbolic\nreasoning tasks. The empirical gains can be striking. For instance, prompting a\nPaLM 540B with just eight chain-of-thought exemplars achieves state-of-the-art', metadata={'page': 0, 'source': 'Chain-of-Thought-prompting.pdf'}),
#   Document(page_content='2021). In this paper, we combine the strengths of these two ideas in a way that avoids their limitations.\nSpecifically, we explore the ability of language models to perform few-shot prompting for reasoning\ntasks, given a prompt that consists of triples: ⟨input, chain of thought , output⟩. Achain of thought is\na series of intermediate natural language reasoning steps that lead to the final output, and we refer to\nthis approach as chain-of-thought prompting . An example prompt is shown in Figure 1.\nWe present empirical evaluations on arithmetic, commonsense, and symbolic reasoning benchmarks,\nshowing that chain-of-thought prompting outperforms standard prompting, sometimes to a striking\ndegree. Figure 2 illustrates one such result—on the GSM8K benchmark of math word problems\n(Cobbe et al., 2021), chain-of-thought prompting with PaLM 540B outperforms standard prompting\nby a large margin and achieves new state-of-the-art performance. A prompting only approach is', metadata={'page': 1, 'source': 'Chain-of-Thought-prompting.pdf'})]}


5. 대화 기록에 대한 기억 (Chat History Memory)을 사용하여 ChatGPT 답변 생성하기


마지막으로 ConversationalRetrievalChain 클래스를 사용해서 '대화 내역에 대한 기억 (Chat History Memory) + Retrieval' 을 동시에 고려하여 사용자 질의에 대한 답변을 생성해보겠습니다. 


## Adding memory to conversations
# Instead of the RetrievalQA chain, we'll use the ConversationalRetrievalChain. 
# ConversationalRetrievalChain allows to seamlessly add historical context or memory to chain.
conv_chain = ConversationalRetrievalChain.from_llm(
    ChatOpenAI(temperature=0, model="gpt-4"), 
    retriever=retriever,
)


chat_history 리스트를 만들어주고, conv_chain.invoke() 로 질의응답을 할 때마다 {"chat_history": chat_history} 에 질문과 답변의 대화 내역을 차곡차곡 저장(chat_history.append((query, result["result"])))해줍니다. 


# Initialize our chat history. 
chat_history = []
query = "What is LangChain?"
result = conv_chain.invoke({"question": query, "chat_history": chat_history})

print(result["answer"])

# 'LangChain is a framework for developing applications powered by language models. 
# It enables applications to be context-aware and reason based on the provided context. 
# The framework consists of several parts including LangChain Libraries, LangChain Templates, 
# LangServe, and LangSmith. The libraries contain interfaces and integrations 
# for various components, a basic runtime for combining these components into chains 
# and agents, and off-the-shelf implementations of chains and agents. 
# The templates are a collection of easily deployable reference architectures 
# for a wide variety of tasks. LangServe is a library for deploying LangChain chains as a REST API,
# and LangSmith is a developer platform for debugging, testing, and evaluating.'


# Add previous conversation to chat history
chat_history.append((query, result["answer"]))


이러면 질의응답 기억을 참고하여 새로운 답변을 생성할 수 있습니다. 아래 예에서는 위의 답변을 줄여서 요약하라고 지시했습니다. 


# Query to shorten the last sentence
query = "Can you shorten the answer above?"
result = conv_chain.invoke({"question": query, "chat_history": chat_history})

print(result["answer"])

# 'LangChain is a framework used for developing applications that are powered by language models. 
# It allows these applications to be context-aware and capable of reasoning based on provided context. 
# The framework includes Python and JavaScript libraries, deployable templates for various tasks, 
# a library for deploying as a REST API, and a developer platform for debugging, testing, and evaluation.'


질문과 답변을 나중에 참조할 수 있도록 chat_history.append((query, result["answer"])) 로 기억으로 저장해둡니다. 


chat_history.append((query, result["answer"]))


chat_history

# [('What is LangChain?',
#   'LangChain is a framework for developing applications powered by language models. It enables applications to be context-aware and reason based on the provided context. The framework consists of several parts including LangChain Libraries, LangChain Templates, LangServe, and LangSmith. The libraries contain interfaces and integrations for various components, a basic runtime for combining these components into chains and agents, and off-the-shelf implementations of chains and agents. The templates are a collection of easily deployable reference architectures for a wide variety of tasks. LangServe is a library for deploying LangChain chains as a REST API, and LangSmith is a developer platform for debugging, testing, and evaluating.'),
#  ('Can you shorten the answer above?',
#   'LangChain is a framework used for developing applications that are powered by language models. It allows these applications to be context-aware and capable of reasoning based on provided context. The framework includes Python and JavaScript libraries, deployable templates for various tasks, a library for deploying as a REST API, and a developer platform for debugging, testing, and evaluation.')]


[ Reference ]

* How to use LangChain and GPT to ask questions on multiple pdf documents:
https://www.datascienceengineer.com/blog/post-multiple-pdfs-with-gpt

* LangChain - Document Loaders - PDF: 
https://python.langchain.com/docs/modules/data_connection/document_loaders/pdf

* OpenAI Text Embedding: 

https://platform.openai.com/docs/guides/embeddings

* Chroma - AI-native open-source embedding database: 
https://www.trychroma.com/

* Vector store-backed retriever: 
https://python.langchain.com/docs/modules/data_connection/retrievers/vectorstore

* 위 실습에 사용한 pdf 파일: LangChain.pdf, Chain-of-Thought-prompting.pdf

LangChain.pdf
0.28MB
Chain-of-Thought-prompting.pdf
0.85MB


이번 포스팅이 많은 도움이 되었기를 바랍니다. 

행복한 데이터 과학자 되세요. 


728x90
반응형
Posted by Rfriend
,

데이터, 정보가 저장되고 공유되고 유통되는 채널 중에 Web 이 있습니다. LangChain과 LLM 모델을 사용해서 텍스트를 생성할 때 Web URL 로 부터 데이터를 로드해서 Context 정보로 LLM 모델에 제공하여 이를 참조해 최종 답변을 생성하게 할 수 있습니다. 


요즘에 LLM을 이용한 서비스 중에 보면, 특정 웹 서비스의 최상위 URL을 입력하면 하위 directory의 모든 웹 페이지 데이터를 자동으로 크롤링해와서, 이들 모든 웹페이지의 정보를 참조하여 사용자의 질문에 답변을 생성하는 RAG(Retrieval Augmented Generation) 방법을 적용한 챗봇을 매우 짧은 시간에 편리하게 해주는 만들어주는 서비스가 있습니다. 이런 아이디어를 쉽게 구현할 수 있는 방법이 있습니다. 


이번 포스팅에서는 LangChain을 이용하여 특정 Root Directory를 지정해주면 그 밑의 모든 URL에 있는 텍스트 데이터를 로드해서 LLM 모델의 인풋으로 사용할 수 있도록 준비하는 방법을 소개하겠습니다. 


LangChain - Recursive URL Loader


먼저, 터미널에서 pip install을 이용해서 필요한 Python 모듈을 설치합니다. 


! pip install langchain openai unstructured libmagic python-magic-bin


LangChain의 RecursiveUrlLoader 를 이용하면 Root directory 밑의 모든 child pages 에 대해서 자동으로 재귀적으로 (Recursive) 순회하면서 각 웹페이지에 있는 텍스트를 가져와서 로딩해줍니다. 


RecursiveUrlLoader 의 'exclude_dirs' 매개변수를 이용하면 제외를 시킬 웹페이지 URL을 별도로 지정해줄 수도 있으니 참고하세요. 


BeautifulSoup 의 "html.parser"를 이용하여 HTML tag는 제외한 상태에서 HTML 콘텐츠의 문자열로부터 텍스트를 추출할 수 있습니다. 


아래 예제에서는 "https://www.langchain.com/" 페이지와 max_depth=2 까지의 하위 child pages 페이지들로부터 텍스트를 추출하였습니다. 


from langchain.document_loaders.recursive_url_loader import RecursiveUrlLoader

from bs4 import BeautifulSoup as Soup

url = "https://www.langchain.com/"

loader = RecursiveUrlLoader(
    url=url, 
    # the maximum depth to crawl, by default 2. 
    # If you need to crawl the whole website, set it to a number that is large enough would simply do the job.
    max_depth=2, 
    # extract plain text from a string of HTML content, without any HTML tags.
    extractor=lambda x: Soup(x, "html.parser").text
)

docs = loader.load()


LangChain main web page


LangChain의 메인 웹 페이지에서 총 7개 페이지로부터 텍스트를 추출해서 로드했습니다. 


len(docs)
# 7


모든 child pages 의 웹페이지를 순회를 하면서 텍스트를 추출해서 로드할 때 (a) page content, (b) metadata 를 가져옵니다. 그리고 각각에 대해서 접근해서 확인해 볼 수 있습니다. 


(a) Page Content


docs[0].page_content[:200]

# '\n\n\n\n\nLangChain\n\n\n\n\n\n\n\n\n\n\n\n\n\n\n\n\n\n\n\n\n\n\nð\x9f¦\x9cð\x9f\x94\x97 
# LangChainLangSmithLangServeAgentsRetrievalEvaluationBlogDocsPartnersð\x9f¦\x9cð\x9f\x94
# \x97 LangChainð\x9f¦\x9cð\x9f\x94\x97 
# LangChain
# Catch up on the latest in LangSmith on YouTube.Bui'


(b) Metadata


docs[0].metadata

# {'source': 'https://www.langchain.com/',
#  'title': 'LangChain',
#  'description': 'LangChainâ\x80\x99s flexible abstractions and extensive toolkit unlocks developers to build context-aware, reasoning LLM applications.',
#  'language': 'en'}


docs[1].metadata

# {'source': 'https://www.langchain.com/langserve',
#  'title': 'LangServe',
#  'description': 'Deploy your LLM application with confidence. LangServe lets you deploy LangChain runnables and chains as a REST API.',
#  'language': 'en'}


docs[2].metadata

# {'source': 'https://www.langchain.com/use-case/agents',
#  'title': 'LangChain Agents',
#  'description': 'Turn your LLMs into reasoning engines.',
#  'language': 'en'}


docs[3].metadata

# {'source': 'https://www.langchain.com/use-case/retrieval',
#  'title': 'Retrieval',
#  'description': 'Personalize and Contextualize your LLM Application.',
#  'language': 'en'}


[ Reference ]

* LangChain - Recursive URL: 
https://python.langchain.com/docs/integrations/document_loaders/recursive_url


이번 포스팅이 많은 도움이 되었기를 바랍니다. 

행복한 데이터 과학자 되세요!


728x90
반응형
Posted by Rfriend
,

OpenAI의 프레임워크에서 "대규모 언어 모델(Large Language Model, LLM)"과 "챗 모델(Chat Model)"이라는 용어는 언어 모델의 두 가지 다른 측면이나 구현을 나타냅니다.  


1. LLM (Large Language Model) 

- 일반 설명: LLM은 OpenAI가 개발한 GPT-3나 GPT-4와 같은 대규모 언어 모델을 가리키는 광범위한 용어입니다. 이 모델들은 인간과 유사한 텍스트를 이해하고 생성할 수 있게 해주는 많은 수의 파라미터로 특징지어집니다. 

- 기능: LLM은 다양한 인터넷 텍스트로 훈련됩니다. 따라서 번역, 요약, 질문 답변 등 다양한 언어 작업을 수행할 수 있습니다. 

- 유연성: 이 모델들은 대화 작업을 위해 특별히 조정되지 않았습니다. 대신, 챗봇을 포함하여 다양한 애플리케이션에 적용될 수 있는 범용 모델입니다. 또한 콘텐츠 생성, 코딩 지원 등 다른 분야에도 확장됩니다. 

- 훈련 데이터: 이 모델들의 훈련 데이터는 인터넷에서 다양한 텍스트 소스를 포함하며, 언어, 맥락, 지식에 대한 광범위한 이해를 제공합니다. 


2. Chat Model

- 특징: 현재 여러분이 상호작용하고 있는 챗 모델처럼, 챗 모델은 대화 작업에 특화된 대규모 언어 모델의 더 전문화된 구현입니다. 

- 기능: 대화 참여, 질문 답변, 작업 지원, 그리고 여러 차례에 걸쳐 일관되고 맥락을 인식하는 대화를 유지(maintain a coherent and context-aware conversation over multiple turns)하는 데에 설계되었습니다.

- 훈련 및 조정: 일반 대규모 언어 모델을 기반으로 하지만, 대화적인 맥락에서 뛰어난 성능을 발휘하기 위해 추가적인 훈련이나 조정을 거칩니다. 이는 대화 데이터셋에 대한 훈련이나 대화에서의 성능을 개선하기 위한 강화 학습 기법을 사용할 수 있습니다. 

- 사용자 경험: 사용자 친화적이고 매력적인 대화 경험을 제공하는 데 중점을 둡니다. 종종 적절하고 맥락에 맞는 응답을 보장하기 위한 추가적인 안전장치나 지침이 포함됩니다. 


요약하자면, LLM은 다양한 언어 작업을 수행할 수 있는 범용 대규모 언어 모델인 반면, Chat Model은 대화 상호작용 및 대화에 최적화된 LLM의 특화된 버전(maintain a coherent and context-aware conversation over multiple turns)입니다. 


이번 포스팅에서는 LangChain으로 OpenAI의 ChatModel을 활용한 챗봇을 만들 때 인풋 메시지를 작성하는 방법을 소개하겠습니다. 


(1) SystemMessage(), HumanMessage()를 이용한 Messages 작성

(2) ChatPromptTemplate과 format_prompt()를 이용한 Formatted Prompts 작성

(3) ChatPromptTemplate 를 이용한 Formatted Prompts 작성


LangChain - OpenAI ChatModel - Messages


먼저 터미널에서 pip install 로 openai, langchain을 설치합니다. 


! pip install openai langchain


Prompt 작성과 Chat Model에 필요한 모듈을 importing 하고, 환경변수에 OpenAI API Key를 설정해줍니다. 


import os

from langchain.prompts import (
    ChatPromptTemplate, 
    SystemMessagePromptTemplate, 
    HumanMessagePromptTemplate,
)
from langchain.schema import SystemMessage, HumanMessage
from langchain.chat_models import ChatOpenAI

# set OpenAI API Key in your environment variables
os.environ["OPENAI_API_KEY"]="sk-xxxx..."


(1) SystemMessage(), HumanMessage()를 이용한 Messages 작성


Chat Model로는 OpenAI의 GPT-4 버전을 사용하겠습니다. 


# Chat Model
model = ChatOpenAI(temperature=0, model="gpt-4")


LangChain의 ChatModels 는 SystemMessage, HumanMessage, AIMessage의 3가지 종류의 메시지 클래스를 제공합니다. 


- (a) SystemMessage: 시스템 컴포넌트로부터의 메시지로, ChatModel에게 페르소나, 역할 설정.

- (b) HumanMessage: 사용자로부터의 메시지로, ChatModel에게 작업을 시키는 인풋 메시지.

- (c) AIMessage: AI 모델로부터의 메시지로, SystemMessage와 HumanMessage를 인풋으로 받아 아웃풋으로 반환하는 메시지 


아래 예에서는 langchain.schema 에서 SystemMessage, HumanMessage를 importing하여 리스트로 두 메시지를 묶어서 Chat Model 에 인풋으로 넣어주면 됩니다. 


Formatted message가 아닌 일반 메시지를 인풋으로 넣을 때 바로 사용할 수 있어서 편리합니다. 


# System, Human Messages
# Chat models accept List[BaseMessage] as inputs, 
# or objects which can be coerced to messages, 
# including str (converted to HumanMessage) and PromptValue.
messages = [
    SystemMessage(
        content="You are a helpful assisant that translate English to Korean."
    ), 
    HumanMessage(
        content="Translate this sentence from English to Korean: I love programming."
    ), 
]


model.invoke(messages)
# AIMessage(content='나는 프로그래밍을 사랑한다.')


(2) ChatPromptTemplate과 format_prompt()를 이용한 Formatted Prompts 작성


이번에는 Prompt 메시지의 내용을 기본 뼈대의 Template을 만들어놓고, Chat Model을 실행시킬 때 사용자가 맞춤형으로 Prompt의 일부 부분을 인풋으로 넣어주어 Formatted prompts 를 만들어 최종 Chat Model을 실행시킬 때 사용하는 ChatPromptTemplate을 소개하겠습니다. 


아래 Template 작성 예에서는 System template에서 {input_language}, {output_language} 부분, 그리고 Human template의 {text} 부분이 나중에 사용자가 최종 입력하는 값에 따라 입력이 되어서 최종 Formatted prompt 가 작성되는 방식입니다. 


먼저, System template, Human template을 만들고, 


# You can make use of templating by using a MessagePromptTemplate
# (a) System Message
system_template = """
You are a helpful assistant that translate {input_language} to {output_language}"""
system_message_prompt = SystemMessagePromptTemplate.from_template(system_template)


# (b) Human Message
human_template = "{text}"
human_message_prompt = HumanMessagePromptTemplate.from_template(human_template)


다음으로 ChatPromptTemplate.from_messages([템플릿 리스트...]) 를 사용하여 Chat Prompt를 만듭니다. 


# You can build a ChatPromptTemplate from one or more MessagePromptTemplates.
chat_prompt = ChatPromptTemplate.from_messages(
    [system_message_prompt, human_message_prompt]
)


마지막으로, chat_prompt.format_prompt() 에서 아래처럼 사용자 인풋에 해당하는 변수 별 값을 입력해주면 ChatPromptValue()를 반환합니다. 


# ChatPromptTemplate’s format_prompt – this returns a PromptValue, 
# which you can convert to a string or Message object, 
# depending on whether you want to use the formatted value as input to an llm or chat model.
chat_prompt.format_prompt(
    input_language="English", 
    output_language="Korean",
    text="I love programming.")

# ChatPromptValue(messages=[
# SystemMessage(content='\nYou are a helpful assistant that translate English to Korean'), 
# HumanMessage(content='I love programming.')])


chat_prompt.format_prompt().to_messages() 를 뒤에 붙여주면 [SystemMessage, HumanMessage]를 반환합니다. --> 다음 단계에서 ChatModel에 인풋으로 넣어줍니다. 


# to_messages()
chat_prompt.format_prompt(
    input_language="English", 
    output_language="Korean",
    text="I love programming.").to_messages()

# [SystemMessage(content='\nYou are a helpful assistant that translate English to Korean'),
#  HumanMessage(content='I love programming.')]


ChatModel 에 위에서 작성한 [SystemMessage, HumanMessage] 를 인풋으로 넣어 invoke()로 실행시킵니다. 


# Get a chat completion from the formatted messages
model.invoke(
    chat_prompt.format_prompt(
        input_language="English", 
        output_language="Korean",
        text="I love programming.").to_messages()
)

# AIMessage(content='나는 프로그래밍을 사랑한다.')


(3) ChatPromptTemplate 를 이용한 Formatted Prompts 작성


위의 (2)번 방법이 Formatted Prompts를 작성하는 방법이었는데요, 코드가 길고 좀 복잡한 면이 있습니다. 이번의 (3)번 방법은 보다 직관적이고 코드도 간결해서 사용하기에 상대적으로 편리합니다. 


ChatPromptTemplate.from_messages([("system", "Message..."), ("human", "Message...")]) 로 Chat Prompts 를 작성해줍니다. 


# Chat Prompts
final_prompt = ChatPromptTemplate.from_messages(
    [
        ("system", "You are a helpful assistant that translate {input_language} to {output_language}"), 
        ("human", "{text}")
    ]
)


'|'로 Prompt와 Chat Model을 Chaining 해주고, invoke({"인풋변수": "인풋 값"}) 형식으로 딕션어리에 키:값 쌍으로 입력해주면 됩니다. (2)번 방법보다 상대적으로 직관적이어서 이해하기 쉽습니다. 


# Chainning using '|' operator
chain = final_prompt | model


# Invoke a chain
chain.invoke({
    "input_language": "English", 
    "output_language": "Korean", 
    "text": "I love programming."}
)

# AIMessage(content='나는 프로그래밍을 사랑한다.')


[ Reference ]

- LangChain - ChatOpenAI: https://python.langchain.com/docs/integrations/chat/openai


이번 포스팅이 많은 도움이 되었기를 바랍니다. 

행복한 데이터 과학자 되세요!  :-)


728x90
반응형
Posted by Rfriend
,

LangChain은 Harrison Chase에 의해 만들어진 것으로, 대형 언어 모델을 사용하여 응용 프로그램을 보다 효율적이고 효과적으로 구축하기 위한 도구 세트입니다. LangChain에서 "OpenAI Callback"은 LangChain 프레임워크 내에서 GPT-3 또는 GPT-4와 같은 OpenAI의 언어 모델과 상호 작용하기 위해 사용되는 함수나 메커니즘을 말합니다. 

LangChain의 OpenAI 콜백은 OpenAI 언어 모델로 쿼리를 보내고 그로부터 응답을 받는 인터페이스 역할을 합니다. 이것은 자연 언어 이해와 생성 기능을 필요로 하는 응용 프로그램에 있어 중요합니다. 콜백을 사용함으로써 개발자들은 대화 생성, 텍스트 요약, 질문 답변 등 다양한 기능을 포함한 응용 프로그램에 GPT-3 또는 GPT-4의 강력한 언어 처리 기능을 통합할 수 있습니다. 

이 콜백은 OpenAI의 API와 상호 작용하는 세부 사항을 추상화함으로써 개발자들이 API 통신의 복잡성에 대해 걱정하지 않고 자신들의 응용 프로그램의 고급 로직에 집중할 수 있게 해줍니다. 


LangChain의 get_openai_callback() 메소드를 사용하면 OpenAI LLM 모델 API 서비스에 대한 토큰 사용을 트래킹할 수 있습니다. (2024년.1월 현재 OpenAI API에 대해서만 구현이 되어 있음). 애플리케이션을 운영하는 입장에서는 사용하는 토큰 양(total tokens)과 소요되는 비용(total costs)을 트래킹하면서 적정 예산 범위 내 가용 가능한지를 점검하고 관리할 필요가 있을 것입니다. 


LangChain - OpenAI Callback - Tracking token usage


먼저, 터미널에서 pip install 을 사용해서 openai, langchain 모듈을 설치합니다. 


! pip install openai langchain


다음으로, 예제 실습에 필요한 모듈을 importing 합니다. 

LangChain의 Callbacks 클래스에서 get_openai_callback() 메소드를 import 해서 OpenAI API 서비스에서 사용한 토큰에 대해서 트래킹을 해보겠습니다. 

OpenAI의 GPT-4 Chat 모델을 사용하겠으며, OpenAI API Key를 환경변수로 입력해주었습니다. 


import os

from langchain.callbacks import get_openai_callback
from langchain.chat_models import ChatOpenAI

os.environ["OPENAI_API_KEY"]="sk-xxxx..." # set with yours

# initiate ChatOpenAI LLM model
model = ChatOpenAI(model="gpt-4")


매우 간단하게 1개의 호출에 대한 API token 사용에 대한 트래킹과, 복수의 API 호출에 대한 토큰 사용 트래킹을 나누어서 소개하겠습니다. 


(1) get_openai_callback()을 이용해 1개의 호출에 대한 토큰 사용 트래킹


# Track token usage for specific calls.
# It is currently only implemented for the OpenAI API.
with get_openai_callback() as cb:
    result = model.invoke("Tell me a joke about birds")
    print("result:", result)
    print("---" * 10)
    print(cb)
    
# result: content="Why don't birds use Facebook?\n\nBecause they already tweet enough!"
# ------------------------------
# Tokens Used: 26
# 	Prompt Tokens: 13
# 	Completion Tokens: 13
# Successful Requests: 1
# Total Cost (USD): $0.00117


(2) get_openai_callback()을 이용해 여러개의 호출에 대한 토큰 사용 트래킹


복수개의 API 호출에 대한 토근 사용 트래킹도 가능합니다. 아래에 Callback 의 각 속성 정보에 접근하는 방법도 소개하였습니다. 가령, 총 토근 수 (cb.total_tokens), 프롬프트 토큰 수 (cb.prompt_tokens), 답변 생성 토큰 수 (cb.completion_tokens), 총 소요 비용 (cb.total_cost) 등의 속성 정보를 개별적으로 접근해서 확인할 수 있습니다. 


# Anything inside the context manager will get tracked.
# Here’s an example of using it to track multiple calls in sequence.
with get_openai_callback() as cb:
    result_1 = model.invoke("Tell me a joke about birds")
    result_2 = model.invoke("Tell me a joke about dogs")
    
    print(f"Result 1: {result_1}")
    print(f"Result 2: {result_2}")
    print("-----" * 10)
    print(cb)
    print("-----" * 10)
    print(f"Total tokens: {cb.total_tokens}")
    print("-----" * 10)
    print(f"Prompt Tokens: {cb.prompt_tokens}")
    print("-----" * 10)
    print(f"Completion Tokens: {cb.completion_tokens}")
    print("-----" * 10)
    print(f"Total Cost (USD): ${cb.total_cost}")

    
# Result 1: content="Why do seagulls fly over the sea?\n\nBecause if they flew over the bay, they'd be bagels!"
# Result 2: content='Why did the scarecrow adopt a dog?\n\nBecause he needed a "barking" buddy!'
# --------------------------------------------------
# Tokens Used: 69
# 	Prompt Tokens: 26
# 	Completion Tokens: 43
# Successful Requests: 2
# Total Cost (USD): $0.0033599999999999997
# --------------------------------------------------
# Total tokens: 69
# --------------------------------------------------
# Prompt Tokens: 26
# --------------------------------------------------
# Completion Tokens: 43
# --------------------------------------------------
# Total Cost (USD): $0.0033599999999999997


[ Reference ]

* LangChain - Tracking token usage: 
https://python.langchain.com/docs/modules/model_io/chat/token_usage_tracking


이번 포스팅이 많은 도움이 되었기를 바랍니다. 

행복한 데이터 과학자 되세요!  :-)


728x90
반응형
Posted by Rfriend
,

이번 포스팅에서는 LangChain 으로 LLM 모델 기반 애플리케이션을 구축할 때 캐시(Cache)를 사용하여 응답 속도를 향상시키고 계산 부하를 줄이는 방법을 소개하겠습니다. 


1. 캐시(Cache)란 무엇인가?

2. LangChain 으로 LLM 기반 애플리케이션 구축 시 사용하는 캐시 유형

3. LangChain 에서 Cache 적용해보기


LangChain - Cache


1. 캐시(Cache)란 무엇인가? 


"캐시(Cache)"는 컴퓨팅에서 데이터를 저장하여 이후 데이터 요청을 더 빠르게 처리할 수 있도록 하는 하드웨어 또는 소프트웨어 구성 요소를 말합니다. 캐시에 저장되는 데이터는 이전 계산의 결과거나 다른 곳에 저장된 데이터의 복사본일 수 있습니다. 캐시는 주로 데이터 접근 속도를 높이고, 주 메모리나 더 먼 저장 위치에서 데이터를 가져오는 시간을 줄이는 데 사용됩니다. 

LangChain과 같은 언어 모델 애플리케이션 구축 프레임워크의 맥락에서, 캐싱은 성능과 효율성을 향상시키는 데 중요한 역할을 합니다. LangChain과 같은 애플리케이션에서 캐시가 수행하는 기능은 다음과 같습니다. 

(1) 응답 속도 향상: GPT-3 또는 GPT-4와 같은 언어 모델이 쿼리를 처리할 때, 복잡한 계산을 수행해야 할 수 있으며, 이는 상당한 시간이 소요될 수 있습니다. 비슷한 쿼리가 자주 발생하는 경우, 결과를 캐싱하면 이러한 반복 쿼리에 대한 응답 시간을 크게 단축할 수 있습니다. 

(2) 계산 부하 감소: 이전에 계산된 결과를 저장함으로써, 언어 모델이 동일한 계산을 여러 번 수행할 필요를 줄일 수 있습니다. 이는 비용이 들어가는 언어 모델에 대한 호출 API 호출을 줄이는 데 특히 유용할 수 있습니다. 

(3) 사용자 경험 개선: 높은 사용자 상호 작용을 가진 애플리케이션, 예를 들어 챗봇이나 대화형 도구에서 자주 요청되는 정보나 응답을 캐싱하면 사용자는 즉각적인 피드백을 받을 수 있어 전반적인 경험이 향상됩니다. 

(4) 맞춤화 및 컨텍스트 유지: 경우에 따라 캐싱은 세션 동안 컨텍스트나 사용자 특정 데이터를 유지하는 데 사용될 수 있어 언어 모델과의 보다 개인화되고 컨텍스트에 맞는 상호 작용을 가능하게 합니다. 


전반적으로, LangChain과 같은 애플리케이션에서 캐싱의 역할은 데이터 및 계산 결과를 지능적으로 저장하고 재사용함으로써 효율성, 속도 및 사용자 경험을 향상시키는 것입니다. 


2. LangChain 으로 LLM 기반 애플리케이션 구축 시 사용하는 캐시 유형


LangChain은 언어 모델 애플리케이션을 구축하기 위한 프레임워크인데, 이러한 맥락에서 일반적으로 사용되는 캐시 유형은 다음과 같습니다. 

- 메모리 캐시 (Memory Cache): 언어 모델 계산 또는 API 응답 결과를 임시로 저장하는 데 사용됩니다. 이러한 작업이 자원을 많이 사용할 수 있으므로, 메모리에 결과를 캐싱하면 반복 쿼리나 작업에 대한 성능을 크게 향상시킬 수 있습니다. 

- 디스크 캐시 (Disk Cache): 더 크거나 시간에 민감하지 않은 데이터에 대해 디스크 캐싱이 사용될 수 있습니다. 이는 대용량 데이터셋이나 언어 모델 출력을 저장하는 데 특히 유용하며, 메모리 캐시의 속도가 필요하지 않지만 자주 접근되어 캐싱의 이점을 볼 수 있는 경우에 해당합니다. 

- 애플리케이션 캐시 (Application Cache): LangChain은 애플리케이션 프레임워크이므로 애플리케이션 특정 캐싱 메커니즘을 사용합니다. 여기에는 사용자 세션, 진행 중인 대화의 컨텍스트 또는 특정 사용자 환경 설정 및 데이터를 캐싱하는 것이 포함됩니다. 

- 데이터베이스 캐시 (Database Cache): LangChain이 데이터 저장 및 검색을 위해 데이터베이스와 상호 작용하는 경우, 일반적인 쿼리나 데이터 검색 작업을 가속화하기 위해 데이터베이스 캐싱이 사용될 수 있습니다. 

- 웹 캐시 (Web Cache): LangChain 애플리케이션이 웹 소스에서 데이터를 가져올 때, 웹 캐싱 메커니즘을 사용하여 웹 콘텐츠를 저장하고 빠르게 검색할 수 있습니다. 

- CDN 캐시 (CDN Cache): 애플리케이션이 웹을 통해 넓은 지역의 사용자 기반에 콘텐츠를 제공하는 경우, 사용자 위치에 가까운 곳에서 정적 리소스를 캐시하기 위해 CDN(콘텐츠 전송 네트워크,Content Delivery Network) 캐시를 사용할 수 있습니다. 


LangChain 애플리케이션에서 캐시 유형의 선택은 애플리케이션의 특정 요구 사항, 예를 들어 데이터의 성격, 접근 빈도, 필요한 접근 속도, 자원 제한 등에 따라 달라집니다


3. LangChain 에서 Cache 적용해보기


터미널에서 pip install로 openai, langchain을 설치합니다. 


! pip install openai langchain


인메모리 캐시(InMemory Cache)와 SQLite 데이터베이스 캐시 (SQLite Database Cache)를 순서대로 소개하겠습니다. 


3-1. InMemory Cache


먼저 메모리 캐시 (Memory Cache)를 이용하는 방법을 소개합니다.  

LLM 모델은 OpenAI의 "gpt-3.5-turbo"를 이용하겠으며, 환경변수로 OPENAI_API_KEY를 등록해줍니다. 


# (1) InMemoryCache
from langchain.globals import set_llm_cache
from langchain.llms import OpenAI

import os

os.environ["OPENAI_API_KEY"]="sk-xxxx..." # set with yours


캐시의 효과를 더 강조하기 위해서 조금 느린 LLM 모델을 사용하겠습니다. 


# To make the caching really obvious, let's use a slower model.
model = OpenAI(model="gpt-3.5-turbo-instruct", n=3)


%%time 으로 실행 시간을 측정해보겠습니다. 처음 사용할 때는 캐시가 적용되지 않기 때문에 시간이 상대적으로 오래 걸립니다. 


%%time
from langchain.cache import InMemoryCache

set_llm_cache(InMemoryCache())

# The first time, it is not yet in cache, so it should take longer
model.invoke("Tell me a joke about birds.")

# CPU times: total: 688 ms
# Wall time: 1.35 s
# '\n\nWhy did the chicken go to the seance?\n\nTo talk to the other side of the road!'


똑같은 사용자 쿼리를 LLM 모델에 보내면 캐시에 저장되어 있는 응답을 사용하여 즉시 응답해주기 때문에 소요시간이 대폭 줄어들었음을 알 수 있습니다. 


%%time
# The second time it is, so it goes faster
model.invoke("Tell me a joke about birds.")

# CPU times: total: 15 ns
# Wall time: 12 ns
# '\n\nWhy did the chicken go to the seance?\n\nTo talk to the other side of the road!'


3-2. SQLite Database Cache


다음으로 SQLLite Database Cache를 사용하기 위해 database path를 설정해줍니다. 


## (2) SQLite Cache
# We can do the same thing with a SQLite Cache
from langchain.globals import set_llm_cache
from langchain.cache import SQLiteCache

set_llm_cache(SQLiteCache(database_path=".langchain.db"))

# To make the caching really obvious, let's use a slower model.
model = OpenAI(model="gpt-3.5-turbo-instruct", n=3)


첫번째 사용자 쿼리 실행 시간을 측정해보겠습니다. 


%%time
# The first time, it is not yet in cache, so it should take longer.
model.invoke("Tell me a joke about birds")

# CPU times: total: 46.9 ms
# Wall time: 764 ms
# '\n\nWhy did the chicken go to the seance?\n\nTo talk to his ghost hen-cestors!'


위와 똑같은 사용자 쿼리를 LLM 모델에 보내보면, 이번에는 SQLite Cache에 저장되어 있던 답변이 신속하게 반환됩니다. 


%%time
# The second time it is, so it goes faster
model.invoke("Tell me a joke about birds")

# CPU times: total: 15.6 ms
# Wall time: 7.56 ms
# '\n\nWhy did the chicken go to the seance?\n\nTo talk to his ghost hen-cestors!'


[ Reference ]

- LangChain Cache: https://python.langchain.com/docs/modules/model_io/llms/llm_caching


이번 포스팅이 많은 도움이 되었기를 바랍니다. 

행복한 데이터 과학자 되세요!  :-)


728x90
반응형
Posted by Rfriend
,

이번 포스팅에서는 LangChain 에서 LLM 체인을 호출할 때 사용하는 인터페이스에 대해서 소개하겠습니다. LangChain의 인터페이스는 크게 아래처럼 2가지로 구분할 수 있습니다. 


(1) Standard Interface: invoke(), stream(), batch()

(2) Async Interface: ainvoke(), astream(), abatch(), astream_log()


LangChain - Interface


(1) Standard Interface: invoke(), stream(), batch()


표준 인터페이스에는 invoke(), stream(), batch()가 있습니다. 표준 인터페이스는 LLM 모델 체인을 정의하고 표준 방식으로 호출(call a chain in a standard way)하는 것을 쉽게 만들어줍니다. 


먼저, 터미널에서 pip install을 사용해서 openai, langchain 모듈을 설치해줍니다. 


! pip install openai langchain


필요한 모듈을 importing하고, OpenAI의 LLM 모델을 API로 사용하기 위해 OPENAI_API_KEY를 환경변수로 등록해줍니다. 


import os

from langchain.llms import OpenAI
from langchain_core.output_parsers import StrOutputParser

os.environ["OPENAI_API_KEY"]="sk-xxxx...." # set with yours

llm = OpenAI()
parser = StrOutputParser()

chain = llm | parser


각 인터페이스에 대해 하나씩 예를 들어보겠습니다. 굳이 추가적인 설명이 필요치 않아서 제목과 예시를 보면 되겠습니다. 


(1-1) invoke(): 입력에 대해 체인을 호출함


# invoke(): call the chain on an input

chain.invoke("What are some colors of rainbow?")
# The colors of the rainbow are red, orange, yellow, green, blue, indigo, and violet.


(1-2) stream(): 응답의 청크(chunk)를 스트리밍함


# stream(): stream back chunks of the response

for chunk in chain.stream(
    "What are some colors of rainbow? Only answer the colors one by one per a line."):
    print(chunk, end="",  flush=True)
    
# Red
# Orange
# Yellow
# Green
# Blue
# Indigo
# Violet


참고로, flush=True를 설정하면 응답 텍스트가 출력되자마자 버퍼를 비워서 즉시 화면에 출력됩니다. 설정하지 않으면 파이썬은 자체적으로 적절한 시점에서 버퍼를 비울 때까지 데이터를 버퍼에 저장합니다. 이를 통해 프로그램이 실행되는 동안 실시간으로 데이터를 출력하거나 로깅을 할 때 유용하게 사용할 수 있습니다. 


(1-3) batch(): 입력 리스트 (a list of inputs)에 대해 체인을 호출함


# batch(): call the chain on a list of inputs
chain.batch([
    "What are some colors of rainbow?", 
    "Where is the capital city of South Korea?", 
    "When did the World War II happen?"
])

# ['\n\nThe colors of the rainbow are red, orange, yellow, green, blue, indigo, and violet.', 
# '\n\nThe capital city of South Korea is Seoul.', '
# \n\nWorld War II began on September 1, 1939, when Nazi Germany invaded Poland.']


(2) Async Interface: ainvoke(), astream(), abatch(), astream_log()


"async" 키워드는 비동기 프로그래밍(Asynchronous programming)을 말합니다. 이 함수는 비동기 함수로 정의되었으며, 이 함수 안에서 "await" 키워드를 사용하여 다른 비동기 함수가 완료될 때까지 기다릴 수 있습니다. 이를 통해 동시성 및 병렬성을 활용하여 더 효율적인 프로그램을 작성할 수 있습니다. 

예를 들어, 네트워크 요청이나 파일 입출력과 같은 I/O 작업을 수행할 때 비동기 프로그래밍은 프로그램이 블록되지 않고 다른 작업을 수행할 수 있게 해줍니다. 

Python 3.5부터 "async"와 "await" 키워드가 도입되어 비동기 프로그래밍을 지원하며, 이를 통해 asyncio 모듈과 같은 도구를 사용하여 비동기 코드를 작성할 수 있습니다. 


(2-1) ainvoke(): 입력에 대해 체인을 비동기적으로 호출함


# ainvoke(): call the chain on an input async

await chain.ainvoke("What are some colors of rainbow?")
# '\n\nThe colors of the rainbow are red, orange, yellow, green, blue, indigo, and violet.'


(2-2) astream(): 응답의 청크를 비동기적으로 스트리밍함


비동기적으로 처리하고 바로 바로 스트리밍 하기 때문에 중간에 공백 라인이 생겼습니다. 


# astream(): stream back chunks of the response async

async for chunk in chain.astream(
    "What are some colors of rainbow? Only answer the colors one by one per a line."):
    print(chunk)
#
#
# Red
#
#
# Orange
#
#
# Yellow
#
#
# Green
#
# Blue
# Indigo
# Violet


(2-3) abatch(): 입력 리스트(a list of inputs)에 대해 체인을 비동기적으로 호출함


# abatch(): call the chain on a list of inputs async
await chain.abatch([
    "What are some colors of rainbow?", 
    "Where is the capital city of South Korea?", 
    "When did the World War II happen?"
])

# ['\n\n-Red\n-Orange\n-Yellow\n-Green\n-Blue\n-Indigo\n-Violet',
#  '\n\nThe capital city of South Korea is Seoul.',
#  '\n\nWorld War II began on September 1, 1939, when Nazi Germany invaded Poland.']


(2-4) astream_log(): 최종 응답뿐만 아니라 중간 단계 로그를 그때 그때 스트리밍함


중간 단계의 세부 로그 데이터를 확인할 수 있습니다. 


# astream_log(): stream back intermediate steps as they happen, in addition to the final response
async for chunk in chain.astream_log(
    "What are some colors of rainbow? Only answer the colors one by one per a line."):
    print("---" * 20)
    print(chunk)
    
# ------------------------------------------------------------
# RunLogPatch({'op': 'replace',
#   'path': '',
#   'value': {'final_output': None,
#             'id': '98250f70-4772-4afe-9e3e-e815b1c0ca78',
#             'logs': {},
#             'streamed_output': []}})
# ------------------------------------------------------------
# RunLogPatch({'op': 'add',
#   'path': '/logs/OpenAI',
#   'value': {'end_time': None,
#             'final_output': None,
#             'id': '7b2ca22e-71e0-4a03-9775-801f6c92f3d6',
#             'metadata': {},
#             'name': 'OpenAI',
#             'start_time': '2024-01-06T12:08:35.661',
#             'streamed_output_str': [],
#             'tags': ['seq:step:1'],
#             'type': 'llm'}})
# ------------------------------------------------------------
# RunLogPatch({'op': 'add',
#   'path': '/logs/StrOutputParser',
#   'value': {'end_time': None,
#             'final_output': None,
#             'id': 'abebbbcd-7c1c-4af3-8a47-54c67df34bb8',
#             'metadata': {},
#             'name': 'StrOutputParser',
#             'start_time': '2024-01-06T12:08:36.061',
#             'streamed_output_str': [],
#             'tags': ['seq:step:2'],
#             'type': 'parser'}})
# ------------------------------------------------------------
# RunLogPatch({'op': 'add', 'path': '/streamed_output/-', 'value': '\n'},
#  {'op': 'replace', 'path': '/final_output', 'value': '\n'})
# ------------------------------------------------------------
# RunLogPatch({'op': 'add', 'path': '/logs/OpenAI/streamed_output_str/-', 'value': '\n'})
# ------------------------------------------------------------
# RunLogPatch({'op': 'add', 'path': '/streamed_output/-', 'value': '\n'},
#  {'op': 'replace', 'path': '/final_output', 'value': '\n\n'})
# ------------------------------------------------------------
# RunLogPatch({'op': 'add', 'path': '/logs/OpenAI/streamed_output_str/-', 'value': '\n'})
# ------------------------------------------------------------
# RunLogPatch({'op': 'add', 'path': '/streamed_output/-', 'value': 'Red'},
#  {'op': 'replace', 'path': '/final_output', 'value': '\n\nRed'})
# ------------------------------------------------------------
# RunLogPatch({'op': 'add', 'path': '/logs/OpenAI/streamed_output_str/-', 'value': 'Red'})
# ------------------------------------------------------------
# RunLogPatch({'op': 'add', 'path': '/streamed_output/-', 'value': '\n'},
#  {'op': 'replace', 'path': '/final_output', 'value': '\n\nRed\n'})
# ------------------------------------------------------------
# RunLogPatch({'op': 'add', 'path': '/logs/OpenAI/streamed_output_str/-', 'value': '\n'})
# ------------------------------------------------------------
# RunLogPatch({'op': 'add', 'path': '/streamed_output/-', 'value': 'Orange'},
#  {'op': 'replace', 'path': '/final_output', 'value': '\n\nRed\nOrange'})
# ------------------------------------------------------------
# RunLogPatch({'op': 'add', 'path': '/logs/OpenAI/streamed_output_str/-', 'value': 'Orange'})
# ------------------------------------------------------------
# RunLogPatch({'op': 'add', 'path': '/streamed_output/-', 'value': '\n'},
#  {'op': 'replace', 'path': '/final_output', 'value': '\n\nRed\nOrange\n'})
# ------------------------------------------------------------
# RunLogPatch({'op': 'add', 'path': '/logs/OpenAI/streamed_output_str/-', 'value': '\n'})
# ------------------------------------------------------------
# RunLogPatch({'op': 'add', 'path': '/streamed_output/-', 'value': 'Yellow'},
#  {'op': 'replace', 'path': '/final_output', 'value': '\n\nRed\nOrange\nYellow'})
# ------------------------------------------------------------
# RunLogPatch({'op': 'add', 'path': '/logs/OpenAI/streamed_output_str/-', 'value': 'Yellow'})
# ------------------------------------------------------------
# RunLogPatch({'op': 'add', 'path': '/streamed_output/-', 'value': '\n'},
#  {'op': 'replace',
#   'path': '/final_output',
#   'value': '\n\nRed\nOrange\nYellow\n'})
# ------------------------------------------------------------
# RunLogPatch({'op': 'add', 'path': '/logs/OpenAI/streamed_output_str/-', 'value': '\n'})
# ------------------------------------------------------------
# RunLogPatch({'op': 'add', 'path': '/streamed_output/-', 'value': 'Green\n'},
#  {'op': 'replace',
#   'path': '/final_output',
#   'value': '\n\nRed\nOrange\nYellow\nGreen\n'})
# ------------------------------------------------------------
# RunLogPatch({'op': 'add',
#   'path': '/logs/OpenAI/streamed_output_str/-',
#   'value': 'Green\n'})
# ------------------------------------------------------------
# RunLogPatch({'op': 'add', 'path': '/streamed_output/-', 'value': 'Blue\nIndigo\nViolet'},
#  {'op': 'replace',
#   'path': '/final_output',
#   'value': '\n\nRed\nOrange\nYellow\nGreen\nBlue\nIndigo\nViolet'})
# ------------------------------------------------------------
# RunLogPatch({'op': 'add',
#   'path': '/logs/OpenAI/streamed_output_str/-',
#   'value': 'Blue\nIndigo\nViolet'})
# ------------------------------------------------------------
# RunLogPatch({'op': 'add',
#   'path': '/logs/OpenAI/final_output',
#   'value': {'generations': [[{'generation_info': {'finish_reason': 'stop',
#                                                   'logprobs': None},
#                               'text': '\n'
#                                       '\n'
#                                       'Red\n'
#                                       'Orange\n'
#                                       'Yellow\n'
#                                       'Green\n'
#                                       'Blue\n'
#                                       'Indigo\n'
#                                       'Violet',
#                               'type': 'Generation'}]],
#             'llm_output': None,
#             'run': None}},
#  {'op': 'add',
#   'path': '/logs/OpenAI/end_time',
#   'value': '2024-01-06T12:08:36.322'})
# ------------------------------------------------------------
# RunLogPatch({'op': 'add',
#   'path': '/logs/StrOutputParser/final_output',
#   'value': {'output': '\n\nRed\nOrange\nYellow\nGreen\nBlue\nIndigo\nViolet'}},
#  {'op': 'add',
#   'path': '/logs/StrOutputParser/end_time',
#   'value': '2024-01-06T12:08:36.322'})


[ Reference ]

- LangChain Interface: https://python.langchain.com/docs/expression_language/interface#async-invoke


이번 포스팅이 많은 도움이 되었기를 바랍니다. 

행복한 데이터 과학자 되세요!  :-)


728x90
반응형
Posted by Rfriend
,

LangChain으로 LLM 모델을 사용한 애플리케이션을 만들 때 기존의 여러개 프롬프트를 재사용하고 조합해서 최종 프롬프트를 만들어서 사용해야 할 경우가 있습니다. 이때 LangChain의 PipelinePrompt 를 사용하면 되는데요, PipeliePrompt는 다음과 같이 Final promt, Pipeline prompts 의 두 개 부분으로 구성되어 있습니다. 


- (1) Final prompt: 최종적으로 반환되는 프롬프트. 

- (2) Pipeline prompts: string 이름과 prompt template 으로 구성되는 튜플의 리스트(a list of tuples). 각 프롬프트는 포맷이 정의되고, 동일한 이름의 변수로 파이프라인의 다음 template으로 전달됨. 


간단한 예를 들어보겠습니다. 


- (1) Final prompt: final_prompt

- (2) Pipeline prompts: introduction_prompt, example_prompt, start_prompt

- (3) Composing all together

       : PipelinePromptTemplate(

             final_prompt=final_prompt,

             pipeline_prompts=[

                 ("introduction", introduction_prompt),

                 ("example", example_prompt),

                 ("start", start_prompt)

             ])


LangChain - Pipeline Prompts


먼저, 터미널에서 pip install로 langchain, openai 모듈을 설치합니다. 


! pip install langchain openai


다음으로 실습에 필요한 모듈을 importing 합니다. 

from langchain.prompts.pipeline import PipelinePromptTemplate
from langchain.prompts import ChatPromptTemplate
from langchain.chat_models import ChatOpenAI
from langchain_core.output_parsers import StrOutputParser


OpenAI의 Chat Model을 사용해서 답변을 생성할 것이므로 OPENAI API KEY를 환경변수에 등록합니다. 


import os 

os.environ["OPENAI_API_KEY"]="sk-xxxx..."


(1) Final prompt 생성


여러개의 하위 프롬프트를 구성요소로 가지는 최종 프롬프트를 작성합니다. (나중에 변수이름과 하위 구성요소 프롬프트를 튜플로 매핑시키고, 하나의 리스트로 묶어줍니다.)


# Final template and prompt
final_template = """{introduction}

{example}

{start}"""

final_prompt = ChatPromptTemplate.from_template(final_template)


(2) Pipeline prompts 생성


(2-1) instruction_prompt 생성


# Introduction template and prompt
introduction_template = """You are an expert on {topic}."""

introduction_prompt = ChatPromptTemplate.from_template(introduction_template)


(2-2) exmaple_prompt 생성


# Example template and prompt
example_template = """Here is an example of an interaction:

Input: {example_input}
Output: {example_output}"""

example_prompt = ChatPromptTemplate.from_template(example_template)


(2-3) start_prompt 생성


# Start template and prompt
start_template = """Now, do this for real. 

Input: {input}
Output:"""

start_prompt = ChatPromptTemplate.from_template(start_template)


(3) 여러개의 Pipeline prompts를 PipelinePrompt를 이용해서 하나의 Pipeline으로 조합하기    (Composing all together)  


# Composing multiple prompts together using PipelinePromptTemplate()
input_prompts = [
    ("introduction", introduction_prompt), 
    ("example", example_prompt), 
    ("start", start_prompt), 
]

pipeline_prompt = PipelinePromptTemplate(
    final_prompt=final_prompt, pipeline_prompts=input_prompts
)


pipeline_prompt.input_variables
# ['example_input', 'example_output', 'input', 'topic']


최종 pipeline_prompt를 구성하는 각 하위 프롬프트의 변수이름에 값을 입력해서 프린트해보았습니다. 이제 프롬프트는 준비가 다 되었습니다. 


print(
    pipeline_prompt.format(
        topic="Math", 
        example_input="It costs 2 dollar per apple. How much do you need in total to buy 10 apples?", 
        example_output="Since 2 x 10 = 20, you need a total of $20.", 
        input="How much does it cost to buy 6 cans of beer that cost $3 each?",
    )
)


# Human: [HumanMessage(content='You are an expert on Math.')]

# [HumanMessage(content='Here is an example of an interaction:\n\nInput: It costs 2 dollar per apple. How much do you need in total to buy 10 apples?\nOutput: Since 2 x 10 = 20, you need a total of $20.')]

# [HumanMessage(content='Now, do this for real. \n\nInput: How much does it cost to buy 6 cans of beer that cost $3 each?\nOutput:')]


(4) pipeline_prompt + Chat Model + Output Parser를 Chaining 하기


# Chat Model
model = ChatOpenAI(temperature=0, model='gpt-4')

# Output Parser
parser = StrOutputParser()

# Chaining
chain = pipeline_prompt | model | parser


(5) chain.invoke() 로 Chat Model 실행하고 결과 반환받기


두개를 실행시켜 봤는데 예제를 통해 가르켜준대로 잘 대답을 해주네요. 


chain.invoke({
    "topic": "Math", 
    "example_input": "It costs 2 dollar per apple. How much do you need in total to buy 10 apples?", 
    "example_output": "Since 2 x 10 = 20, you need a total of $20.", 
    "input": "How much does it cost to buy 6 cans of beer that cost $3 each?"
})

# 'Since 6 x 3 = 18, you need a total of $18.'


chain.invoke({
    "topic": "Math", 
    "example_input": "It costs 2 dollar per apple. How much do you need in total to buy 10 apples?", 
    "example_output": "Since 2 x 10 = 20, you need a total of $20.", 
    "input": "How much does it cost in total to buy 6 cans of beer that cost $3 each \
    and two snacks that cost $5 each?"
})

# 'Since (6 x $3) + (2 x $5) = $18 + $10 = $28, you need a total of $28.'


[ Reference ]

* LangChain - Pipeline: https://python.langchain.com/docs/modules/model_io/prompts/pipeline


이번 포스팅이 많은 도움이 되었기를 바랍니다. 

행복한 데이터 과학자 되세요. :-)


728x90
반응형
Posted by Rfriend
,

프롬프트 템플릿을 '부분적(Partial prompt templates)'으로 사용하는 것이 의미 있을 수 있습니다. 예를 들어, 필요한 값들의 부분 집합을 전달하여, 나머지 값들만을 기대하는 새로운 프롬프트 템플릿을 만듭니다.

LangChain은 이를 두 가지 방법으로 지원합니다. 

1. 문자열 값을 가진 부분적 프롬프트 템플릿 (Partial prompt templates with Strings) 
2. 문자열 값을 반환하는 함수를 사용한 부분적 프롬프트 템플릿 (Partial prompt templates with Functions)

이 두 가지 다른 방법은 다른 사용 사례들을 지원합니다.


아래 예제에서 문자열 값을 반환하는 함수를 사용한 부분적 프롬프트 템플릿 (Partial with Functions) 을 만들고, LangChain에서 이를 수행하는 방법에 대해 소개하겠습니다. 


LangChain - Partial Prompt Templates


함수를 이용한 부분적 프롬프트 템플릿 사용 사례는 언제나 일반적인 방법으로 가져오고 싶은 변수가 있을 때 적용됩니다.


이의 대표적인 예는 날짜나 시간과 관련된 경우입니다. 항상 현재 날짜를 포함하고 싶은 프롬프트가 있다고 가정해보겠습니다. 프롬프트에 그것을 하드코딩 하여 다른 입력 변수들과 함께 전달하는 것은 매우 불편하며 또 휴면에러를 유발할 수도 있습니다. 이 경우, 항상 현재 날짜를 반환하는 함수(Function)로 프롬프트를 부분적(Partial prompt template)으로 사용하면 매우 편리합니다.


먼저 터미널에서 pip install 로 langchain, openai 모듈을 설치합니다. 


! pip install langchain openai


다음으로, 필요한 모듈을 importing 합니다. 그리고 LLM 모델로는 OpenAI 의 LLM을 쓸 것이므로 OpenAI API Key를 환경변수에 등록해줍니다. 


import os

from langchain.llms import OpenAI
from langchain.prompts import PromptTemplate
from langchain_core.output_parsers import StrOutputParser

os.environ["OPENAI_API_KEY"]="sk-xxxx..." # set with yours


이번 예제에서는 현재 날짜와 시간을 가져오는 사용자 정의 함수(User Defined Function)를 정의해서 사용하겠습니다. 


# Define a funtion that returns the current date
from datetime import datetime

def get_datetime():
    now = datetime.now()
    return now.strftime("%m/%d/%Y, %H:%M:%S")


부분적 프롬프트 템플릿(Partial prompt templates)을 만드는 방법에는 2가지가 있습니다. 


- 방법 1: PromptTemplate()로 prompt를 먼저 만들고, prompt.partial() 로 부분 프롬프트 생성

- 방법 2: PromptTemplate() 의 partial_varialbes 로 부분 변수 초기화하여 부분 프롬프트 생성


[방법 1] PromptTemplate()로 prompt를 먼저 만들고, prompt.partial() 로 부분 프롬프트 생성


# [option 1] Partial prompt template with a function
prompt = PromptTemplate(
    template="Tell me a {adjective} joke about the day {date}", 
    input_variables=["adjective", "date"]
)

# -- Partil prompt here --
partial_prompt = prompt.partial(date=get_datetime)

print(partial_prompt.format(adjective="funny"))
# Tell me a funny joke about the day 01/03/2024, 23:39:21


[방법 2] PromptTemplate() 의 partial_varialbes 로 부분 변수 초기화하여 부분 프롬프트 생성


# [option 2] You can initialize the prompt with the partialed variables
prompt = PromptTemplate(
    template="Tell me a {adjective} joke about the day {date}", 
    input_variables=["adjective"], 
    partial_variables={"date": get_datetime}, # -- partial prompt initialization here --
)

print(prompt.format(adjective="funny"))
# Tell me a funny joke about the day 01/03/2024, 23:41:26


이제, 위에서 만든 부분적 프롬프트 템플릿을 LLM Model, Output Parser와 '|'로 Chaining 해보겠습니다. 


# LLM Model
llm = OpenAI()

# Output Parser
parser = StrOutputParser()

# Chaining
chain = prompt | llm | parser


프롬프트 내 "date" 는 위에서 Partial Variable 로 해서 get_date() 함수로 현재의 날짜와 시간을 가져와서 부분적으로 입력을 해주었으며,  chain.invoke({"adjective": "funny"}) 를 사용해서 "adjective" 변수에 대해서만 사용자가 하드코딩으로 "funny"를 입력해주면 프롬프트 전체를 완성해서 LLM 모델에 전달하여 LLM 모델이 답변을 생성하도록 실행해보겠습니다. 


print(prompt.format(adjective="funny"))
# Tell me a funny joke about the day 01/03/2024, 23:41:26


response = chain.invoke({"adjective": "funny"})
print(response)

# Q: What did the calendar say when it saw the date and time?
# A: "Wow, I'm so far ahead of myself!"


아래에는 chain.invoke({"adjective": "sarcastic"}) 으로 바꾸어서 실행을 해보았습니다. 

promt.format(adjective="sarcastic") 으로 프롬프트를 확인해보면 {date} 부분에 get_date() 함수로 가져온 현지 날짜와 시간이 바뀌어 있음을 알 수 있습니다. 그리고 LLM 모델의 답변도 "adjective"와 "date"가 바뀌었기 때문에 위와는 다르게 바뀌었네요. 


print(prompt.format(adjective="sarcastic"))
# Tell me a sarcastic joke about the day 01/04/2024, 00:02:09


response = chain.invoke({"adjective": "sarcastic"})
print(response)

# Q: What did the clock say to the person at 00:01:20 on 1/4/2024? 
# A: "Happy Birthday, a day late!"


[ Reference ]

- LangChain - Partial Prompt Templates: 

https://python.langchain.com/docs/modules/model_io/prompts/partial


이번 포스팅이 많은 도움이 되었기를 바랍니다. 

행복한 데이터 과학자 되세요!  :-)


728x90
반응형
Posted by Rfriend
,

Zero-shot, One-shot, Few-shot prompting은 특히 자연어 처리나 이미지 생성과 관련된 머신러닝 모델에서, 모델이 데이터를 어떻게 훈련하거나 사용하는지에 대해 설명할 때 사용됩니다. 이 용어들은 훈련 또는 추론 중에 모델에 제공되는 예제의 수와 관련이 있습니다. 


1. Zero-Shot Prompting

- 이는 모델이 수행해야 할 작업에 대한 예제가 전혀 제공되지 않는 시나리오를 의미합니다. 모델은 오로지 사전 훈련과 프롬프트의 지시에만 의존합니다. 

- 예시: 언어 모델에게 영어에서 프랑스어로 문장을 번역하라고 요청하는 것이며, 이때 이전의 번역 예제는 제공되지 않습니다. 


2. One-Shot Prompting 

- 이 경우 모델은 수행해야 할 작업의 한 가지 예제(a single example)를 제공받습니다. 이는 모델이 기대하는 형식이나 응답 유형을 이해하는 데 도움이 됩니다. 

- 예시: 언어 모델에게 새로운 농담을 만들기 전에 한 가지 농담 예제를 보여주는 것입니다. 이 예제는 템플릿이나 가이드 역할을 합니다. 


3. Few-Shot Prompting 

- 여기서는 모델에게 작업을 더 잘 이해할 수 있도록 소수의 예제(하나 이상이지만 일반적으로 많지 않음)가 제공됩니다. 

- 예시: 언어 모델에게 긴 텍스트를 한 단락으로 요약하는 세 가지 다른 예제를 제공한 후 새로운 텍스트를 요약하도록 요청하는 것입니다. 


각 경우에서 모델은 제공된 프롬프트의 정보를 사용하여 요청된 작업을 더 잘 이해하고 완수합니다. Zero-shot, One-shot, Few-shot prompting의 효과는 작업의 복잡성과 모델의 능력에 따라 다를 수 있습니다. 


지난번 포스팅에서는 LangChain과 LLM Models 을 사용하여 Few-shot Prompting 하는 방법을 소개하였습니다. 


이번 포스팅에서는 LLM Models 대신에 Chat Models 과 LangChain을 사용하여 Few-shot Prompting 하는 방법을 소개하겠습니다. 


(1) Chat Model 에 고정된 개수의 몇 개의 예시를 주는 Few-shot Prompting 

(2) Chat Model 에 사용자 인풋과 유사한 top k 개의 예시를 선별해서 주는 Dynamic Few-shot Prompting


LangChain - Few-shot Prompting for Chat Models


(1) Chat Model 에 고정된 개수의 몇 개의 예시를 주는 Few-shot Prompting 


먼저 터미널에서 pip install 로 langchain, openai, faiss-cup 모듈을 설치합니다. 


! pip install -q langchain openai faiss-cpu


그리고, 실습에 필요한 모듈을 importing 하고, Chat Model로 ChatGPT-4를 사용할 것이므로 OnenAI API Key를 등록해줍니다. 


from langchain.embeddings import OpenAIEmbeddings
from langchain.prompts import FewShotPromptTemplate, PromptTemplate
from langchain.prompts.example_selector import SemanticSimilarityExampleSelector
from langchain.vectorstores import FAISS
#from langchain.llms import OpenAI
from langchain.chat_models import ChatOpenAI
from langchain_core.output_parsers import StrOutputParser

# set environment: OpenAI API Key
import os
os.environ["OPENAI_API_KEY"]="sk-xxxx..." # set with yours


(a) Few-shot Prompting에 사용할 몇 개의 예시를 작성합니다.


(b) 그리고 ChatPromptTemplate() 를 사용해서 ("human": "{input}"), ("ai", "{output}") 처럼 Human과 AI의 역할에 인풋과 아웃풋을 매핑해줍니다 (이 부분이 LLM Model과 Chat Model이 다른 부분임).


(c) 그 다음에 FewShotChatMessagePromptTemplate()에 앞서 정의해준 examples, example_prompt를 각 각 설정해줍니다.


(d) 마지막으로 ChatPromptTemplate.from_messages() 으로 앞에서 정의해준 예시와 Prompt 포맷을 다 조합해서 최종 Few-shot Prompt 를 작성해줍니다. 이때 "system"에게 페르소나를 지정해주는 것과 마지막에 "human"의 "input"이 추가되었습니다. 


# (a) Fixed Examples
# Define examples of creating antonyms
examples = [
    {"input": "happy", "output": "sad"}, 
    {"input": "tall", "output": "short"}, 
    {"input": "sunny", "output": "rainy"}, 
    {"input": "surprised", "output": "calm"}, 
    {"input": "dry", "output": "humid"}, 
    {"input": "hot", "output": "cold"}, 
    {"input": "satisfied", "output": "dissatisfied"}, 
]


# (b) A prompt template used to format each individual example.
example_prompt = ChatPromptTemplate.from_messages(
    [
        ("human", "{input}"), 
        ("ai", "{output}")
    ]
)

# (c) Assemble them into the few-shot prompt template
few_shot_prompt = FewShotChatMessagePromptTemplate(
    example_prompt = example_prompt, 
    examples = examples,
)

print(few_shot_prompt.format())
# Human: happy
# AI: sad
# Human: tall
# AI: short
# Human: sunny
# AI: rainy
# Human: surprised
# AI: calm
# Human: dry
# AI: humid
# Human: hot
# AI: cold
# Human: satisfied
# AI: dissatisfied


# (d) Finally, assemble the final prompt and use it with a model
final_prompt = ChatPromptTemplate.from_messages(
    [
        ("system", "You are a trustwordy AI assistant."), 
        few_shot_prompt, 
        ("human", "{input}")
    ]
)


앞에서 정의한 Few-shot Prompt와 Chat Model, 그리고 Output Parser를 '|'를 사용해서 Chaining 해줍니다. 


# Chat Model
model = ChatOpenAI(model="gpt-4")

# Output Parser
parser = StrOutputParser()

# Chaining
chain = final_prompt | model | parser


앞에서 정의한 chain을 invoke()를 사용해서 실행시켜줍니다. 

chain.invoke({"input": "excited"})  ==> 'bored'

chain.invoke({"input": "snowy"})  ==> 'sunny'

라고 답변하는걸 보니 Few-shot Prompting이 잘 작동하네요. 


## Run the chain

chain.invoke({"input": "excited"})
# 'bored'

chain.invoke({"input": "snowy"})
# 'sunny'


(2) Chat Model 에 사용자 인풋과 유사한 top k 개의 예시를 선별해서 주는 Dynamic Few-shot Prompting


LangChain은 여러개의 예시 중에서 몇 개의 예시만을 선별해서 Few-shot Prompting을 할 수 있도록 4가지 종류의 Example Selector를 제공합니다. 


[ LangChain: Example Selector Types ]

LangChain Example Selector Types


이중에서 인풋과 예시를 임베딩으로 변환한 후에, 각 임베딩 벡터간 코사인 유사도를 계산해서, 사용자의 인풋과 가장 유사한 k개의 예시를 선택해주는 Semantic Similarity Example Selector를 사용해보겠습니다. 임베팅 변환은 OpenAI의 OpenAIEmbeddings() 를 사용하였으며, 임베딩 벡터를 저장하고 유사도 검색을 하는 Vector DB는 FAISS를 사용하였습니다. 


FewShotChatMessagePromptTemplate() 에 (예제 대신에) Example Selector를 설정해주고, ChatPromptTemplate.from_messages()에 "human"과 "ai"의 메시지 포맷을 설정해줍니다. 그리고 인풋으로 받는 변수 input_variables=["input"] 을 설정해주면 됩니다. 


# Select examples based on similarity to the inputs 
# by finding the examples with the embeddings that have the greatest cosine similarity with the inputs.
example_selector = SemanticSimilarityExampleSelector.from_examples(
    # the list of examples available to select from.
    examples, 
    # The embedding class used to produce embeddings which are used to measure semantic similarity.
    OpenAIEmbeddings(), 
    # The VectorStore class used to store the embeddings and do a similarity search over.
    FAISS, 
    # the number of examples to produce.
    k=2,
)


similar_prompt = FewShotChatMessagePromptTemplate(
    # we provide an ExampleSelector instead of examples.
    example_selector=example_selector, 
    # Define how each example will be formatted. 
    example_prompt=ChatPromptTemplate.from_messages(
        [("human", "{input}"), ("ai", "{output}")]
    ), 
    input_variables=["input"]
)


k=2 로서 사용자 인풋과 가장 유사한(즉, 인풋과 예제 임베딩 간 코사인 유사도가 가장 큰) 2개의 예제를 Example Selector를 사용해 선별해보겠습니다. 


"excited"를 인풋으로 넣었더니 감정에 해당하는 예제 2개를 잘 선택했습니다. 

"snowy"를 인풋으로 넣엏더니 날씨에 해당하는 예제 2개를 잘 선택했습니다. ^^b


# "excited" is a Feeling, k=2
example_selector.select_examples({"input": "excited"})
# [{'input': 'surprised', 'output': 'calm'}, {'input': 'happy', 'output': 'sad'}]


# "snowy" is a Weather, k=2
example_selector.select_examples({"input": "snowy"})
# [{'input': 'sunny', 'output': 'rainy'}, {'input': 'hot', 'output': 'cold'}]


ChatPromptTemplate.from_messages() 로 "system"의 페르소나를 지정해주고, 앞에서 Example Selector를 사용한 Few-shot Prompt 와 "human"의 "input" 까지 조합해주면 최종 프롬프트가 완성됩니다. 


# Assemble the final prompt template
final_prompt = ChatPromptTemplate.from_messages(
    [
        ("system", "You are a trustwordy AI assistant."),
        similar_prompt, 
        ("human", "{input}"),
    ]
)


print(final_prompt.format(input="excited"))
# System: You are a trustwordy AI assistant.
# Human: surprised
# AI: calm
# Human: happy
# AI: sad
# Human: excited


final_prompt, Chat Model, 그리고 Output Parser를 '|'를 사용해서 Chaining 해줍니다. 


마지막으로 invoke()를 써서 chat_chain을 실행시켜주면 됩니다. 


chat_chain.invoke({"input": "excited"}) ==> "relaxed"

chat_chain.invoke({"input": "snowy"}) ==> "clear"


라고 몇 개의 예제를 통해 과제에 대한 정보를 주었더니 Chat Model이 잘 이해해서 답변을 정확하게 생성했네요. 


# Chaining
chat_chain = final_prompt | model | parser

# Run the chain
chat_chain.invoke({"input": "excited"})
# 'relaxed'

chat_chain.invoke({"input": "snowy"})
# 'clear'


[ Reference ]

- LangChain - Few-shot examples for chat models: 
https://python.langchain.com/docs/modules/model_io/prompts/few_shot_examples_chat

- LangChain - Example Selector Types:

https://python.langchain.com/docs/modules/model_io/prompts/example_selector_types/


이번 포스팅이 많은 도움이 되었기를 바랍니다. 

행복한 데이터 과학자 되세요!  :-)


728x90
반응형
Posted by Rfriend
,

ChatGPT와 같은 LLM 모델을 이용한 질의응답 시에 제약조건으로 지식단절(Knowledge Cutoff)이 있습니다. 

지식단절 (Knowledge Cutoff)이란 LLM 모델이 학습에 사용한 데이터가 생성된 시점 이후의 새로운 사건, 정보에 대해서는 학습이 안되어서 답변 생성이 불가능한 것을 말합니다. 


지식단절의 한계를 극복하는 방법으로 최신의 데이터를 계속 수집해서 자주 LLM 모델을 Fine-tuning 해주는 방법이 있습니다. 하지만 이는 비용과 시간이 많이 듭니다. 


지식단절의 한계를 극복하는 또 다른 방법으로는 웹 검색 툴을 추가하여, 사용자의 질문에 해당하는 최신의 공개된 정보를 웹 검색을 통해 가져와서, 이 최신 공개 정보를 컨텍스트 정보로 하여 LLM 모델이 답변을 생성하도록 할 수 있습니다. 이는 앞서 말한 Fine-tuning 기법 대비 상대적으로 비용과 시간이 적게 들고 바로 적용해볼 수 있는 장점이 있습니다. 


이번 포스팅에서는 LangChain 을 이용하여 DuckDuckGo Web Search Tool을 추가해 사용자 질의에 해당하는 최신 정보를 검색하고, ChatGPT LLM 모델이 이를 컨텍스트 정보로 삼아 답변을 생성하는 방법을 소개하겠습니다. 

LangChain에서는 Google Search, Bing Search, DuckDuckGo Search 웹 검색 툴을 제공합니다. Google 과 Bing search를 사용하려면 API 서비스 등록을 하고 API Key를 받아서 사용해야 합니다. 


[ 웹 검색 툴로 최신 정보를 검색하여 컨텍스트 정보로 참고하여 답변 생성하기 ]

LangChain - adding Web Search Tools, Google, Bing, DuckDuckGo


먼저 터미널에서 pip install 을 사용해 langchain, openai, black, python-lsp-black, duckduckgo-search 모듈을 설치합니다. 


! pip install -q langchain openai black>=22.3 python-lsp-black duckduckgo-search


실습에 필요한 모듈을 importing 합니다. 


from langchain.chat_models import ChatOpenAI
from langchain.prompts import ChatPromptTemplate
from langchain_core.output_parsers import StrOutputParser
from langchain_core.runnables import RunnablePassthrough


OpenAI API Key를 환경변수로 등록해줍니다. 


import os

os.environ["OPENAI_API_KEY"] = "sk-xxxx..." # set with yours


(1) Web Search Tool을 사용하지 않았을 때의 지식 단절 (Knowledge Cutoff)


먼저, Web Search Tool을 사용하지 않고 ChatGPT LLM 모델만을 가지고 최신 정보가 필요한 질문을 했을 때 지식 단절로 인해 적절한 답변을 못하는 현상을 살펴보겠습니다. 


template = """You are an AI assistant. Answer the question.
If you don't know the answer, just say you don't know.

Question: {question}
Answer:"""

prompt = ChatPromptTemplate.from_template(template)
model = ChatOpenAI(model="gpt-4")
parser = StrOutputParser()

chain = prompt | model | parser


아래처럼 "누가 BTS 멤버 중에 가장 늦게 군대에 갔나요?" 라고 질문을 했을 때 ChatGPT-4 모델이 최신의 실시간 데이터를 제공할 수 없다고 답변합니다. (가상의 그럴싸한 거짓말을 하는 환각(Hallucinations) 현상을 일으키지 않아서 그나마 다행이예요.)


## -- 지식 단절 (Knowledge Cutoff)
chain.invoke({"question": "Which BTS member was the last to go to the military?"})

# "As an AI developed up to October 2021, I can't provide real-time data. 
# As of my last update, none of the BTS members have begun their military service yet. 
# In South Korea, all able-bodied men are required to serve in the military 
# for approximately two years. Please check the most recent sources for this information."


(2) Web Search Tool을 사용하여 최신 정보를 검색해 지식 단절 (Knowledge Cutoff) 극복하기


이번에는 DuckDuckGo Search Tool을 추가해서 최신 정보를 웹에서 검색해 가지고 와서, 이를 컨텍스트 정보로 하여 답변을 생성해보도록 하겠습니다. 


## Adding Web Search Tools
from langchain.tools import DuckDuckGoSearchRun

search = DuckDuckGoSearchRun()

## Provide "the latest context information" from web search
template = """Answer the question based on context.

Question: {question}
Context: {context}
Answer:"""

prompt = ChatPromptTemplate.from_template(template)
model = ChatOpenAI(model="gpt-4")
parser = StrOutputParser()

chain = (
    {"question": RunnablePassthrough(), "context": RunnablePassthrough()}
    | prompt 
    | model 
    | parser
)


먼저, DuckDuckGo Search tool 이 잘 작동하나 살펴보겠습니다. 


search_result = search.run("Which BTS member was the last to go to the military?")

print(search_result)

# The last two members, Jimin and Jungkook, began their 18-month military duty 
# in South Korea on Tuesday. Some fans say they should have been exempt. 24 BTS in 2019. 
# Any potential reunion... South Korea Final Members of K-Pop Band BTS Begin Mandatory 
# South Korean Military Service This video cannot be played because of a technical error. 
# (Error Code: 102006) By Kim Tong-hyung / AP... Updated Dec 15, 2023, 11:01 AM 
# SGT SEOUL - South Korean singers Jimin and Jungkook of K-pop boy band BTS 
# began their mandatory military service on Dec 12. They are the last of the... 
# Last October, BTS's agency BigHit Music owned by HYBE, confirmed that all seven members 
# of the band would fulfil their country's military obligation, starting with the eldest, 
# Jin, who... BTS formed in 2013 with seven members: RM, Jin, V, J-Hope, Suga, 
# Jimin and Jungkook. The band went on to achieve global fame, 
# with number one singles in more than 100 countries around the...


다음으로, DuckDuckGo 웹 검색 결과를 컨텍스트로 하여 답변을 생성해보겠습니다. 

2024년 1월을 기준으로 했을 때, BTS 멤버 중에 가장 늦게 군대에 간 멤버가 "지민과 정국 (Jimin and Jungkook)" 이라고 이번에는 정확하게 답변을 해주네요! 


question = "Which BTS member was the last to go to the military?"

chain.invoke({"question": question, "context": search.run(question)})
# 'Jimin and Jungkook'


[ Reference ]

- LangChain - Using Tools: https://python.langchain.com/docs/expression_language/cookbook/tools

- Google Search: https://python.langchain.com/docs/integrations/tools/google_search

- Bing Search: https://python.langchain.com/docs/integrations/tools/bing_search

- DuckDuckGoSearch: https://python.langchain.com/docs/integrations/tools/ddg


이번 포스팅이 많은 도움이 되었기를 바랍니다. 

행복한 데이터 과학자 되세요!  :-)


728x90
반응형
Posted by Rfriend
,