텍스트 분석을 할 때 제일 처음 하는 일이 문서, 텍스트를 분석에 적합한 형태로 전처리 하는 일입니다. 

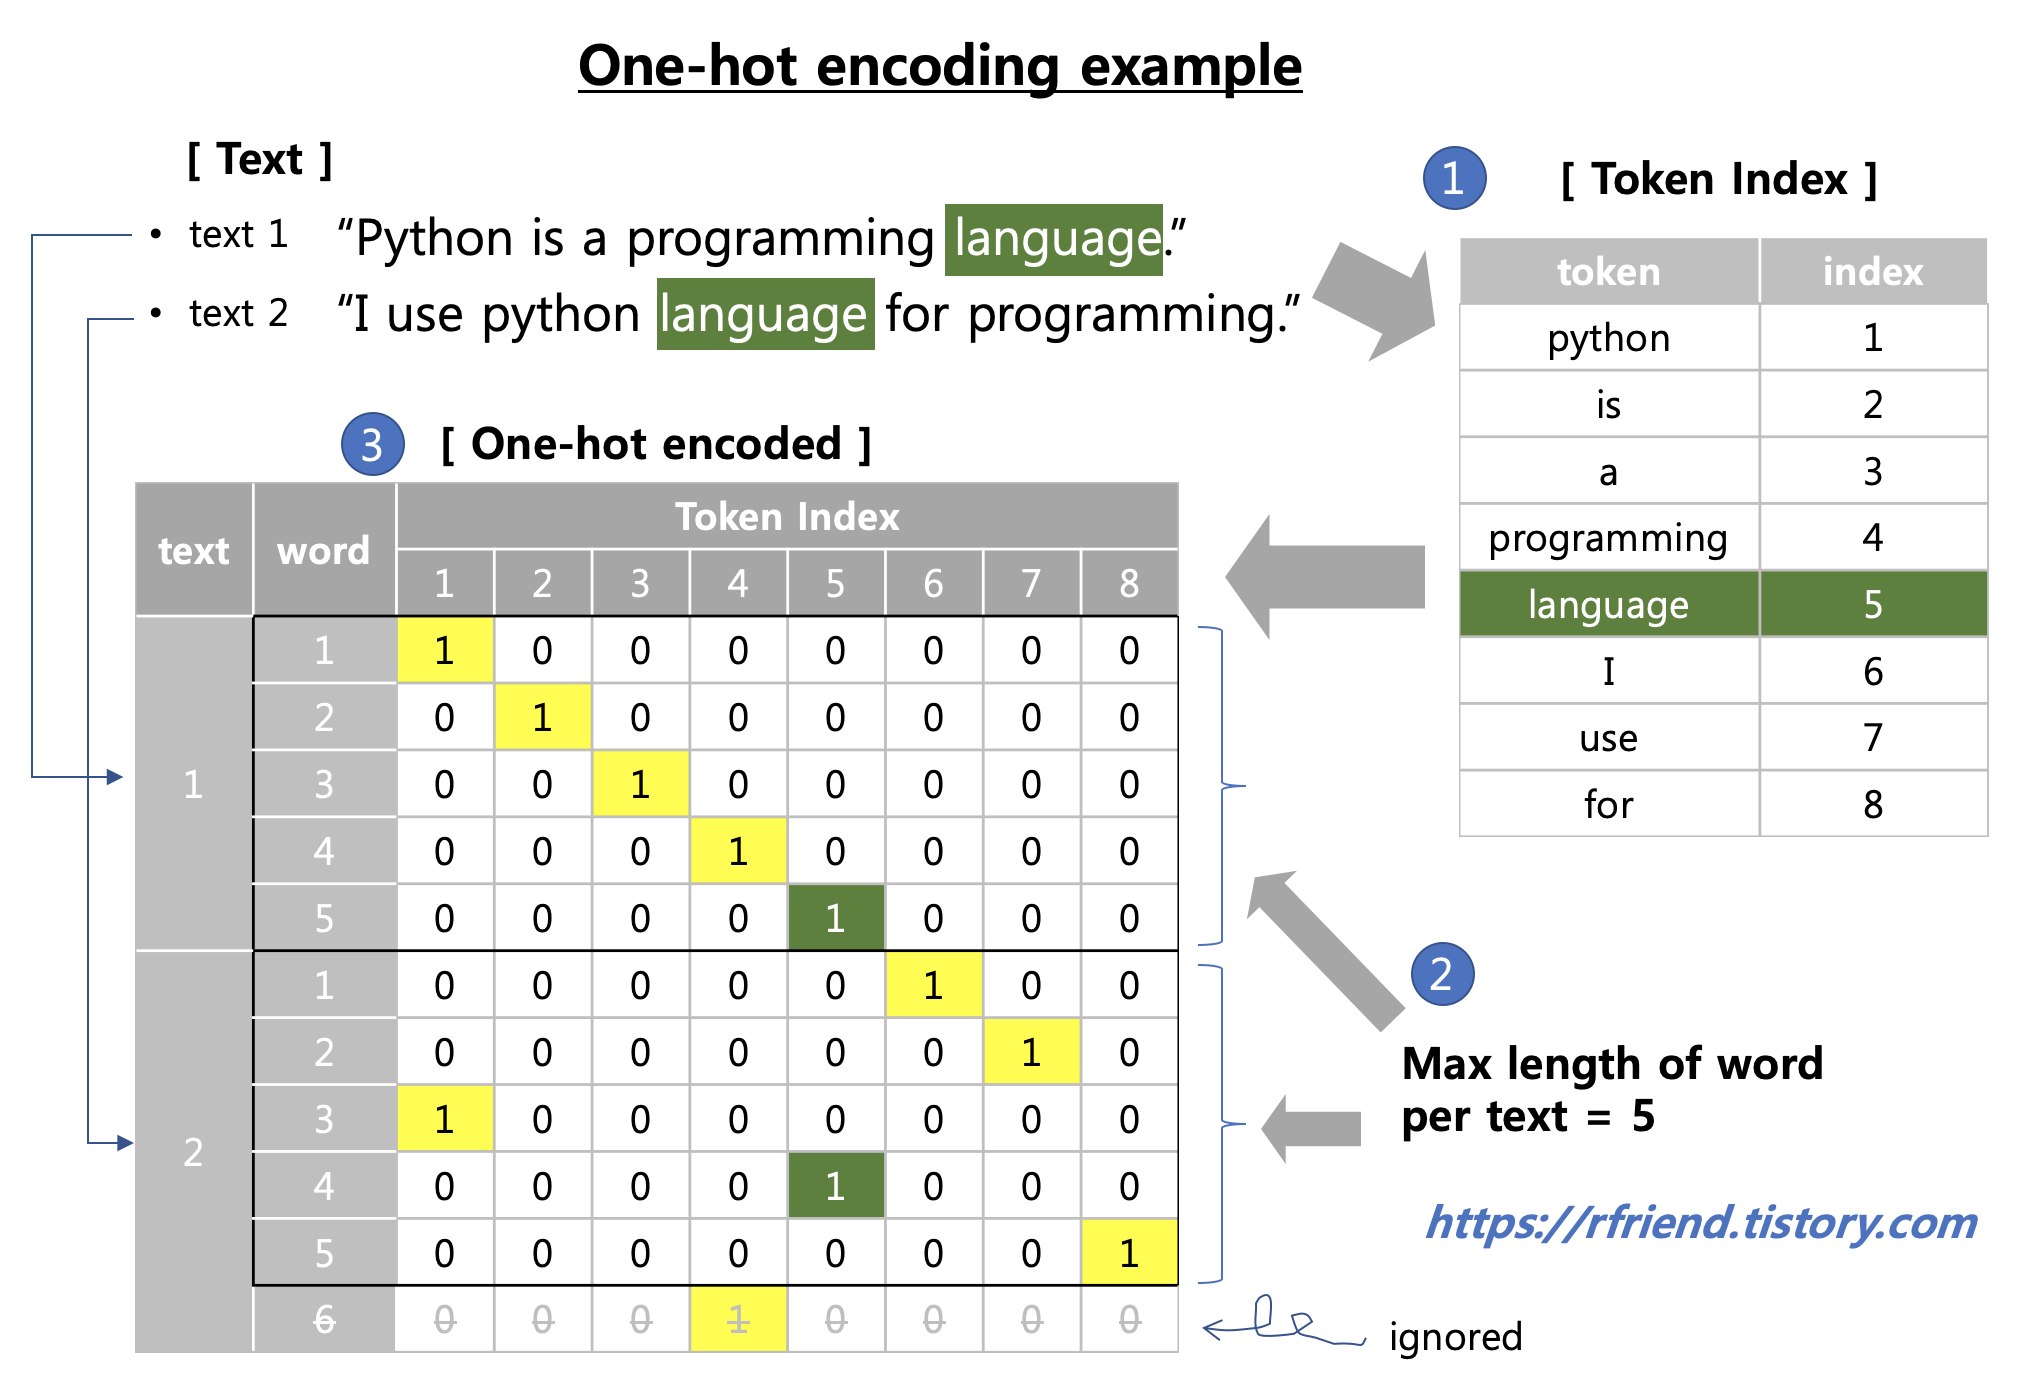
이번 포스팅에서는 (1) 텍스트 데이터를 Python의 string methods 를 이용하여 단어 단위로 파싱(parsing text at word-level) 한 후에, 단어별 index를 만들고, (2) 텍스트를 단어 단위로 one-hot encoding 을 해보겠습니다. 

one-hot encoding of text at a word-level


1. 텍스트 데이터를 Python string methods를 사용하여 단어 단위로 파싱하고,  단어별 token index 만들기

예제로 사용할 텍스트는 Wikipedia 에서 검색한 Python 영문 소개자료 입니다. 

python_wikipedia.txt
0.00MB

# import modules
import numpy as np
import os

# set directory
base_dir = '/Users/ihongdon/Documents/Python/dataset'
file_name = 'python_wikipedia.txt'
path = os.path.join(base_dir, file_name)

# open file and print it as an example
file_opened = open(path)
for line in file_opened.readlines():
    print(line)

Python programming language, from wikipedia


Python is an interpreted, high-level, general-purpose programming language. Created by Guido van Rossum and first released in 1991, Python's design philosophy emphasizes code readability with its notable use of significant whitespace. Its language constructs and object-oriented approach aims to help programmers write clear, logical code for small and large-scale projects.[26]


Python is dynamically typed and garbage-collected. It supports multiple programming paradigms, including procedural, object-oriented, and functional programming. Python is often described as a "batteries included" language due to its comprehensive standard library.[27]


Python was conceived in the late 1980s as a successor to the ABC language. Python 2.0, released 2000, introduced features like list comprehensions and a garbage collection system capable of collecting reference cycles. Python 3.0, released 2008, was a major revision of the language that is not completely backward-compatible, and much Python 2 code does not run unmodified on Python 3. Due to concern about the amount of code written for Python 2, support for Python 2.7 (the last release in the 2.x series) was extended to 2020. Language developer Guido van Rossum shouldered sole responsibility for the project until July 2018 but now shares his leadership as a member of a five-person steering council.[28][29][30]


Python interpreters are available for many operating systems. A global community of programmers develops and maintains CPython, an open source[31] reference implementation. A non-profit organization, the Python Software Foundation, manages and directs resources for Python and CPython development.


아래는 Python string method를 사용해서 텍스트에서 단어를 파싱하고 전처리할 수 있는 사용자 정의 함수 예시입니다. 가령, 대문자를 소문자로 바꾸기, stop words 제거하기, 기호 제거하기, 숫자 제거하기 등을 차례대로 적용할 수 있는 기본적인 예시입니다. (이 역시 텍스트 분석용 Python module 에 잘 정의된 함수들 사용하면 되긴 합니다. ^^;) 

# UDF of word preprocessing
def word_preprocess(word):
    # lower case
    word = word.lower()
        
    # remove stop-words
    stop_words = ['a', 'an', 'the', 'in', 'with', 'to', 'for', 'from', 'of', 'at', 'on',
                  'until', 'by', 'and', 'but', 'is', 'are', 'was', 'were', 'it', 'that', 'this', 
                  'my', 'his', 'her', 'our', 'as', 'not'] # make your own list
    for stop_word in stop_words:
        if word != stop_word:
            word = word
        else:
            word = ''
    
    # remove symbols such as comma, period, etc.
    symbols = [',', '.', ':', '-', '+', '/', '*', '&', '%', '[', ']', '(', ')'] # make your own list
    for symbol in symbols:
        word = word.replace(symbol, '')
    
    # remove numbers
    if word.isnumeric():
        word = ''
    
    return word


다음으로, python_wikipedia.txt 파일을 열어서(open) 각 줄 단위로 읽고(readlines), 좌우 공백을 제거(strip)한 후에, 단어 단위로 분할(split) 하여, 위에서 정의한 word_preprocess() 사용자 정의 함수를 적용하여 전처리를 한 후, token_idx 사전에 단어를 Key로, Index를 Value로 저장합니다. 

# blank dictionary to store
token_idx = {}

# opening the file
file_opened = open(path)

# catching words and storing the index at token_idx dictionary
for line in file_opened.readlines():
    # strip leading and trailing edge spaces
    line = line.strip()
        
    # split the line into word with a space delimiter
    for word in line.split():
        
        word = word_preprocess(word) # UDF defined above
        
        # put word into token_index
        if word not in token_idx:
            if word != '':
                token_idx[word] = len(token_idx) + 1


단어를 Key, Index를 Value로 해서 생성된 token_idx Dictionary는 아래와 같습니다. 

token_idx
{'"batteries': 48,
 '1980s': 56,
 '2x': 87,
 'abc': 58,
 'about': 80,
 'aims': 28,
 'amount': 81,
 'approach': 27,
 'available': 104,
 'backwardcompatible': 74,
 'capable': 67,
 'clear': 32,
 'code': 18,
 
 .... 중간 생략 ....
 
 'successor': 57,
 'support': 83,
 'supports': 40,
 'system': 66,
 'systems': 107,
 'the': 84,
 'typed': 38,
 'unmodified': 78,
 'use': 22,
 'van': 10,
 'whitespace': 24,
 'wikipedia': 4,
 'write': 31,
 'written': 82}


token_idx.values()
dict_values([104, 96, 102, 112, 68, 111, 21, 18, 8, 15, 20, 47, 37, 16, 74, 89, 57, 117, 19, 93, 83, 76, 91, 43, 30, 32, 54, 33, 35, 98, 64, 80, 17, 34, 10, 61, 50, 46, 49, 23, 72, 67, 119, 95, 14, 3, 116, 81, 85, 1, 99, 51, 77, 38, 90, 118, 120, 100, 101, 9, 39, 12, 123, 84, 122, 69, 26, 115, 88, 13, 36, 60, 5, 6, 75, 103, 66, 94, 78, 97, 121, 55, 108, 109, 58, 4, 82, 41, 79, 87, 29, 106, 114, 113, 105, 73, 45, 71, 24, 2, 53, 31, 86, 11, 22, 42, 59, 7, 110, 40, 56, 70, 92, 28, 27, 48, 62, 44, 107, 65, 25, 52, 63])


총 123개의 단어가 있으며, 이 중에서 'python'이라는 단어는 token_idx에 '1' 번으로 등록이 되어있습니다. 

max(token_idx.values())
123
token_idx.get('python')
1


2. 텍스트를 단어 단위로 One-hot encoding 하기

하나의 텍스트 문장에서 고려할 단어의 최대 개수로 max_len = 40 을 설정하였습니다. (한 문장에서 41번째 부터 나오는 단어는 무시함). 그리고 One-hot encoding 한 결과를 저장할 빈 one_hot_encoded 다차원 배열을 np.zeros() 로 만들어두었습니다. 

# consider only the first max_length words in texts            
max_len = 40

# array to store the one_hot_encoded results
file_opened = open(path)

one_hot_encoded = np.zeros(shape=(len(file_opened.readlines()), 
                                  max_len, 
                                  max(token_idx.values())+1))


one_hot_encoded 는 (5, 40, 124) 의 다차원 배열입니다. 5개의 텍스트 문장으로 되어 있고, 40개의 최대 단어 길이(max_len) 만을 고려하며, 총 124개의 token index 에 대해서 해당 단어가 있으면 '1', 없으면 '0'으로 one-hot encoding을 하게 된다는 뜻입니다. 

one_hot_encoded.shape
(5, 40, 124)


아래는 파일을 열고 텍스트를 줄 별로 읽어 들인 후에, for loop 을 돌면서 각 줄에서 단어를 분할하고 전처리하여, token_idx.get(word) 를 사용해서 해당 단어(word)의 token index를 가져온 후, 해당 텍스트(i), 단어(j), token index(idx)에 '1'을 입력하여 one_hot_encoded 다차원 배열을 업데이트 합니다. 

file_opened = open(path)
for i, line in enumerate(file_opened.readlines()):
    # strip leading and trailing edge spaces
    line = line.strip()
    
    for j, word in list(enumerate(line.split()))[:max_len]:
        
        # preprocess the word
        word = word_preprocess(word)
        
        # put word into token_index
        if word != '':
            idx = token_idx.get(word)
            one_hot_encoded[i, j, idx] = 1.


이렇게 생성한 one_hot_encoded 다차원배열의 결과는 아래와 같습니다. 

one_hot_encoded
array([[[0., 1., 0., ..., 0., 0., 0.],
        [0., 0., 1., ..., 0., 0., 0.],
        [0., 0., 0., ..., 0., 0., 0.],
        ...,
        [0., 0., 0., ..., 0., 0., 0.],
        [0., 0., 0., ..., 0., 0., 0.],
        [0., 0., 0., ..., 0., 0., 0.]],

       [[0., 1., 0., ..., 0., 0., 0.],
        [0., 0., 0., ..., 0., 0., 0.],
        [0., 0., 0., ..., 0., 0., 0.],
        ...,
        [0., 0., 0., ..., 0., 0., 0.],
        [0., 0., 0., ..., 0., 0., 0.],
        [0., 0., 0., ..., 0., 0., 0.]],

       [[0., 1., 0., ..., 0., 0., 0.],
        [0., 0., 0., ..., 0., 0., 0.],
        [0., 0., 0., ..., 0., 0., 0.],
        ...,
        [0., 0., 0., ..., 0., 0., 0.],
        [0., 0., 0., ..., 0., 0., 0.],
        [0., 0., 0., ..., 0., 0., 0.]],

       [[0., 1., 0., ..., 0., 0., 0.],
        [0., 0., 0., ..., 0., 0., 0.],
        [0., 0., 0., ..., 0., 0., 0.],
        ...,
        [0., 0., 0., ..., 0., 0., 0.],
        [0., 0., 0., ..., 0., 0., 0.],
        [0., 0., 0., ..., 0., 0., 0.]],

       [[0., 1., 0., ..., 0., 0., 0.],
        [0., 0., 0., ..., 0., 0., 0.],
        [0., 0., 0., ..., 0., 0., 0.],
        ...,
        [0., 0., 0., ..., 0., 0., 1.],
        [0., 0., 0., ..., 0., 0., 0.],
        [0., 0., 0., ..., 0., 0., 0.]]])
type(one_hot_encoded)
numpy.ndarray


이해를 돕기 위하여 python_wikipedia.txt 파일의 첫번째 줄의, 앞에서 부터 40개 단어까지의 단어 중에서, token_idx 의 1번~10번 까지만 one-hot encoding이 어떻게 되었나를 단어와 token_idx 까지 설명을 추가하여 프린트해보았습니다. (말로 설명하려니 어렵네요. ㅜ_ㅜ) 

# sort token_idx dictionary by value
import operator
sorted_token_idx = sorted(token_idx.items(), key=operator.itemgetter(1))

# print out 10 words & token_idx of 1st text's 40 words as an example
for i in range(10):
    print('word & token_idx:', sorted_token_idx[i])
    print(one_hot_encoded[0, :, i+1])
word & token_idx: ('python', 1)
[1. 0. 0. 0. 0. 0. 0. 0. 0. 0. 0. 0. 0. 0. 0. 0. 0. 0. 0. 0. 0. 0. 0. 0.
 0. 0. 0. 0. 0. 0. 0. 0. 0. 0. 0. 0. 0. 0. 0. 0.]
word & token_idx: ('programming', 2)
[0. 1. 0. 0. 0. 0. 0. 0. 0. 0. 0. 0. 0. 0. 0. 0. 0. 0. 0. 0. 0. 0. 0. 0.
 0. 0. 0. 0. 0. 0. 0. 0. 0. 0. 0. 0. 0. 0. 0. 0.]
word & token_idx: ('language', 3)
[0. 0. 1. 0. 0. 0. 0. 0. 0. 0. 0. 0. 0. 0. 0. 0. 0. 0. 0. 0. 0. 0. 0. 0.
 0. 0. 0. 0. 0. 0. 0. 0. 0. 0. 0. 0. 0. 0. 0. 0.]
word & token_idx: ('wikipedia', 4)
[0. 0. 0. 0. 1. 0. 0. 0. 0. 0. 0. 0. 0. 0. 0. 0. 0. 0. 0. 0. 0. 0. 0. 0.
 0. 0. 0. 0. 0. 0. 0. 0. 0. 0. 0. 0. 0. 0. 0. 0.]
word & token_idx: ('interpreted', 5)
[0. 0. 0. 0. 0. 0. 0. 0. 0. 0. 0. 0. 0. 0. 0. 0. 0. 0. 0. 0. 0. 0. 0. 0.
 0. 0. 0. 0. 0. 0. 0. 0. 0. 0. 0. 0. 0. 0. 0. 0.]
word & token_idx: ('highlevel', 6)
[0. 0. 0. 0. 0. 0. 0. 0. 0. 0. 0. 0. 0. 0. 0. 0. 0. 0. 0. 0. 0. 0. 0. 0.
 0. 0. 0. 0. 0. 0. 0. 0. 0. 0. 0. 0. 0. 0. 0. 0.]
word & token_idx: ('generalpurpose', 7)
[0. 0. 0. 0. 0. 0. 0. 0. 0. 0. 0. 0. 0. 0. 0. 0. 0. 0. 0. 0. 0. 0. 0. 0.
 0. 0. 0. 0. 0. 0. 0. 0. 0. 0. 0. 0. 0. 0. 0. 0.]
word & token_idx: ('created', 8)
[0. 0. 0. 0. 0. 0. 0. 0. 0. 0. 0. 0. 0. 0. 0. 0. 0. 0. 0. 0. 0. 0. 0. 0.
 0. 0. 0. 0. 0. 0. 0. 0. 0. 0. 0. 0. 0. 0. 0. 0.]
word & token_idx: ('guido', 9)
[0. 0. 0. 0. 0. 0. 0. 0. 0. 0. 0. 0. 0. 0. 0. 0. 0. 0. 0. 0. 0. 0. 0. 0.
 0. 0. 0. 0. 0. 0. 0. 0. 0. 0. 0. 0. 0. 0. 0. 0.]
word & token_idx: ('van', 10)
[0. 0. 0. 0. 0. 0. 0. 0. 0. 0. 0. 0. 0. 0. 0. 0. 0. 0. 0. 0. 0. 0. 0. 0.
 0. 0. 0. 0. 0. 0. 0. 0. 0. 0. 0. 0. 0. 0. 0. 0.]


많은 도움이 되었기를 바랍니다. 


728x90
반응형
Posted by Rfriend
,

지난번 포스팅에서는 파이썬의 자료 유형인 

 - 숫자(Number), 

 - 문자열(String), 

 - 리스트(List), 

 - 튜플(Tuple), 

 - 사전(Dictionary) 


중에서 먼저 숫자(Number)와 문자열(String)의 기본 사용법을 소개하였습니다. 


이번 포스팅에서는 지난 포스팅에 이어서 문자열에 특화되어 문자열 자료형을 다양하게 처리할 수 있는 함수인 문자열 메소드(String Methods) 에 대해서 알아보겠습니다. 


문자열 메소드를 숙지하고 있으면 동일한 목적의 문자열 전처리를 위해 직접 프로그래밍을 하는 것보다 문자열 메소드를 사용한 1~2줄의 코드면 해결되므로 업무 효율도 오르고, for loop 문을 쓰는 것보다 속도도 훨씬 빠릅니다. 


[참고]  메소드 (Method)


내장 함수(Built-in Function)와는 달리 문자열 자료형과 같이 특정 자료형이 가지고 있는 함수를 메소드(Method) 라고 합니다. 메소드는 객체 지향 프로그래밍의 기능에 대응하는 파이썬 용어입니다. 함수와 거의 동일한 의미이지만 메소드는 클래스의 멤버라는 점이 다릅니다. 


평소에 공부해놓고 '아, 문자열 메소드에 이런 기능이 있었지!' 정도는 기억해놓고 있어야 바로 찾아서 쓰기 쉽겠지요? 아래에 문자열 메소드들을 기능에 따라서 그룹핑을 해보았는데요, 저의 경우 len(), find(), lower(), upper(), lstrip(), rstrip(), split(), splitlines(), replace(), join(), zfill() 등을 종종 사용하는 편이네요. 


[ 파이썬 문자열 메소드 (String Methods in Python) ]


이번 포스팅은 https://www.tutorialspoint.com/python/python_strings.htm  사이트에 있는 영문 소개자료를 참고하여 작성하였습니다. 문자열 메소드의 기능 설명만 되어 있어서 좀더 이해하기 쉽도록 예제를 추가로 만들어보았습니다. 

expandtabs(), maketrans() 등 일부 메소드는 제가 써본적도 없고 앞으로 거의 쓸 일이 없을 것 같아서 주관적으로 판단해서 몇 개 빼고 소개하는 것도 있습니다. 


하나씩 예을 들어 살펴보겠습니다. 


1. 문자열 계산 관련 메소드 (String methods based on calculation)


len() : 문자열 길이


# len() : Returns the length of the string

>>> a = 'I Love Python'

>>> len(a)

13


 min(), max() : 문자열 내 문자, 혹은 숫자의 최소값, 최대값 (알파벳 순서, 숫자 순서 기반)


# max(str), min(str) : Returns the max, min alphabetical character from the string str

>>> d = 'abc'

>>> f = '123'

>>> 

>>> min(d)

'a'

>>> max(d)

'c'

>>> 

>>> min(f)

'1'

>>> max(f)

'3'


 count() :  문자열 안에서 매개변수로 입력한 문자열이 몇 개 들어있는지 개수를 셈 

                (begin, end 위치 설정 가능)


# count() : Counts how many times str occurs in string

>>> a = 'I Love Python'

>>> a.count('o')

2

>>> 

>>> a = 'I Love Python'

>>> a.count('o', 7, len(a)) # count(string, begin, end)

1

>>> 

>>> a.count('k') # there is no 'k' character in 'a' string

0


2. 문자열에 특정 문자 들어있는지 여부, 어디에 위치하고 있는지 찾아주는 메소드


  startswith() : 문자열이 매개변수로 입력한 문자열로 시작하면 True, 그렇지 않으면 False 반환


# startswith(): Determines if string or a substring of string

>>> a = 'I Love Python'

>>> a.startswith('I')

True

>>> a.startswith('I Lo')

True

>>> a.startswith('U')

False


  endswith() : 문자열이 매개변수로 입력한 문자열로 끝나면 True, 그렇지 않으면 False 반환


# endswith(): Determines if string or a substring of string

>>> a = 'I Love Python'

>>> a.endswith('Python')

True

>>> a.endswith('Pycham')

False


 find() : 문자열에 매개변수로 입력한 문자열이 있는지를 앞에서 부터 찾아 index 반환, 없으면 '-1' 반환


# find() : Search forwards, Determine if str occurs in string and return the index

>>> a = 'I Love Python'

>>> a.find('o')

3

>>> a.find('k') # if there is no string, then '-1'

-1


  rfind() : 문자열에 매개변수로 입력한 문자열이 있는지를 뒤에서 부터 찾아 index 반환, 없으면 '-1' 반환


# rfind() : Same as find(), but search backwards in string

>>> a = 'I Love Python'

>>> a.rfind('o')

11


 index() :  find()와 기능 동일하나, 매개변수로 입력한 문자열이 없으면 ValueError 발생


# index(): Same as find(), but raises an exception if str not found

>>> a = 'I Love Python'

>>> a.index('o')

3

>>> a.index('k') # ValueError: substring not found

Traceback (most recent call last):

  File "<stdin>", line 1, in <module>

ValueError: substring not found


 rindex() : index()와 기능 동일하나, 뒤에서 부터 매개변수의 문자열이 있는지를 찾음


# rindex(): Same as index(), but search backwards in string

>>> a = 'I Love Python'

>>> a.rindex('o')

11

>>> a.rindex('k') # ValueError: substring not found

Traceback (most recent call last):

  File "<stdin>", line 1, in <module>

ValueError: substring not found


3. 숫자, 문자 포함 여부 확인하는 메소드


  isalnum() : 문자열이 알파벳과 숫자로만 이루어졌으면 True, 그렇지 않으면 False


>>> a = 'I Love Python'

>>> d = 'abc'

>>> e = '123abc'

>>> f = '123'

>>> 

# isalnum() : Returns true if string has at least 1 character and 

#                  all characters are alphanumeric and false otherwise

>>> a.isalnum() # False

False

>>> d.isalnum() # True

True

>>> e.isalnum() # True

True

>>> f.isalnum() # True

True


  isalpha() : 문자열이 알파벳(영어, 한글 등)으로만 이루어졌으면 True, 그렇지 않으면 False


>>> a = 'I Love Python'

>>> d = 'abc'

>>> e = '123abc'

>>> f = '123'

>>> 

# isalpha() : Returns true if string has at least 1 character 

#                 and all characters are alphabetic and false otherwise

>>> a.isalpha() # False (there is space between characters)

False

>>> d.isalpha() # True

True

>>> e.isalpha() # False

False

>>> f.isalpha() # False

False


  isdigit() : 문자열이 숫자만 포함하고 있으면 True, 그렇지 않으면 False, isnumeric()과 동일


>>> a = 'I Love Python'

>>> d = 'abc'

>>> e = '123abc'

>>> f = '123'

>>> 

# isdigit() : Returns true if string contains only digits and false otherwise

>>> a.isdigit() # False 

False

>>> d.isdigit() # False

False

>>> e.isdigit() # False

False

>>> f.isdigit() # True

True


  isnumeric() : 문자열이 숫자로만 이루어져 있으면 True, 그렇지 않으면 False, isdigit()과 동일


>>> a = 'I Love Python'

>>> d = 'abc'

>>> e = '123abc'

>>> f = '123'

>>> 

# isnumeric(): Returns true if a unicode string contains only numeric characters

>>> a.isnumeric() # False

False

>>> d.isnumeric() # False

False

>>> e.isnumeric() # False

False

>>> f.isnumeric() # True

True


  isdecimal() : 문자열이 10진수 문자이면 True, 그렇지 않으면 False


>> a = 'I Love Python'

>>> d = 'abc'

>>> e = '123abc'

>>> f = '123'

>>> 

# isdecimal(): Returns true if a unicode string contains only decimal characters

>>> a.isdecimal() # False

False

>>> d.isdecimal() # False

False

>>> e.isdecimal() # False

False

>>> f.isdecimal() # True 

True


4. 대문자, 소문자 여부 확인하고 변환해주는 문자열 메소드


  islower() : 문자열이 모두 소문자로만 되어있으면 True, 그렇지 않으면 False


>>> a = 'I Love Python'

>>> g = 'i love python'

>>> h = 'I LOVE PYTHON'

>>> 

# islower(): Returns true if string has at least 1 cased character 

#            and all cased characters are in lowercase and false otherwise

>>> a.islower() # False

False

>>> g.islower() # True

True

>>> h.islower() # False

False


  isupper() : 문자열이 모두 대문자로만 되어있으면 True, 그렇지 않으면 False


>>> a = 'I Love Python'

>>> g = 'i love python'

>>> h = 'I LOVE PYTHON'

>>> 

# isupper(): Returns true if string has at least one cased character 

#           and all cased characters are in uppercase and false otherwise

>>> a.isupper() # False

False

>>> g.isupper() # False

False

>>> h.isupper() # True

True


  lower() : 문자열 내 모든 대문자를 모두 소문자(a lowercase letter)로 변환


>>> a = 'I Love Python'

>>> 

# lower(): Converts all uppercase letters in string to lowercase

>>> a.lower()

'i love python'


 upper() :  문자열 내 모든 소문자를 모두 대문자(a uppercase letter)로 변환


>>> a = 'I Love Python'

>>> 

# upper(): Converts lowercase letters in string to uppercase

>>> a.upper()

'I LOVE PYTHON'


 swapcase() : 문자열 내 소문자는 대문자로 변환, 대문자는 소문자로 변환


# swapcase(): Inverts case for all letters in string

>>> a = 'I Love Python'

>>> a.swapcase() # 'i lOVE pYTHON'

'i lOVE pYTHON'

>>> 

>>> g = 'i love python'

>>> g.swapcase() # 'I LOVE PYTHON' (same as upper())

'I LOVE PYTHON'

>>> 

>>> h = 'I LOVE PYTHON'

>>> h.swapcase() # 'i love python' (same as lower())

'i love python'


  istitle() : 문자열이 제목 형식에 맞게 대문자로 시작하고 이후는 소문자이면 True, 그렇지 않으면 False


>>> a = 'I Love Python'

>>> g = 'i love python'

>>> h = 'I LOVE PYTHON'

>>> 

# istitle(): Returns true if string is properly "titlecased" and false otherwise

>>> a.istitle() # True

True

>>> g.istitle() # False

False

>>> h.istitle() # False

False


 title() : 문자열을 제목 형식(titlecased)에 맞게 시작은 대문자로, 나머지는 소문자로 변환 


>>> g = 'i love python'

>>> h = 'I LOVE PYTHON'

>>> 

# title(): Returns "titlecased" version of string, that is, 

#          all words begin with uppercase and the rest are lowercase

>>> g.title() # 'I Love Python'

'I Love Python'

>>> h.title() # 'I Love Python'

'I Love Python'


  capitalize)=() : 문자열 내 첫번째 문자를 대문자로 변환하고, 나머지는 모두 소문자로 변환


>>> a = 'I Love Python'

>>> g = 'i love python'

>>> h = 'I LOVE PYTHON'

>>> 

# capitalize(): Capitalizes first letter of string

>>> a.capitalize() # 'I love python'

'I love python'

>>> g.capitalize() # 'I love python'

'I love python'

>>> h.capitalize() # 'I love python'

'I love python'


5. 공백 존재 여부 확인 및 처리하기 문자열 메소드 


 lstrip() : 문자열의 왼쪽에 있는 공백을 제거


# lstrip() : Removes all leading whitespace in string

>>> b = '      I Love Python'

>>> b.lstrip()

'I Love Python'


  rstrip() : 문자열의 오른쪽에 있는 공백을 제거


# rstrip() : Removes all trailing whitespace of string

>>> c = 'I Love Python      '

>>> c.rstrip()

'I Love Python'


  strip() : 문자열의 양쪽에 있는 공백을 제거


# strip() : Performs both lstrip() and rstrip() on string

>>> '     I Love Python     '.strip()

'I Love Python'


  isspace() : 문자열이 단지 공백(whitespace)으로만 되어있을 경우 True, 그렇지 않으면 False


# isspace(): Returns true if string contains only whitespace characters and false otherwise

>>> i = '     '

>>> j = '      I Love Python'

>>> 

>>> i.isspace() # True

True

>>> j.isspace() # False

False


  center(width) : 총 길이가 매개변수로 받는 문자열폭(width)만큼 되도록 공백을 추가하여 중앙 정렬


# center(): Returns a space-padded string with the original string 

#                centered to a total of width columns

>>> a = 'I Love Python'

>>> a.center(21)

'    I Love Python    '


6. 문자열을 나누고, 붙이고, 교체하고, 채우는 문자열 메소드 (split, join, replace, fill)


  split() : 문자열을 구분자(delimiter, separator) 기준에 따라 나누기


split()은 상당히 자주 사용하는 문자열 메소드 입니다. 


# split(): Splits string according to delimiter str (space if not provided) 

#    and returns list of substrings; split into at most num substrings if given

>>> x = 'haha, hoho, hihi'

>>> x.split(sep=',') # as a list ['haha', ' hoho', ' hihi']

['haha', ' hoho', ' hihi']


>>> ha, ho, hi = x.split(sep=',')

>>> ha

'haha'

>>> ho

' hoho'

>>> hi

' hihi'


>>> a = 'I Love Python'

>>> a.split(' ') # without arg 'sep='

['I', 'Love', 'Python']

>>> a.split() # default delimiter is space if not provided

['I', 'Love', 'Python'] 


  splitlines() : 여러개의 줄로 이루어진 문자열을 줄 별로 구분하여 리스트 생성


# splitlines(): returns a list with all the lines in string, 

#     optionally including the line breaks (if num is supplied and is true)

>>> y = 'haha, \nhoho, \nhihi'

>>> y

'haha, \nhoho, \nhihi'

>>> y.splitlines() # ['haha, ', 'hoho, ', 'hihi']

['haha, ', 'hoho, ', 'hihi']


 replace(old, new, max) : old 문자열을 new 문자열로 교체.  단, max 매개변수 있으면, max 개수 만큼만 교체하고 이후는 무시


# replace(old, new): Replaces all occurrences of old in string with new 

#        or at most max occurrences if max given

>>> a = 'I Love Python'

>>> a.replace('Python', 'R')

'I Love R'

>>> 

>>> 

>>> a_2 = 'I Love Python, Python, Python, Python, Python~!!!'

>>> a_2.replace('Python', 'R', 3) # str.replace(old, new, max)

'I Love R, R, R, Python, Python~!!!'


 join() :  여러개의 문자열을 구분자(separator) 문자열을 사이에 추가하여 붙이기


join()은 꽤 자주 쓰는 문자열 메소드 중의 하나입니다. 


# join(): Merges (concatenates) the string representations of elements 

#         in sequence seq into a string, with separator string

>>> mylist = ['I', 'Love', 'Python']

>>> print(mylist)

['I', 'Love', 'Python']

>>> 

>>> mystring = '_'.join(mylist)

>>> print(mystring) # 'I_Love_Python'

I_Love_Python


# To concatenate item in list to strings with join() method

>>> mylist_num = [1, 2, 3, 4, 5]

>>> print(mylist_num) # [1, 2, 3, 4, 5]

[1, 2, 3, 4, 5]

>>> 

>>> mylist_str = ''.join(map(str, mylist_num))

>>> print(mylist_str) # 12345

12345

>>> 

>>> '_'.join(map(str, mylist_num)) # '1_2_3_4_5'

'1_2_3_4_5'


 zfill(width) : 문자열을 매개변수 width만큼 길이로 만들되, 추가로 필요한 자리수만큼 '0'을 채움


# zfill(width): Returns original string leftpadded with zeros to a total of width characters; 

#      intended for numbers, zfill() retains any sign given (less one zero)

>>> f = '123'

>>> f.zfill(10)

'0000000123' 


 ljust(width[, fillchar]) : 문자열을 매개변수 width만큼 길이로 만들되, 왼쪽은 원본 문자열로 채우고, 

오른쪽에 추가로 필요한 자리수만큼 매개변수 fillchar 문자열로 채움


# ljust(): Returns a space-padded string with the original string left-justified 

#          to a total of width columns

# str.ljust(width[, fillchar])

>>> a = 'I Love Python'

>>> a.ljust(20, 'R')

'I Love PythonRRRRRRR'


 rjust(width[, fillchar]) : 문자열을 매개변수 width만큼 길이로 만들되, 오른쪽은 원본 문자열로 채우고, 

 왼쪽에 추가로 필요한 자리수만큼 매개변수 fillchar 문자열로 채움


# rjust(): Returns a space-padded string with the original string right-justified 

#          to a total of width columns

>>> a.rjust(20, 'R')

'RRRRRRRI Love Python'

>>> a.rjust(20, ' ')

'       I Love Python'


다음번 포스팅에서는 문자열의 포맷 메소드(string formatting opertor)에 대해서 알아보겠습니다. 


많은 도움 되었기를 바랍니다. 

이번 포스팅이 도움이 되었다면 아래의 '공감~'를 꾸욱 눌러주세요. ^^


728x90
반응형
Posted by Rfriend
,